Thursday, February 27, 2020

guest designing at time out #156

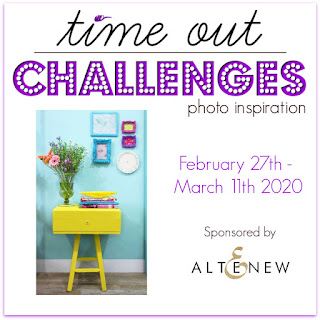
Posting today as a guest designer to join the talented ladies over at Time Out for this fortnight's challenge. It's a photo challenge. I always love the photos Sandie picks. Don't you just want to eat these yummy colors?


I just love how that fresh yellow pops off the aqua, especially with those touches of white. (BTW, you can see a larger version of the photo over at Time Out.)

Well, since the challenge is being sponsored by Altenew, I headed to my stash and had a looksee. I also headed to my stash of backgrounds looking for something nice and aqua and amazingly enough I found what I needed!


In the inspiration photo, that painted yellow piece really popped out at me. I knew I wanted to place a yellow die cut "something" on an aqua background. Well I had my background, a piece made by cleaning up some metallic gelato-y messes awhile back. Perusing my Altenew dies, I chose Persian Motifs, cut it from lemon yellow and heat embossed the outline in white on it.

Then in a nod to the pile of books in the photo I inked up my Label Love sentiment with four blocks of color. I tore the edges of the background and adhered it. Stitched my sentiment down and adhered the yellow motif with foam adhesive. A few shiny sequins finished my card. Wish you could see the metallic sheen of the aqua BG, it really makes the card.


I'm looking foward to seeing your entries in the gallery, and how you choose to interpret the photo.

Many thanks to Sandie and the design team for having me. It's such fun to be part of the inspiration post for this month's photo challenge. I'll be back with a second make later...

I'm joining the Anything Goes fun at SSS Wednesday Challenge as well as the Hearts and Flowers Challenge over at Die Cut Divas.

Tuesday, February 25, 2020

STAMPlorations inspiration #256

Time for another Tuesday inspiration from the STAMPlorations inspiration team!

This month I've been creating cards using a design I love but rarely remember to use. It's great for one layer cards - the split design with a sentiment in the middle area.

Well today's card was a leftover from last week's which was a combo of two ideas. Use a stencil to create the images and make your own stencil using a cover plate die! And when you've used the fussy cut portion of the die cut as a stencil and inked through it, you just can't throw that beauty away!

Distress inks - Blueprint Sketch, Mermaid Lagoon, Old Paper, Iced Spruce

That white portion of the die cut along the bottom was covered by my mask when I inked last week's card. I thought about inking it up for today's but then decided I liked that added unexpected touch of white.

You could win yourself a $10 GC to the store by leaving a comment on this month's inspiration posts! Check out today's post here. And as always, I'd appreciate it if you used my STAMPGIRLMARIA discount code for an additional 20% off your order from the store - at no extra cost to you, just perks for me ;)

For more inspiration using only a portion of this cover plate die, check out this card.

Thanks for stopping over today. Have a great week.

I'm hooking up at Die Cut Divas where it's about Hearts and Flowers this month and at SSS Wednesday where it's about Add a Sentiment.

Wednesday, February 19, 2020

STAMPlorations digital stamps four more ways

I'm over on the STAMPlorations blog today with four digital stamp projects. You could win a $15 GC to the store for comments left here and there. Just sayin...

So. I'm no pro with digital stamps. I love getting inky with actual stamps. And I'm a pro at ink smudges. But there are some benefits to digi stamps - no smudges, perfect coverage without a MISTI, image resizing, even layering images (though I've yet to give that a try). And no shipping!

I use Microsoft Word and my Canon ink jet printer. I recommend this post for a great intro to digi stamps. It's where I figured out how to print them using Word.

I've got four projects to share today. One image enlarged. One shrunk. One left as is. And one heat embossed. Let's get started.

First up, I wanted a really large image. I inserted the PNG file for the image (it's the rectangular frame with roses along its left edge) into a Word document. Then I clicked on the image and stretched it to enlarge it. It's got nice thick lines so this worked great. I trimmed the printed image down to the card front size I wanted and made a shaker card.

Blossom Frames digi stamp
Copic markers
sequins

Something about those thick black lines... I decided to go all dramatic on this one. Chose red tones and Copic colored only a piece I die cut from the printed panel and set it back behind the shaker. Added a heat embossed German sentiment since this will be a birthday card for DS's girlfriend.


For my second card I shrunk a digi stamp so it could be just an accent piece on my card.

Blossom Frames digi stamp
Altenew ink
PP, washi, sequins

You can imagine my joy when I stumbled upon this PP in my stash. A perfect complement to the digi image. Thinking anniversary or wedding, I chose silver glitter for the die cut sentiment and the strip of washi. Sequins added more sparkle.

To eliminate some of the empty white space I masked and stamped some yellow blooms with the Sweetly stamp. On the cardbase and within the digi frame. BTW, I flipped the die and made a second cut to turn the manila tag into a rectangle!

So after enlarging and shrinking images on the previous cards, my next card uses an image just as it is (A2 size), I merely trimmed away the black lines of the frame.

Fluttery Garden digi stamp
Copic markers

No need to color the entire image. I had fun coloring just the butterflies. Have you ever been to a garden where those gorgeous blue butterflies flutter about? They were my inspiration.

I added interest by cutting out parts of their wings with an exacto knife and backing the "holes" with yellow cardstock. Added white gel pen dots to the wings and some color to the background with dots of various yellow Copic markers.


My final card was the result of an aha moment I had when I was printing digi stamps on PP (for my March post!), and using cellophane tape to hold my PP in place on copy paper. I noticed the toner ink remained wet where it printed on the tape...Maybe that would also be the case on vellum, I thought. And it was! Which means if you're quick you can heat emboss a digi stamp printed onto vellum! 

Cupful of Blooms digi stamp
PP, embossing powder, vellum

It may not be as perfect as with normal heat embossing, but I think it's pretty amazing! And quick. I chose to back it with floral PP and adhere the vellum with just a line of messy stitching up top.


That's it for today. Don't forget to leave a comment here.  And here too, for another chance to win.

I'm playing over at:
SSS Wednesday Challenge - Add a sentiment (card #3)
Die Cut Divas - Hearts or Flowers (card #1)
Creative with Stamps - Red (card #1)

Tuesday, February 18, 2020

STAMPlorations inspiration #255

Time for another Tuesday inspiration from the STAMPlorations inspiration team!

This month I'm creating cards using a design I love but rarely remember to use. It's great for one layer cards. Recognize it? The split design with a sentiment in the middle area.

Today's card was a combo of two ideas. Use a stencil to create the images and make your own stencil using a cover plate die! Stretch your supplies, ya know!

Distress inks - Blueprint Sketch, Mermaid Lagoon, Old Paper, Iced Spruce

I die cut the cover plate. Then fussy cut the portion I wanted to use to ink above and below my masked area on the card. Then added the sentiment. Voila!

For more inspiration using only a portion of this cover plate die, check out this card.

You could win yourself a $10 GC to the store by leaving a comment on this month's inspiration posts! Check out today's post here. And as always, I'd appreciate it if you used my STAMPGIRLMARIA discount code for an additional 20% off your order from the store - at no extra cost to you, just perks for me ;)

Thanks for stopping over today. Have a great week.

I'm stopping over at:
Allsorts - Dies/Punches
Cuttlebug Mania - Flower Power
CAS Mix Up - Die Cut a Stencil


Monday, February 17, 2020

fun with funky fossil designs scandi home

Happy Tuesday! I had more fun yesterday with some new stamps from Funky Fossil Designs (I won a GC at Time Out and of course I had to pick up a few things while I was at the store ;).

My first play was with the Quirky Owls. Check them out here. I also picked up AdventureCheck those cards out here.

For today's cards I was playing with such a fun set - Scandi Home. You had me at Scandi. This first one just had to happen. IMO, nothing says Scandi better than red and white.


Red cardstock. White embossing. A fun rectangle die from Charlie und Paulchen. I put the message on the inside - a red heart and the sentiment "home is where the heart is" which is also from the stamp set.

My second card... well, the coffee and tea pot stamps reminded me of the kitchen art you see. Kind of 50s retro. So I grabbed some Altenew inks, masked the outside edges of the card front and did some stamping. Just mixed and matched the images and colors as I moved my way from bottom to top.


The colors are truer below - yellows and oranges.


Fun, fun, fun. Sarah is having a sale at Funky Fossil. 15% off until midnight tonight. Just sayin!

Thanks for stopping by. I'm stopping by at:
Your Next Stamp - Create your own Background (home my second card counts - yesterday's cards certainly would have counted!)
ATSAM - AG
Color my Heart Color Dare - #381

fun with funky fossil designs adventure

Happy Monday! I had some fun this weekend with some new stamps from Funky Fossil Designs (I won a GC at Time Out and of course I had to pick up a few things while I was at the store ;).

My first play was with the Quirky Owls. Check them out here.

I also picked up Adventure and made two cards to share with you today.

First one turned out exactly as I'd hoped. I think this image is so cool.


Stamped it in black on PP and then heat embossed the sentiment in white onto vellum that I stitched loosely to the front. I'm thinking this could make a good card for a graduate or someone starting a new job or moving to a new city.


My second card... well, a good idea but lousy execution.  I'm sharing it anyhoo.


I was going for a sunrise feel. DH says it looks like the forest's on fire. Oops. Next time I'd use sponge daubers to apply ink to the stamp rather than the ink pads. Or maybe mask the image and apply ink behind it? I heat embossed the sentiment over the hot mess to hide a bit of it ;)


Fun, fun, fun. I just noticed Sarah is having a sale at Funky Fossil. 15% off until midnight tonight.

Thanks for stopping by. I'm stopping by at:
Daring Cardmakers - Something you Love (that image of mountains/trees)
Creative with Stamps - Red

Sunday, February 16, 2020

fun with funky fossil quirky owls

Happy Sunday folks! I had some fun yesterday with some new stamps from Funky Fossil Designs (I was a lucky winner at Time Out and of course I had to pick up a few things while I was at the store ;).

My first play was with the Quirky Owls. They couldn't be more perfectly named.

I also picked up two stencils, 3D Cubes and Retro Starburst. Gave them a try.

First up, Mr Spectacled. Cuz, c'mon, isn't he the greatest? Decided to perch him on a 3D cube.


And Glossy Accent his specs. The sentiment die is STAMPlorations Skinny Sentiments.


So then I grabbed a soon-to-be released STAMPlorations stencil, inked up a cloudy night sky, added some starbursts to it with gold embossing paste and let Mr Bow Tie soar through the night sky.


I cannot get enough of that gold shimmer...


Then I figured I better try to be a bit more girly with the owls and used distress oxides for a background. When I inked through a STAMPlorations Hearts all Over stencil over the inked background, you can barely see the tone-on-tone hearts. Either my BG was too heavily inked. Or maybe it's an oxide thing.


Since the owl and sentiment (5 Love Words) seem to be just floating through that dreamy sky, I opted for a hint of a nest with some black thread. The sentiment continues inside.


Fun, fun, fun. I just noticed Sarah is having a sale at Funky Fossil. 15% off until midnight Feb 17.

Thanks for stopping by. I'm stopping by at:
Creataive Friday - Valentine/Hearts (the hearts are stencilled onto the BG of card #3)
Penny Black and More - Animals, Birds, Butterflies
ATSAM - AG

Friday, February 14, 2020

STAMPlorations release - reprise

Hope you're all having a sweet Valentine's Day. No Valentine for you here today. There's a new release in town over at the STAMPlorations shop. Have you seen it? And did you see all the DT makes this past week?

Remember Leafy?

And this card I made with it?


I mentioned the leftovers I had after die cutting those tags from the light and middle blue panels...

Leafy stamp
Manila Tags die
Winnie and Walter Hello die
sequins, washi, PP snippet

I took those panels, layered them over one another and adhered a snippet of PP behind. Stitched the panel onto a cardbase and added a strip of washi along the bottom. Added a die cut sentiment and sequins.

Gotta love leftovers ;) There's still time to check out all the DT's creations over at the STAMP blog. And leave comments, there are prizes to be won - a $20 gift code and a stamp set from the release.

In addition, the four new stamp sets being released are 10% off automatically until February 19. If you use my STAMPGIRLMARIA designers' code you'll get an extra 20% off too!

Thanks for stopping by.

CAS valentine for son

A quick post today to share the Valentine I made for DS. I was inspired by the challenge over at Poppystamps. I went to my dies and found a NBUS beaut which fit the animal challenge and my desire for a CAS Valentine.

Altenew ink

So hard to photograph on a crappy weather day. Here's a closeup for you.


Are you doing anything special for Valentine's Day? I remember being in Myrtle Beach with my snowbird parents and being amazed at how Valentine's crazy the folks were! Germans poo poo the holiday as American commercialism ;) I think we'll be going out to dinner. And I bought myself red tulips for the table ;) A girl's gotta do what a girl's gotta do, ya know?!? Hope the day includes lots of hugs for you!

I'm playing over at:
Poppystamps - Animal Menagerie
02-20
The Card Concept - Be Mine Valentine
The Paper Players - Red, Pink, B/W

Thursday, February 13, 2020

spotlight on ink lifting

I'm over at the STAMPlorations blog with a spotlight tutorial on ink lifting. Check it out.


STAMPlorations release - sweetly


There's a new release in town. Over at the STAMPlorations shop. Have you seen it?

Yesterday and today we've had two new sets from Shery R. If you love floral arrangements you're gonna love Softly and Sweetly. Meet Sweetly.


Beautiful flowers and a butterfly to boot! Meet card #1.

alcohol markers


Doesn't get any easier than this. Stamp the bouquet. Stamp a sentiment.

No masking before stamping individual blooms. Or leaves. All you have to decide is "to color or not to color?" 

I couldn't make up my mind ;) Just kidding. I opted for the spotlight technique.

Then, as I was perusing the sentiment possibilities I remembered the Wanderlust dies.

Sweetly stamp
Tags #1 die
Make Memories die

Knowing I would die cut the sentiment in rainbow colors, I stamped the bouquet around the edges of my cardbase to create a nice black and white background. Die cut a tag from white CS, stamped "sweet" and then adhered the letters and a bit of twine.

So, that's a wrap. Have you enjoyed this week's posts? Be sure to check out all the DT's creations over at the STAMP blog. And leave comments all around, there are prizes to be won - a $20 gift code and a stamp set from the release.

In addition, the four new stamp sets being released are 10% off automatically until February 19. If you use my STAMPGIRLMARIA designers' code you'll get an extra 20% off too!

Appreciate your visits.

I'm playing over at:
Sweet Stampers - Hearts/Flowers
Happy Little Stampers - AG with Dies
Sunday Stamps - Tag (my design is real CAS, only the tag and the bow)

Wednesday, February 12, 2020

STAMPlorations release - softly


There's a new release in town. Over at the STAMPlorations shop. Have you seen it?

We're inspiring you today and tomorrow with two new sets from Shery R. If you love floral arrangements you're gonna love Softly and Sweetly. Meet Softly.


Love how this arrangement is long rather than round. Lots of possibilities. Ready for card #1?

Zig Clean Color Real Brush Markers
washi

Pretty straightforward actually. Some random stamping of a wonderful sentiment "think happy" on my cardbase. A fussy cut watercolored flower arrangement and a strip of washi ;)

I did no-line watercoloring with my Zigs for the flowers. Let myself be inspired by the stamp set name for my color choices - soft. TIP: Bristol Smooth is a dream to work on with Zigs directly to paper. Add some pigment then take a waterbrush to it.

Then, of course, I had to think outside the box. If I've got a bunch of flowers and I've got a newly released flower vase and leaves, why not combine them? More Zig coloring (bold and bright this time) and this happened.

Zig Clean Color Real Brush Markers

Have you enjoyed today's post? Be sure to check out all the DT's creations over at the STAMP blog. And leave comments all around, there are prizes to be won - a $20 gift code and a stamp set from the release.

In addition, the four new stamp sets being released are 10% off automatically until February 19. If you use my STAMPGIRLMARIA designers' code you'll get an extra 20% off too!

Thanks for stopping by. I'm stopping by at Stamping Sensations where this month's theme is Feminine. And The Flower Challenge where the theme is Add Leaves.
And Happy Little Stampers Watercolor where it's AG plus bling (does glitter tape count?)
Related Posts Plugin for WordPress, Blogger...