Sunday, September 30, 2018

spellbinders wine country shaker

As I mentioned yesterday I was lucky to receive a couple dies to play with from Spellbinders. They're from the Wine Country collection by Stacey Caron. As I was looking at the "ring" that is actually the barrel front, I thought it might make an interesting shaker card.

This is the die, Barrel of Sentiments.


And this is my shaker card.

Spellbinders Platinum Pack - Corrugated
Papertrey Ink Birthday stamp
white embossing powder
Distress Inks 

This is going to a neighbor in MI who's a wine lover. I think he'll like it. I love those bunches of Riesling grapes floating around in the shaker with the sequins!

Thanks again, Team Spellbinders,for the fun products to create with. 

I'm joining in at:
Always Fun Challenges - Anything Goes
Simon Says Stamp Wednesday - Anything Goes
Seize the Birthday - Travel (though the only thing travel related about this is that it'll go by plane)


Saturday, September 29, 2018

spellbinders wine country

Ready for a confession. I was lucky to receive two dies to play with from Spellbinders. They're from the Wine Country collection by Stacey Caron. Now with a blog named rieslingmama you'd think this'd be right up my alley, right? Well, talk about pressure to perform! Let it be known that although I live in the middle of wine country, my favorite form of drink is the Wineschorle (wine sprizter). And 2-3 of those in one setting are my max.

So I've been out helping a local winery harvest grapes. We're nearly done now, only the Riesling on the steep slopes to bring in. So I took a break from the grapes and headed to my craft room to give these babies a go.

Here are the two dies, Barrel of Sentiments and Wine Glass Bottle Tag.


Now there are samples out there using the dies as they are intended. Perfectly layered and colored and the whole shebang. But that ain't me. So I had to just get over it and here's what I did, CAS/techniquey style.

My first card, masculine birthday, was inspired by the current CASe this Sketch.


Spellbinders Wine Glass Bottle Tag die
gold embossing powder
Distress Inks 

Let those planked circles represent barrels - inked them with various Distress Inks and stamped them with the wine names. Added a head embossed sentiment on the die cut and inked label and topped it with a bunch of Riesling grapes. Of course.


Then I had to give that wine glass die a go. On a card, not as a wine bottle tag, though that is mighty handy in my neck of the woods too...

Distress Inks 

I felt the need to make a girly version too, so I took the "barrel" I had leftover and used it to imply a barrel-turned-table with a glass of Spätburgunder (Pinot Noir) perched upon it. Gave that red wine a good work out, first with watercolor pencils then Distress Inks in red and purple and finally a spritz of perfect pearls. Added a few grape bunches as a border down the left edge. Don't you love that sentiment? I have more than a few friends this card could go to ;)


Thanks to Team Spellbinders for the fun products to create with. Says rieslingmama ;) We'll see what else I come up with...

I'm joining in at:
Simon Says Stamp Wednesday - Anything Goes
Addicted to Stamps and More - Anything Goes
Happy Little Stampers - September AG with Dies

Friday, September 28, 2018

STAMPlorations christmas release - day 4


Welcome to Day 4 of the STAMPlorations Christmas release parade.  Today we are showcasing the new dies in this release. You can check out what my teamies created in this post over on the STAMP blog.

Meet the latest in the lineup of cover plate dies, Doodled Christmas Candles. Well, parts of it.
I did some cover plate surgery.

Just kidding! I did some cover plate die cut fussy cutting to get just the candle ;) Colored with alcohol markers.

alcohol markers
gold embossing powder


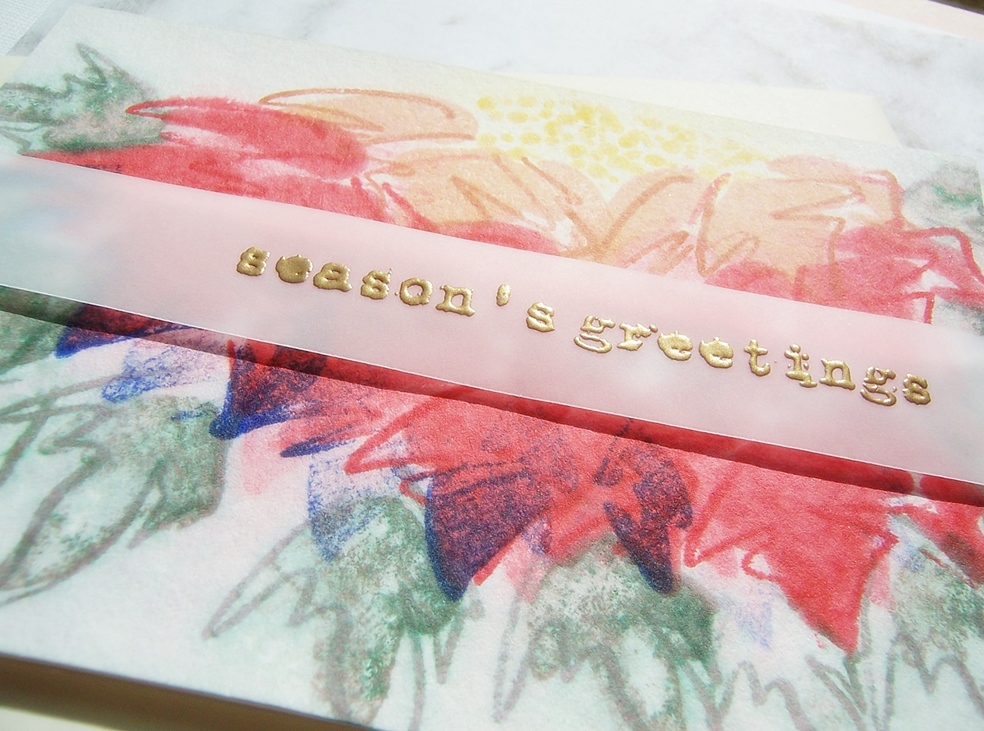
Then I colored some of the leftovers I'd trimmed from the candle and made this card with them.

alcohol markers
gold embossing powder
gold thread


And then I used the cover plate die as a stencil and spritzed Distress Resist Spray through it onto old book paper. Rinsed the die immediately and it was fine. No sticky residue. When it was dry I applied some distress ink in various colors to the different areas where there was no resist spray. Tore the edges too.

Distress Inks
Distress Resist Spray
gold embossing powder
vellum
Maybe you can see the textured shine to the white areas? I also applied some gold ink to a few of the baubles for some extra sparkle. Better IRL.


Next are cards I made to showcase the new Christmas phrase dies. First Christmas Blessings.

Distress Inks
silver Delicata ink


I'll be honest. As CAS as it looks, this was not an easy card to make. I used the nativity die to create a mask. Adhered it and masked a rectangle with painter's tape. Inked an ombre sky and pounced some silver ink onto it too to lend a bit of sparkle.

Then I did the camouflage die cutting technique, saving all the tiny pieces to glue back into the holes after I'd adhered the die cut sentiment to one cut from fun foam. Kinda tedious. But I like the calm and solemn feel of the end result.


So for Making Spirits Bright, I just had to pull out the sleigh and stamp away, singing Jingle Bells the entire time ;) Don't you love those fancy one-horse-open-sleigh runners? They coordinate so well with the font.

gold embossing powder

Notice the fun detail of the gold embossed snow flakes? And the layer of vellum helps the sentiment stand out from the busy background.


I actually used my MISTI to stamp so I could be sure to get good coverage. And so I could make two at one time! Here's the green version.


Be sure to visit the STAMP blog for lots of inspiration and be sure to leave comments by Oct 5 and you might win a $25 GC to the store!  This release as well as the CHRISTMAS CUTplorations Dies section are 10% off automatically until October 8. Use my STAMPGIRLMARIA code for an extra 20% off ;) Hope you enjoyed today's lineup.

Thursday, September 27, 2018

STAMPlorations christmas release - day 3


Welcome to Day 3 of the STAMPlorations Christmas release parade. Shirley B has been at it again, designing more layered stamp sets, and today we are showcasing Layered Poinsettias. You can check out what my teamies created in this post over on the STAMP blog.


I was a little stumped at first. So I took to Pinterest for inspiration and found this amazing piece of artwork which inspired the colors and messy watercolor look to all three of my creations.

Meet #1.

Altenew inks
gold embossing powder

I created a giant poinsettia by repeat stamping the smaller solid stamp, adding a few outlines and some leaves along the lower edge. Used watercolor paper and spritzed it well with water to soften the inks when I was finished. Simply added a heat embossed sentiment across the panel. Pretty crazy, eh?


Here's #2. Does it remind you of when you walk into the greenhouse and the pink poinsettias are lined up in all their glory waiting for you to pick THE one you want for your home this Christmas?

Altenew inks

Gave it a nice spritz of perfect pearls for some shimmer to go with the glitter CS die cut.


And because I couldn't not create something outta the box, meet #3.

CUTplorations Hugs
Altenew inks
glitter glue

After stamping and misting my cascading leaves, I adhered a scrap die cut negative and some lines of bronze glitter glue to match the die cut on the leaves.


I won't keep you any longer. Check out the STAMP blog for more. Be sure to leave comments by Oct 5 and you might win a $25 GC to the store! This release and the CHRISTMAS CUTplorations Dies section are 10% off automatically until October 8. Use my STAMPGIRLMARIA code for an extra 20% off ;) Thanks for coming by.

when the challenges align...

Don't you love it when your mojo is on overdrive?

There are so many challenges and cards that have caught my eye since I've headed back into my craft room after summer in MI. So this card happened. Do you know what aligned and inspired me?

 Essentials by Ellen Gordjus die
white embossing powder
Twin alcohol markers

There's a hard-to-photograph BG there too, heat embossed white on white. And an Ellie ;)


1. I saw that Ellen Hutson currently has a sketch challenge. Unusual, but hey, I can do that.
2. I saw this card at the Ellen Hutson blog and fell in love with the color combo.

3. I saw this photo at Just Us Girls #459 and it fits the Fall weather we're having too.

4. I saw the Background challenge at Stamp, Ink,  Paper - which brings me back to #1. How about using a BG stamp to create those three panels in the sketch?!?
And because it's good old AG over at Simon Says Wednesday challenge, I'm headed there too! Thanks for looking. Come back later today when I'll be sharing my takes with Shirley's newest layered stamp set, this time it's poinsettias!


Tuesday, September 25, 2018

pti september blog hop

It's been way too long. But this month I'm joining the Papertrey blog hop fun. Our weather is perfectly aligned with the autumn feel of this inspiration photo so I was totally motivated to play along.

Wanna see?

Hero Arts ombre ink
Nuvo drops

Pretty much created itself. I'd seen this card of Betsy's and wanted to give the technique a go. Die cut several of the only PTI leaf die I own. Watercolored them. Stamped them with veins. Spritzed with perfect pearls. Stamped a hint of a plaid pattern down my cardbase and adhered the leaves, catching the vibe of the inspiration photo tablescape. Added a few Nuvo drops for more color and voila!


I'm looking forward to seeing the gallery with all its autumn beauty. Thanks for coming by.

I'm stopping by at:
Cards in Envy - Feels like Fall
The Cat's Pajamas - Fall
 Time Out - #118


Monday, September 24, 2018

more pastel plus graphic

Did you see my sympathy card with a rainbow bridge theme? If you've made die cut rainbows before, you know that if you cut colored cardstock to make your rainbow (you can cut white and color it but I didn't think of that in time!) you end up with a lot of rainbows. And when you create the one you were aiming to make (in my case, with more blue for the sympathy card) you end up with leftovers that make some rainbows that follow the ROYGBIV order, like card #1 and some that end up being  more fantasy, like card #2.

Meet card #1. 

washi
And card #2.
Simon Says Stamp Be die
Simon Says Stamp Happy die
Simon Says Stamp Solar Burst stencil

For these birthday cards, I stamped the Plank Background background stamp in black and sliced the panel on the diagonal. I stamped it again in yellow on the card bases so it would line up with the sliced panels.

On #2 I also applied yellow ink over the Solar Burst stencil over the stamped background to imitate the sun peeking out behind the rainbow! See?


 Again I was inspired by The Card Concept challenge for these clean and layered cards.


Plank Background is a STAMPtember release by Simon Says. I missed the big STAMPtember party but  you can check out all the SSS goodies as well as their collaborations with other stamp companies here!

I'm also playing at:
Seize the Birthday - Die Cuts or Punches
Happy Little Stampers - September AG with Dies
The Paper Players - #411 (#1)


pastel rainbow bridge

A friend lost her best buddy, her four-legged hiking partner, so I revisited this design to create a sympathy card with a rainbow bridge theme.

washi
alphabet stickers


I was inspired by the current challenge at The Card Concept to use the cool background stamp called Plank Background that was released this STAMPtember by Simon Says. I missed the big STAMPtember party but  you can check out all the SSS goodies as well as their collaborations with other stamp companies here!

I'm also playing at:
Happy Little Stampers - September AG with Dies
The Paper Players - #411


Related Posts Plugin for WordPress, Blogger...