Saturday, March 31, 2012

keep on target... and keep on truckin

"Fascination with feathers" is the name of a challenge at Moxie Fab World.  Feathers or arrows (might that be Hunger Games related???) are required.

Of course the only feather stamp I possess is a peacock feather, and that, according to Cath E. is old news.

So at this point I'd like to give Claire B. from Waltzingmouse a shout out for creating such versatile stamp sets!


Don't they look like archery arrows?  It's actually a branch stamp from the Around Christmastime set!  I drew my arrows using a silver gel pen and then stamped the "feathers" on top of the lines.

This card is now on its way to a friend who is on a weight loss program.  Thus the computer generated sentiment and the dry embossed numbers on the white circle around it.  And the inside sentiment. 


Happy weekend.


Supplies keep on target:
Paper: CS Neenah and DCWV, security envelope
Stamps: WMS, sentiment computer generated
Ink: Versamagic, Versacolor, gel pen
Tools: punches EKS, embossing folder Sizzix
Other:

Friday, March 30, 2012

find the feather (home decor)

Been wanting to play in the Moxie Fab Fascination with Feathers challenge.  Knew what I wanted to do.  One problem.  Had to wash my windows first.  Why, you ask?

Can you spot the feather(s)?  I was actually fascinated with these quail eggs I picked up at the discount store.  Wanted to use them for a natural window decoration to go with the vellumy eggs cuz they have an artistic feel to them.


So I carefully punched holes in the top and bottom of the eggs and used hot glue to attach the feather and "anchor" each to the fishing line (TIP:  one of your best friends for home decorating).  Strung a pearl on the top of each little bundle.


There are six of these bundles hanging on one piece of fishing line.  This is hung from a branch which hangs across the top of my window.  Brought it back from a walk in the woods years ago and painted it white.  You can barely see it up next to the recessed lights in the above photo.   I love to decorate it seasonally.  (Just took down the sequin hearts from Valentines Day - thus the necessary window washing :)

I'm also entering this over at Jay Gee's Nook cuz I was also inspired by her wonderful photo for challenge 17 - check out the egg wreath and branch display in the middle.  How lovely.


Thanks for visiting.  Have an idea for a feathery card so see ya soon.

Thursday, March 29, 2012

it's so easy being green - (upcycle)


Take a bowl, buttons, toothpicks, steel wool and a piece of moldable foam


Add some ironed-to-remove-the-wrinkles packing paper and an empty tissue box.  Add some vintage book page and recycled raffia and what do you get?


My entry for this week's Simon Says Stamp and Show challenge to create a tag (OK, eight).  And my contribution to Cath's challenges at Moxie Fab to:

Can you guess which household items I pressed into my moldable foam to use for stamping my packing paper backgrounds?

leaf shaped beads

 the bottom of a retro bowl

toothpicks

buttons

steel wool
I also made some with metal washers, coins and rice.  Think of all the possibilities!  I absolutely LOVE techniques like this.  The image does not come out crystal clear, but for artistic backgrounds it is too cool.  BTW, I stamped these with Distress Inks

Once I had stamped my packing paper I die cut the paper as well as a piece of tissue box and sewed them together.  Stamped a wildflower with brown acrylic paint.  Attached some branches and blossoms die cut from a vintage childrens book page.  Finished with a torn strip of book paper stamped with a sentiment, inked around the edges and blinged.  Punched a hole.  Set an eyelet.  Added the raffia loop hangers.

These tags are now a set to be given as a gift using one more thing that I couldn't bear to throw away.


DH's old jeans!  Of course I could have goodwilled them, but they were cargo pants so I got four pockets out of 'em!  Oh yeah, the "tag card" is what I stamped off on after stamping my little tags.  Just attached it to a second one (scored at the top to open nicely) and added a button (from an old suitcoat).

Can't really do a cost breakdown on this set of tags.  Didn't actually buy anything.  The only "non-recycled" items involved were 8 pieces of bling and 8 eyelets.

"Don't Throw it Away" shoulda been my middle name.

Assuming you're still here,  vielen vielen dank for looking!


Supplies set of tags:
Paper: tissue box, packing paper and vintage book
Stamps: moldable foam (Ellen Hutson), wildflower CHF, sentiment PTI
Ink: Distress Ink, acrylic paint
Tools: paintbrush, die Spellbinders and Sizzix, sewing machine
Other: eyelets, bling, button, thread + various household items


Tuesday, March 27, 2012

bold and beautiful (masking)


It happens every time school break nears.  My students call to ask if we can skip the last tutoring session.  OF COURSE we can - more creative time for me :)  Thus, my second post today.


Originally planned to combine the CASual Friday and RIC #8.  Had an idea involving a digital stamp but wasn't sure I could pull it off.  Here is my card for RIC.

CFC #45 asks for a combination of pastels and a bold touch of black.  Here is my "bold and beautiful".


Planned to color flowers with Distress Inks as watercolors and cut them out.  As you can see, my plans changed.

Used a stamp set from SEI which includes a silhouette and an outline stamp.  Opted to stamp several pastel flowers (used a mask) and place one with a bold outline popped up in their midst.  Don't normally do groups of four, but it needed a bigger base of pastel.  Think it got a little crowded.

Here's the inside.  Again, thanks so much to Barb who sent me the PTI anniversary set.  I just love these sentiments.

Happy Tuesday.


Supplies with sympathy:
Paper: CS Neenah and American Crafts
Stamps:SEI, sentiment PTI
Ink: pigment Cat's Eye, black Versafine
Tools:
Other: 

all we are is just a...nother... (ric#8)


Why, when looking at the inspiration photo at Runway Inspired Challenge #8, the first thing I notice would be the brick wall must have something to do with the fact that I recently purchased a brick wall stamp from Prima!

So many funky elements in this photo (is that snow on leaves?) but the next thing that grabbed me was the splattering of colors and shapes on the dress.  Whoa.

Came up with this.


This is a mini card 2 1/2 x 3 1/2.  Stamped the brick wall then the sentiment which I clear embossed.  Added the confetti then mounted the panel onto black CS.  Scored the fold and was about to cut the back to be the same size as the front when I decided to leave it wider and "continue" the flourish idea from the front panel.  Kinda like the lace on the dress.  So it actually became a 3 1/2 square card.


Also popping this over to the Moxie Fab World.  Just love the topic Cath shared recently - practical solutions for paper crafters.  Lots of fabulous ideas to check out if you haven't yet.

I have a jar filled with confetti.  I never throw my paper scraps away until I've punched the heck out of them :)  First with circle or heart punches.  Then those last tiny bits with my hole puncher.  For this card I just picked out the colors I needed.  Call me frugal practical.

Thanks for visiting today.  Hope your day is colorful.


Supplies lots of love:
Paper:  scraps, confetti
Stamps:Prima, sentiment Hero Arts, flourish Fancy Pants
Ink: Versafine
Tools:
Other:  clear embossing powder Ranger

Monday, March 26, 2012

another year older... and wiser

Yes I am.  Had to take a break from cards for some weekend partying.  Not hard to do with the summer weather we've been having.  And as a kid in MI,  I used to have to worry about whether my bday party would have to be cancelled due to heavy snowfall...


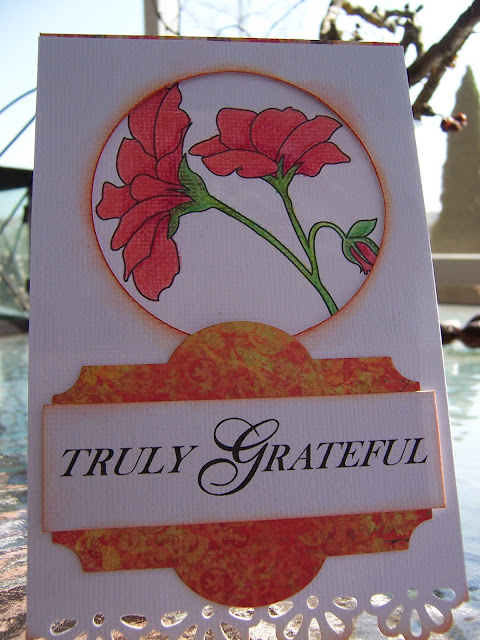
Anyho, this is my fourth card for the bday celebration at The Craft's Meow.  It's how I feel too... grateful for a wonderful life.  It's for the sketch challenge.  I took liberties...


Wanted to use the negative of a circle die cut to frame the digi image from TCM.  It's a freebie here.  So I'm considering the front piece my "center strip".  Then I attached the front to a PP piece for the inside of the card and to show through the decorative edge.  That's my "green".  Like I said, liberties. 

Colored the image with many different red/orange/pink tones of pencils.  Used some K&Co vintage style PP so also inked up edges with red and orange Distress Inks.

As for the title of my post.  Older, definitely.  Wiser, I'd like to think so.  Have a good one.


Supplies Truly Grateful:
Paper: CS American Crafts, PP K&Co
Stamps: digital The Craft's Meow
Ink: Distress Ink, colored pencils
Tools: border punch Martha Stewart, die Spellbinders
Other: dimensional pads

Wednesday, March 21, 2012

18th Birthday Celebration (distress inking)


18 is the age in Germany when you are allowed to drink hard alcohol and get your driver's license. (Beer and wine are allowed at age 16 - can you believe it?)  I needed an 18th bday card.

This is one of the challenge photos over at The Craft's Meow (they're celebrating their first birthday).  A kid's dream, eh?


Two elements jumped out at me.  The banner and the striped wallpaper.  Then I noticed the white labels on the candy jars. 


Inked up the striped Hero Arts BG with Broken China and dabbed a bit of it off before stamping.  Applied ink around the edges with the applicator tool.  Printed the free digi image from TCM and placed it near the bottom like the candy jar table.  Cut some flags, placed them with a bit of adhesive then stitched them into a banner on the card.  A couple little stickers from KI Memories to include the "18" and it's a wrap.

Funny.  The recipient is getting a cocktail glass full of gummy bears along with this card.  Just realized how appropriate that is considering the challenge photo!

Appreciate your coming by.


Supplies Happy Birthday from the Heart:
Paper: CS Neenah and American Crafts, PP Ursus
Stamps: digital The Craft's Meow
Ink: Distress Ink
Tools: corner rounder EKS, sewing machine
Other: stickers KI Memories

Tuesday, March 20, 2012

simple elegance? (recycle)


This is a skirt from a suit I used to wear when I spent my days worrying about revenue and expenses, not teenagers who don't come home at the agreed upon time.  Most feminine suit I ever owned - believe me.  Jacket is long gone, but I saved the skirt for the fabric.  It's got a damask background.

Enter the Tuesday Trigger at Moxie Fab.


What jumped out at me?  The damask pattern of the rug, the pink tulips and the "sun" mirror above the fireplace were the first elements I noticed but then I got an overall fabric-y vibe.  The upholstery on those chairs.  Scrumptious.  Enter the skirt.


Used a freebie digi image from Paper Smooches to make a paper pattern for the bird which I cut out of the ("elegant") fabric.  Adhered it to CS and then stitched around the edges.  Miserably.  Cut the flower around the eye from felt and attached the button.  Made a mask from a Spellbinders sunburst die (like the mirror above the fireplace) and stamped with a damask BG stamp in Versamark ink(like the rug).  Attached the bird and went with the sentiment from Hero Arts ("simple" like the Trigger title).  Some white inked edges and there she was in her simple elegance.

And she has a cousin...


Display our button  

Not quite as elegant.  Knowing I wanted to use felt like the wall hanging in the inspiration photo, I used the Paper Smooches digi to enter this month's Sparks challengeCut the bird from felt, the flower around the eye from the skirt and used a pink button.  Heat embossed the PS sentiment and added a fabric strip to accent it.  Some faux stitching and Tea Dye Distress Ink around the edges and she's off.

Thanks for visiting,  again if you're here for the second time today.  I'm done for the day - promise.


Supplies live simply:
Paper: kraft
Stamps: digital Paper Smooches, sentiment Hero Arts
Ink: Versamark,  black Versafine, white pigment Adirondack
Tools: die Spellbinders, scissors, sewing machine
Other: fabric

Supplies hi:
Paper: kraft
Stamps: digital Paper Smooches, sentiment Paper Smooches
Ink:  Versamark,  Distress Ink
Tools:  scissors, sewing machine
Other: felt and button Sew Sweet, Signo gel pen, fabric

looks like a clothing label (and watercolor background)

The Craft's Meow.  Just discovered this company and really like the variety of styles of stamps they have to offer.  Would love to get me some ;)  They have a first anniversary celebration going on so I joined in on the fun.

You must use an image from TCM.  Fair enough.  But I don't have any.  Yet.  Enter digital stamps.  They are offereing two freebies (from Karen B.) right now.  So I decided to try digital stamping.

A challenge of its own - to create cards to meet challenge requirements using predetermined images!  I upped the ante by combining three of TCM's challenges for this week.

First off, this inspiration photo.  Oh, how I'd love to have a room like this.


I immediately picked up on the large amount of white with touches of green and purple.


Once again the white doesn't look white - chalk that up to my lack of photography skills.  Kept the image of the rose white and just added color to the BG using watercolors and a tiny bit of mica pearls.  Changed out the sentiment from the image for a sympathy sentiment from PTI.


Went with two of the TCM challenges for my second card - this wonderful sketch and Julie's colors.

Birthday Bash Sketch Challenge    Birthday Bash Color Challenge

 Used this great digital sentiment stamp also designed by Karen B.


Thought that it looked like a label, so I inked it up a bit with Antique Linen, trimmed with pinking shears and stitched around the edges.  Now it really looks like a clothing label.  How cool.  Continued the fabric-y feel...


and made this to glorify the label.  Die cut the flower from felt and a leaf from recycled packaging.  Attached a button tied with a little bit of peach twine for a pop of color.  Cut a card base from PP cuz I wanted the creamy color of the backside (the blue PP print is on the inside of my card) and added a distressed strip of the PP to the front.  Inked all edges with Antique Linen and voila.

Lots of pics.  Hope you like what you saw.  Join the TCM fun.  They really have something for everyone's taste.


Supplies with sympathy:
Paper: CS American Crafts and TPC
Stamps: digital The Craft's Meow, sentiment PTI
Ink: black Versafine
Tools: square punck EKS
Other: watercolors, pearlescent mica watercolors

Supplies Happy Birthday from the Heart:
Paper: American Crafts, DCWV
Stamps: digital The Craft's Meow
Ink: Distress Ink
Tools: die Sizzix, leaf die Spellbinders, decorative edge scissors, sewing machine
Other: felt  and button Sew Sweet, embroidery floss

Monday, March 19, 2012

happy and sad (masking technique)

Motive for these cards:  happy birthday and sad BIL's dog died.
Inspiration for these cards:  Play Date Cafe's groovy color challenge #123.


This color combo is so fresh.  Decided to go with the Waltzingmouse Tiny Trees stamp set (so versatile) and one of the dogs from Inkadinkado.  Took out my lime, tangelo, dark blue and teal inks and gave it a go.


Stamped grass using the little three leaf stamp.  Stamped the tree, giving it a longer trunk because of poochie's size.  Masked the bit of grass where poochie is sitting and stamped him.  Added a couple clouds (using a tree top outline stamp from the set - told ya it's versatile), also using a mask to place the one behind the other.  Finished with a partially masked sentiment from Paper Smooches (used cellophane tape to mask off the "i'm" while inking). 

CAS and masked.  Therefore off to this week's Less is More challenge I go.   Also met the requirements for CASual Friday's challenge - CAS with a pattern, an image and a sentiment. 


Now for the happy.  The happy card needed to be masculine.


Sorry, I have major problems photographing white cards - flash? no flash? direct sunlight? indirect lighting?  UUGGHH.  Lot to learn on that front.

But I'm happy with the card.  The colors look so cool together.  So mod, like the inspiration photo.  Something made me add that little bit of black CS behind the bold colors.  Instead of stamping the sentiment directly onto the card, I stamped it on a strip of the same CS, flipped over to be able to use the less-textured side.  Adds a bit more interest.  I also masked with cello tape here to remove the big tails of the "ppy" so that the strip would be a bit narrower.

Thanks for looking.


Supplies so sorry:
Paper: CS Neenah and DCWV
Stamps: dog Inkadinkado, sentiment Paper Smooches, other WMS
Ink: lime Versacolor, tangelo, teal and blue Versamagic, brown Memento
Tools:
Other: Post-Its

Supplies happy birthday:
Paper: American Crafts, DCWV, Coredinations
Stamps: PTI
Ink: black Versafine
Tools: corner rounder and square punch EKS
Other:

Saturday, March 17, 2012

Roy G. Biv

Remember Roy G. Biv?  Hit me like a blast from the past when I saw the inspiration photo at Virginia's Challenge at Lily Pad.


So off I was on another long-and-winding-creative-process road.


The Hero Arts flower challenge still on my brain, I created this card first.  Used a little flower from CL131 to stamp the rows.  If you look carefully I forgot the "B" from Roy!  Velveteen stamping still on my brain, if you look closely you can see a few white on white stamped butterflies around the sentiment.  A little bling.  But I wasn't happy.


This was my second attempt.  Actually went back to the graphic flower from CL131 which I originally intended to use, although a flower top I thought it was more like the buttons from the inspiration photo.  Added some Perfect Pearl mist to make it a bit more interesting.  But still wasn't completely happy.  Needed more white space.


Switched to a different stamp, this time a button from Crafty Secrets.  Stamped the button is a somewhat rainbowy pattern, cut strips and came up with this design.  Think I was subconsciously influenced by the sketch at retro sketches - which I also intended to eventually play but I see I was too late.  Not perfect, but I'm done and this baby is entering Virginia's challenge!

On a side note, DD was much more creative than I with her Cookie Monster muffins.  Although they rose... then fell, so she couldn't slice them open to insert a cookie.  They're yummy anyway.


Thanks for visiting today.

Supplies happy day:
Paper: CS Neenah
Stamps: Hero Arts
Ink: Distress Inks, Adirondack pigment white, black Versafine
Tools:
Other: bling  stash

Supplies:
Paper: CS Neenah
Stamps: Hero Arts
Ink: Distress Inks
Tools: edge punch EKS
Other: yarn stash, metal frame CreaMotion, white embossing powder

Supplies:
Paper: CS Neenah and American Crafts
Stamps: Crafty Secrets
Ink: Distress Inks, black Versafine
Tools: die Spellbinders, square punch EKS
Other: twine, button  Sew Sweet


Related Posts Plugin for WordPress, Blogger...