Showing posts with label guest designer. Show all posts

Wednesday, April 14, 2021

guest designing at ATSAM

I'm excited to be joining the folks over at Addicted to Stamps and More after winning a challenge a couple weeks ago.

The theme for this fortnight is an easy one - Birthday.

I made a card for a little cousin who happens to love hedgehogs. I used a die, a background I made with leftover Easter egg dye (!) and a stamp.

Action Deutschland Hedgehog stamp
pigment inks, sequins

Pop over to the Addicted to Stamps and More blog for more inspiration. Thanks for having me as a guest, Kylie.

Thursday, March 5, 2020

guest designing at time out #156 - reminder

Popping in today to remind you about the photo inspiration challenge over at Time Out . Lucky me, I get to guest design with the talented DT this fortnight. Here's the fabulous inspiration.


I just love how that fresh yellow pops off the aqua, especially with those touches of white. (BTW, you can see a larger version of the photo over at Time Out.)

This challenge is kindly being sponsored by Altenew. I can't help but think of florals when I think of Altenew. Agree? I headed to my stash (whistled... ;) inside joke for Darnell) and took a look at my florals. I discovered that I had some leftover blooms in with the die and wouldn't you know it, the colors fit the bill. They're the colors of those cute frames on the wall in the photo.


All I needed to do was adhere the blooms on the background, a piece from my BG stash made by cleaning up some metallic gelato-y messes awhile back. And then die cut a sentiment from lemon yellow CS to mimic the console.


Again, thanks to Sandie and the design team for having me. It's such fun to be part of the inspiration post for this month's photo challenge. Have you played yet? I'm looking foward to seeing your entries in the gallery.

I'm joining the fun at:
Die Cut Divas - Anything Goes
Love to Create - AG Mixed Media
SSS Wednesday Challenge - Something Feminine
The Flower Challenge - Anything Goes


Thursday, February 27, 2020

guest designing at time out #156

Posting today as a guest designer to join the talented ladies over at Time Out for this fortnight's challenge. It's a photo challenge. I always love the photos Sandie picks. Don't you just want to eat these yummy colors?


I just love how that fresh yellow pops off the aqua, especially with those touches of white. (BTW, you can see a larger version of the photo over at Time Out.)

Well, since the challenge is being sponsored by Altenew, I headed to my stash and had a looksee. I also headed to my stash of backgrounds looking for something nice and aqua and amazingly enough I found what I needed!


In the inspiration photo, that painted yellow piece really popped out at me. I knew I wanted to place a yellow die cut "something" on an aqua background. Well I had my background, a piece made by cleaning up some metallic gelato-y messes awhile back. Perusing my Altenew dies, I chose Persian Motifs, cut it from lemon yellow and heat embossed the outline in white on it.

Then in a nod to the pile of books in the photo I inked up my Label Love sentiment with four blocks of color. I tore the edges of the background and adhered it. Stitched my sentiment down and adhered the yellow motif with foam adhesive. A few shiny sequins finished my card. Wish you could see the metallic sheen of the aqua BG, it really makes the card.


I'm looking foward to seeing your entries in the gallery, and how you choose to interpret the photo.

Many thanks to Sandie and the design team for having me. It's such fun to be part of the inspiration post for this month's photo challenge. I'll be back with a second make later...

I'm joining the Anything Goes fun at SSS Wednesday Challenge as well as the Hearts and Flowers Challenge over at Die Cut Divas.


Friday, October 11, 2019

guest designing at craft stamper TIMI

I'm joining the very talented ladies over at Craft Stamper magazine for their October Take It Make It challenge where it's always anything goes.

Take It, Make It Challenge

I made a one-layer CAS card but did some ink blending, ghosting, stamping and heat embossing to step it up a bit.

distress oxides
painter's tape
water
clear embossing powder

I ink blended Fossilized Amber, Carved Pumpkin and Candied Apple oxides. Stamped the solid Leaf Clusters with water to create the ghost images. Stamped the Fantastic Foliage images randomly with the three oxide colors. Stamped the sentiment in black and heat embossed it clear. Voila!


Fun and easy to do yet adds a lot of interest to the simple card. Hope you'll give it a try. Check out this post for a step-by-step on this design.

Thanks for stopping by. Have a great weekend (get out and enjoy the fall color if you can).

I'm going over to:
SSS Monday challenge - Fall/Autumn
Basteltraum - Autumn
AAA Cards - One Layer with option of Autumn

Friday, January 11, 2019

guest designing at craft stamper TIMI

Here today to share with you a card I made for my TIMI Winners Guest Design over at Craft Stamper.

Many thanks to Trish and the design team. It's such a treat to be part of the inspiration post for this month's anything goes challenge. Remember, anything goes as long as there's stamping on your project. I am so happy to have been selected to join the DT today.

Now to my card. I made another card in the style of my winning card (this card).

Copic markers

Stamp. Mask. Repeat.

Colored with Copics and added stems with the border maker stamp and a negative die cut piece from my scraps. Voila!

I'm playing at:
CAS(E) this Sketch - #303
CAS on Friday - Flowers
Craft Stamper - Take it Make it January

Friday, June 22, 2018

simon says stamp classic bicycle - rainbow

I hope by now you've checked out the Simon Says Stamp Good Vibes release. I've got two more cards made with one of the fun dies from this release - Classic Bicycle.

Can you say ROYGBIV?

distress inks


I'd wanted to use just a portion of the bike and had the idea of looking out a window at it. But that detoured into this more artistic version. Whatever. Pretty basic. Cut a mask. Stamped the stripes. Spritzed with perfect pearls/water mix. Adhered the die cuts. Adhered the frame. 

For the second card I die cut the bike from Neenah CS and Copic colored it with a rainbow. Easy peasy. I put this bike on a 4" circle card. Fits into a regular envelope.

Copics (13 colors!)
washi
white embossing powder

That's all for now folks. Have you checked out the Simon Says Stamp blog for the entire release and hop yet? Thanks for coming by my blog today.

I'm taking these over to:
SSS Wednesday challenge - Bright and Cheerful
Fusion - Primary Bookcase
Just Add Ink - Window or Frame
Happy Little Stampers - June AG with Dies


Wednesday, June 20, 2018

simon says stamp classic bicycle - his, hers, theirs


Know what today is? It's Simon Says Stamp Good Vibes release day!

I've got a few cards made with one of the fun dies from this release - Classic Bicycle.

First, for him. Wouldn't necessarily have to be, but I was thinking masculine when I made this. Perhaps cuz I have a DH who goes on a bike trip once a year with his buddies. And I have no idea if there are wooden bikes, but if anyone makes one, probably a fabulous, young company in Detroit called Shinola ;)

I thought the illusion of a forest was a fitting background. And why not stamp a little sentiment onto a geocaching tag? Getting some good summer vibes?

Simon Says Stamp Classic Bicycle die
distress inks
Studio Calico PP


Next, for her. A shiny red one. In a nod to Kate Spade...

 Simon Says Stamp Classic Bicycle die
recycled red packaging
distress inks
washi


And how about one for the kids? Balloons are always a good idea, agree? I dabbed Distress Ink onto vellum and die cut the balloons from it when it was dry.

Simon Says Stamp Classic Bicycle die
distress inks, vellum, thread

FYI, I'm currently crushing on this method of getting adhesive onto intricate die cuts ;)


Thanks for stopping by. If you enjoyed these, come by tomorrow for two more...
And be sure to check out the Simon Says Stamp blog for the entire release and there'll be tons of inspiration on the blog hops on Thursday and Friday too.

I'm stopping by:
SSS Work it Wednesday - Summertime
SSS Monday Challenge - Transport it
The Paper Girls - Bicycles
Cuttlebug Mania - Summer is Magic
Happy Little Stampers - June AG with Dies


Thursday, June 14, 2018

experimenting with stencils

Hey! You may have seen this card I made for the June release week at Neat and Tangled...


To achieve that background I put the stencil down, applied some yellow ink through it, randomly changed the position of the stencil and inked with orange and then randomly positioned the stencil again and inked once more with pink ink. The resulting background adds interest without being too "graphically stenciled."

Today's card was actually the forefunner to that card. As in, graphically stenciled ;) But the idea for changing the position of the stencil originated here.

Mustard Seed, Carved Pumpkin and Picked Raspberry distress inks
embossing paste
Stampendous Moonstone embossing powder

For this card I inked the entire panel with yellow through the stencil which was placed square on the panel. Then I rotated the stencil 90 degrees and inked with orange. Then I shifted the stencil slightly (half a square) and inked with pink. Then for the icing on the cake I shifted the stencil a little again and added some pearlescent embossing paste onto random areas. The paste absorbs a bit of the pigment from the Distress Ink. Talk about an experiment! And mixed media fun!

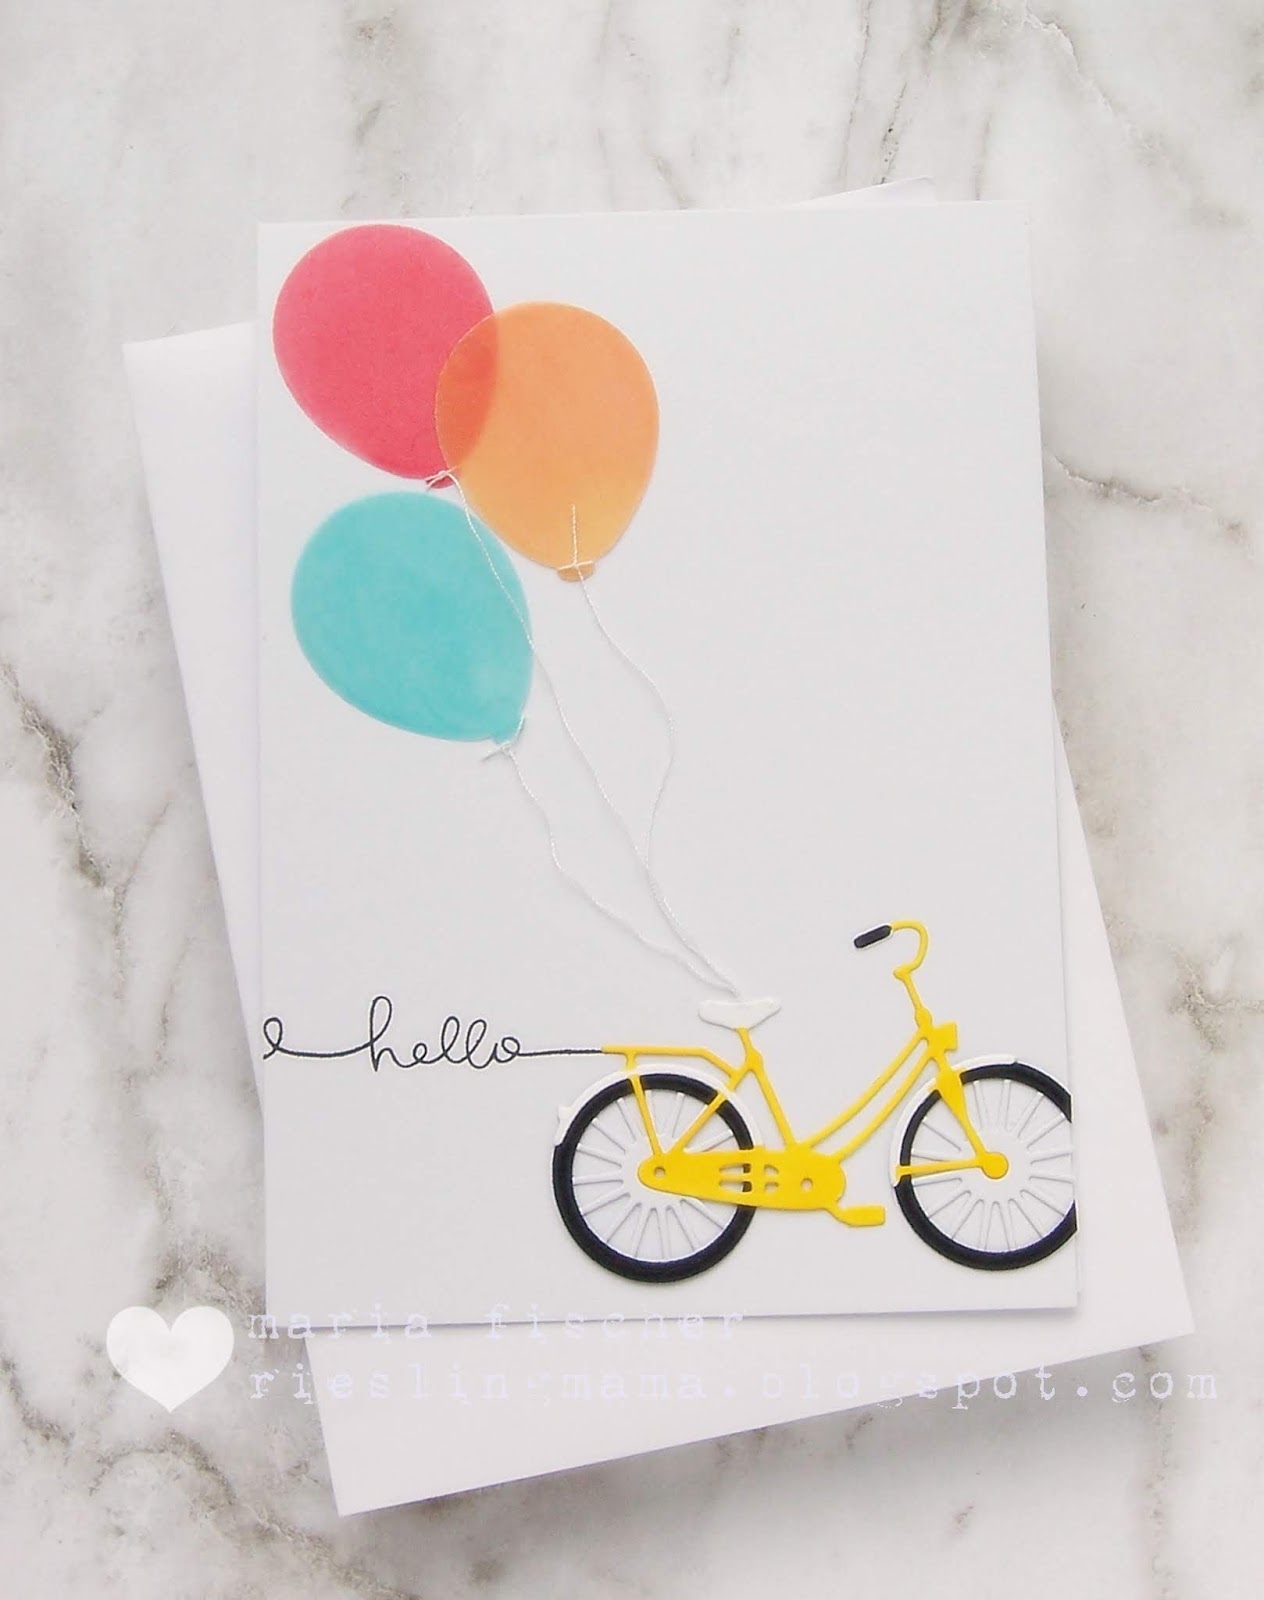
I heat embossed the blooms onto vellum and then loosely adhered them to white die cuts so they wouldn't get lost on the background. The sentiment is heat embossed onto a black cardstock snippet.


As the sentiment says "beauty is everywhere". Try experimenting with your stencils to create beautiful, unexpected backgrounds. And have fun doing it! Thanks for looking.

I'm joining:
SSS Work it Wednesday - Summer
That's Crafty - A Summer's Day
The Flower Challenge - Use a Previous Challenge (vellum/acetate)

Sunday, June 10, 2018

spellbinders heart like a wildflower - positive negative

I was lucky to get the Spellbinders Heart like a Wildflower etched die from the Stephanie Low collection to play with and today I have two more card ideas for you that showcase the fun you can have with die cut positives and negatives. Seems like so often I find myself more inspired by the negatives!

Here is the die. For today's cards I used only the die on the bottom left! 


In this post I mentioned that when test driving the intricate dies, the first thing I noticed was the cool negative space they make. (Those two dies on the top are to create "shadows" for the intricate dies and though I will have examples of that too, I'm still just playing with the positive and negatives of the intricate leaf and wildflower branches.) So I cut the leaf branch from a black rectangle.

Because I needed another sympathy card, I used the same design idea and made this with the positive die cut.

Kartenkunst Trauer stamp
Distress Oxides

Then I die cut a few more and used the negatives...


I added a tropical PP to my cardbase and foam mounted the negatives. I added a heat embossed sentiment on a strip of washi and voila! I love the mix of B/W graphic with the natural elements, don't you?

Thank you to Team Spellbinders for this lovely die to create with. I'm joining in at:

Simon Says Stamp Wednesday challenge - Anniversary/Wedding
Daring Cardmakers - Tropical
Crafty Hazelnut's PP Challenge - June
Happy Little Stampers - June AG with Dies
Crafter's Cafe - Tic Tac Toe (I've used white, PP and embossing)
2 Sisters on the blog - #16


Saturday, June 9, 2018

spellbinders petal'd poetry - CAS for pinsights challenge

Back today with two CAS cards made with Petal'd Poetry etched die from the Good Vibes Only collection by Stephanie Low. Did you see yesterday's post?

Here is the die. Again I've used the flower with leaves (outline and shadow).


I was inspired by the current Pinsights Challenge at Ellen Hutson. (BTW, I used black on yesterday's creations because I hadn't read the fine print at EH to know that that top color is actually navy!)


So for today's cards I went with PP from my stash with a navy, pink and green color scheme, although I chose bolder colors since I was pairing the PP with lotsa white.

Essentials by Ellen Up the Happy stamp
American Crafts PP
Nuvo drops

I die cut the shadow from the white panel and backed the hole with polka dot PP. Die cut the intricate die from white and adhered it. Filled in the negative spaces with bits and pieces from one I'd cut from a bold floral print. And since portions of the die cuts were left over, it became a twofer.

Hero Arts Everyday Occasion Messages stamp
American Crafts PP

Super easy. Just a bit time consuming to adhere all the tiny pieces ;) But isn't this a fun way to use intricate dies? Especially ones that have a shadow die too.

Starting tomorrow I'll be working with Heart like a Wildflower. Hope you'll come back. Thanks Team Spellbinders for this lovely die to create with.

Friday, June 8, 2018

spellbinders petal'd poetry - artsy for pinsights challenge

I've been having a play with two dies I was lucky to receive from Spellbinders. Today I'm playing with Petal'd Poetry etched die from the Good Vibes Only collection by Stephanie Low. Love the style of this collection.

Here is the die. I've used the flower with leaves (outline and shadow).


For all the cards I was inspired by the current Pinsights Challenge at Ellen Hutson.


My first card was inspired by that shot of the northern lights.


The movement in the inspiration photo moved me to swipe the ink pads across my background and then create the cascade of die cut blooms (white, backed with black) in the opposite direction. Plenty of perfect pearls/water shimmer finished it off. See the shimmer?


Then I had to give that lantern photo a go...

Essentials by Ellen Up the Happy stamp
Zing embossing powder, vellum
Distress Inks and Oxides


I die cut foam to use as a stamp and randomly stamped it with Milled Lavender, Shaded Lilac and Blueprint Sketch onto my lightly misted cardbase. Using a paintbrush, I picked up the leftover ink from the foam and painted it on the stamped blooms to soften them more.

For the focal image I cut a vellum circle, applied Abandoned Coral DI to the reverse and heat embossed the sentiment on it. Added a die cut which I colored with Worn Lipstick and Candied Apple DO as a finishing touch.

For my last card I was reminded of Julie E's brayered beauty and went with those colors.

Essentials by Ellen Up the Happy stamp
clear embossing powder, vellum
Distress Inks
Heidi Swapp Color Shine in rose

For this card I die cut the shadow shape from craft foam and stamped it in Worn Lipstick, Spun Sugar, Shabby Shutters and Shaded Lilac. I splattered with all the leftover inks as well as Heidi Swapp Color shine. Then I heat embossed the sentiment and stamped a few butterflies.

Die cut the detail cluster from vellum and applied them over the stamped shadows. Some twine up top finished the card off.


Thanks for hanging in there. I've got two CAS versions for you tomorrow. Hope you'll come back. Happy weekend.

Thank you to Team Spellbinders for this lovely die to create with. I'm joining in at:

I'm also joining Simon Says Stamp Monday challenge - All Things Bright and Beautiful (#1), The Flower Challenge - Use a Past Challenge #20 (#2), Happy Little Stampers - Watercolor June (#2) and Happy Little Stampers - Mixed Media June (#1).


Related Posts Plugin for WordPress, Blogger...