Wednesday, January 27, 2021

use those scraps

I was cleaning up my paper scraps mess from last week's cardmaking sessions and decided to actually make cards with some of the scraps rather than put the scraps back into my scrap storage. Makes sense, right? How come I never do it?

I took a look at the Distress Ink mop up scraps which were red and realized I needed an anniversary card ... soooo, why not die cut lots of little hearts? This card was born.

Heidi Swap spray ink

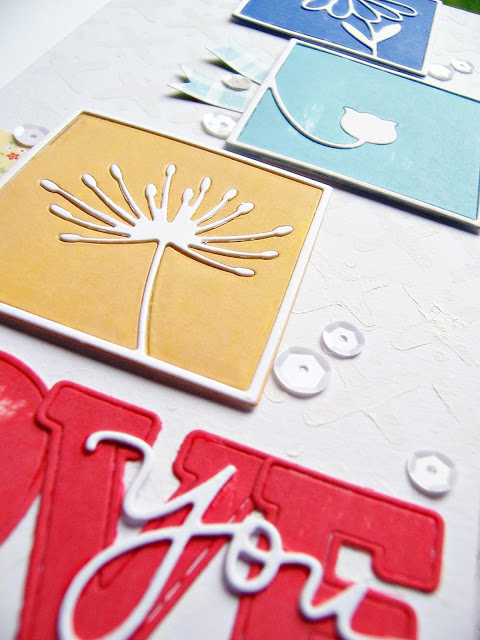
The next scrap was from this card way back when. It was pulled out of scrap storage for my pop up box card bouquet making but didn't get used cuz of the blue. So was it to go back to scrap storage? Again? Nope. The negative of the bloom got backed with a portion of it and I even managed to get the sentiment out of skinny little areas of the scrap! That, folks, makes me happy!


The leftover little hearts from the first card had to go somewhere ... four of something isn't the easiest to design with. So I added a sentiment as the fifth element and voila! A birthday card.


I'm joining these challenges:
Use Your Stuff - Out with the Old (YEP! All three cards!)
Penny Black Saturday Challenge - AG with option of  "Something New" (card #2)
The Cat's Pajamas - January


Tuesday, January 26, 2021

STAMPlorations inspiration #304

Welcome to another Tuesday inspiration posts from the STAMPlorations inspiration team girls. 

Remember this tissue box? Rescued from the trash to inspire my cards this month...


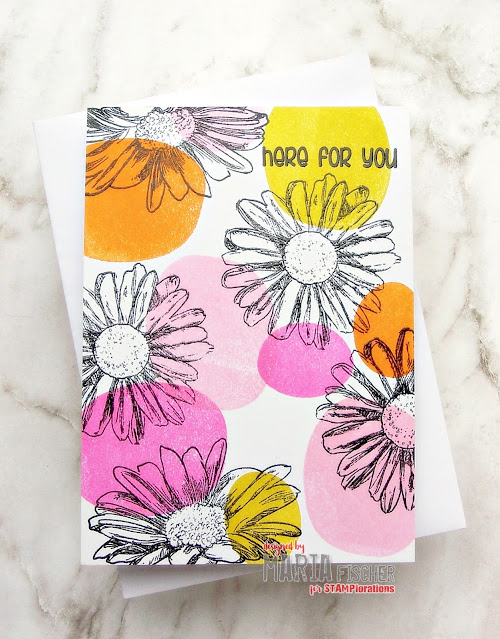
Here's my next idea to add color to B/W stamping...

clear embossing paste
Stamp Market inks

Know how sometime a card's gotta happen quick? Well, this one doesn't ;)

But it's so cool! Add color a different way this time. Stamp the floral images. Apply clear embossing paste through a geometric stencil. Let dry (thus, not quick). Add ink over the dried paste which creates the geometric pattern of color. End up with cool shine over the still-white areas surrounded by a geometric pattern of ombre color. Fun, eh?


You could win yourself a $15 prize code to the store by leaving a comment on this month's inspiration posts! Check out today's post over at STAMPlorations. And if I ever inspire you to order something from the store, I'd really appreciate it if you used my STAMPGIRLMARIA discount code for an additional 20% off your order - at no extra cost to you, just with perks for me ;)

Thanks mucho for visiting today. Have a happy day!

I'm visiting Simon Says Stamp Wednesday where it's about Make Your Own Background and We Love Chocolate Baroque where it's about For Ladies and Girls.


Friday, January 22, 2021

having the right stencil - part 2

Have you ever picked up an item and thrown it in your shopping cart without knowing when or how you were going to use it? Silly me, you're a crafter, of course you have! Well meet another stencil I picked up at my local dollar store a while back.

Mr. Bear. Had to go cool and wintry with him.

Action Deutschland stencil
Distress inks

SUPER easy. But having "the right" stencil helps too I guess.

Inspiration came from two places. I watched Channin P. ink up some layering stencils in a video and it got me thinking how I could incorporate gradient inking on normal stencils. Then I saw the Perfectly CAS challenge - use 1/3 of the card + stencil - and off I went.

I'm joining these challenges:
Poppystamps - Monochromatic (the sentiment is from Poppystamps)
Addicted to CAS - Snow (hope a snow bear is OK)
Perfectly CAS - Stencil

Thursday, January 21, 2021

having the right stencil helps

Have you ever picked up an item and thrown it in your shopping cart without knowing when or how you were going to use it? Silly me, you're a crafter, of course you have! Well I picked up a pack of geometric animal stencils at my local dollar store a while back.

Meet Mrs Bunny.

Action Deutschland stencil
Stamp Market inks
Papertrey Ink Easter stamp
gold embossing powder

SUPER easy. But having "the right" stencil helps too I guess.

Inspiration came from two places. I watched Channin P. ink up some layering stencils in a video and it got me thinking how I could incorporate gradient inking on normal stencils. Then I saw the Perfectly CAS challenge - use 1/3 of the card + stencil - and off I went.

I'm joining in at Perfectly CAS - Stencil

Wednesday, January 20, 2021

playing with pinkfresh floral square frames

Hello. I'm joining the January challenge again, which is basically 2020 in review! There is a link in the post to a larger version of this photo if you want to see what strikes your fancy.

Nathalie's creation for the challenge post totally blew me away. Go check it out - hers is the first project in the post! She was inspired by the June Die Cuts and Cut Files challenge. So I guess I was too. Mostly I loved her color choices, keeping plenty of white too. And the cool stenciled texture in the BG. Hers is a LO. 

Mine is a card. Here's my first one.

Pinkfresh Folk Elements die (just $5 right now)
Distress Oxides, embossing paste

Well my intention was to have the white X pattern all over the card front to tone down the swipes of ink. What I got was embossing paste that picked up the color of the inks. Anyone know - was this cuz the ink wasn't totally dry or is that just a property of the oxides?

I went with it anyhoo. Die cut the little folk elements to match the ink swipes. Added the sentiment using those wonderful alphas. Voila.

But I was still intrigued. Wanted white X pattern all over the card front. So I created this slimline and stenciled white paint and got what I wanted!


See the white pattern all over the cardbase in this close-up?


Otherwise pretty easy. Die cuts from ink-swiped CS. Little PP flags. Sequins. I pretended I was a scrapbooker and brought out all the embellies ;)

This card was not without an oopsie either though. Did you notice it???

I'm playing at:
Make my Monday - Hello (1st card)
Happy Little Stampers - AG with Dies (1st card)
Die Cut Divas - Frame It (2nd card with those floral square frames)
Bastel Traum - #97 Love (2nd card)
Country View Challenges - Squares (2nd card)


Tuesday, January 19, 2021

STAMPlorations inspiration #303

Welcome to another Tuesday inspiration posts from the STAMPlorations inspiration team girls. 

Remember this tissue box? Rescued from the trash to inspire my cards this month...


Here's my next idea to add color to B/W stamping...

Stamp Market inks

Know how sometimes it's gotta happen quick? Like, the card needs to be in the mail yesterday? No coloring possible. Here's another easy idea, though I admit it takes a little bit longer than my two previous ideas. 

Add color by inking through a stencil. I chose a wispy floral stencil and my pink, yellow, chartreuse colors again. Stamp over the dried cardbase with a floral flourish. Add a stacked white die cut sentiment

You could win yourself a $15 prize code to the store by leaving a comment on this month's inspiration posts! Check out today's post over at STAMPlorations. And if I ever inspire you to order something from the store, I'd really appreciate it if you used my STAMPGIRLMARIA discount code for an additional 20% off your order - at no extra cost to you, just with perks for me ;)

Thanks mucho for visiting today. Have a happy day!

I'm joining the Feminine - For Ladies or Girls challenge at Chocolate Baroque. Also Anything Goes at Creative Friday. And at Perfectly CAS - Stencil (though I may technically be wrong since I've not completely followed the 1/3 rule).


Monday, January 18, 2021

playing with pinkfresh dainty blossoms

Hello there peeps! Needing a birthday and sympathy card, I pulled out the Dainty Blossoms from Pinkfresh. I'm joining the January challenge which is basically 2020 in review! There is a link in the post to a larger version of this photo if you want to see what strikes your fancy.

What struck mine? Well lots. But a few things remained in my head as I headed to my craft room. Rainbows and die cuts. June and September. Nathalie's creation for the challenge post totally blew me away too. I'm working on two cards inspired by it. I'll share those later.

I love the stylized illustrations in some of the Pinkfresh stamp sets. Dainty. So I combined some B/W stamping with pastel rainbow die cuts for my cards.

Birthday...

distress inks, gold CS

Sympathy...


Die cut the blossoms from leftover DI scraps (#1) and PP (#2). Stamped the images. Adhered the die cuts. Stamped the sentiment. Easy peasy CAS squeezy.

Hope you and yours are staying healthy and happy. I'm ready for the gray days in Germany to skidaddle. But I'm lucky to be able to spend lots of time in my craft room. Thanks for visiting.

SSS Wednesday Challenge - Layer it Up
Time Out - You (one thing about me... I mop up all my leftovers and then save those scraps. At least sometimes I use them too!)


Saturday, January 16, 2021

simon says stamp - better together slimline friends

There's a new release from Simon Says Stamp called Love You, Too and there's lots to inspire cards to spread love around the world during these strange times. Check it out here.

One of the stamp sets in the new release is called Better Together Slimline Friends, although it's not just for slimline cards I must say. Had to think a bit on this one since I'm not a colorer. Here's what I did. First, a slimline.

distress ink, Copics, white embossing powder

Stamped the gang, colored small sections of each kid to bring in color, die cut matching balloons and heat embossed them with tiny sentiments and added "strings" and added a spot of distress ink to hint at grass and sky. Voila!

And since I've been bit by the pop up box card bug lately (check this out), I figured I'd make one with this gang.


Adds such a fun factor to card sending, don't you think?

Cut and scored white CS to make a 7x7x7 cm pop up box. Stamped it with a couple of the sentiments from the set. Added PP squares to the inside flaps, as well as a couple die cut elements to add to the love/fun factor.

Then on to the gang. I stamped and colored them like for my slimline card. Fussy cut them. Adhered them to plastic strips which I adhered to the inserts inside the box. Also added balloons with the tiny messages. And finally some "grass" (so glad I bought the herb scissors at Aldi last year! ;))

Check out all the makes with the products from the Love You, Too release in the gallery here. And don't miss the blog hops this weekend. Thanks for visiting.

I'm adding my card to:
SSS Wednesday Challenge - Layer it Up 
Time Out - You (one thing about me... I'm really not afraid to try any technique, even though I'm not always the first on the bandwagon)


Friday, January 15, 2021

CAS cards challenge january reminder

Are you finding yourself with more time to craft now that the holidays are over? Usually we roll right into the Mardi Gras season here in my 'hood. But not this year. More time to craft!  I'd like to remind you about this year's first STAMPlorations CAS Cards Challenge


As always the challenge is to create any CAS card, with an optional color twist - this month is pink + red + orange. How fun is that?

May I introduce my CAS card with lots of pink "white space".


Not my typical card perhaps. But I thought I'd illustrate the gallon-quart-pint rule. Here's a little bit about it. I first learned it from Cath at Moxie Fab - remember her? I loved Moxie Fab.

So I took a gallon of bright pink, added a quart of orange and topped it all off with shiny red bows on the presents to bring in the pint of red. I kept the rest really neutral (black).

CAS card tip: Add splatters or small stamped images to tame a bright, overpowering background and also tie in the sentiment color.

For more inspiration with these gift dies check out this post.

I'm looking forward to perusing your CAS card creations! Your project might be chosen as one of the prize winners this month. Check out how the DT was inspired by this month's photo here.

And don't forget about my STAMPlorations discount code STAMPGIRLMARIA for 20% off should I ever inspire you to do some shopping ;)  Thanks for stopping over. See you in the gallery. 

flowers for oma - pop up box card

A little story for you... My MIL turned 85. She's amazing, still going strong. But saddened/maddened that she couldn't celebrate her big day this year. We even decided not to drive up to see her cuz her area is worse Covid-wise than ours at the moment. Only one visitor from another household permitted in your house - that's the current recommendation.

We had presents to take. But since that wasn't going to be happening and mailing wouldn't get them to her on time, I suggested to DH that he order flowers to be delivered on her birthday. Something special, ya know? I mean - 85! I'm not actually sure that that ordering flowers would have been possible given the lockdown, but I didn't get to find out. "NO. That's ridiculous. She'd say so too." was his response.

I'm curious. Is your husband a flower guy or does he think flowers are money out the window? Like mine. 

So what'd I do? I headed to my craft room to make the most expensive paper flower bouquet known to man. In man-hours, that is ;)

patterned paper, paper scraps, recycled plastic packaging, glue dots

They've been around for a long time, but I've never made a pop up box card before. It just seemed to me to be the best design for containing "flowers for Oma." So I watched this video to figure out how they worked. Turns out it's pretty simple. Just fiddly.


I must say I'm impressed with this design. Simple to create the box which pops up and can be displayed nicely when the recipient receives it. A truly interactive design. And what a way to achieve depth in a scene. Certainly can't achieve that on a card. Yet it can be mailed flat.


Anyhoo, briefly, here's what I did:
1. Made box from double-sided PP since I didn't want to "decorate" the flaps other than the 85.
2. Pulled out Altenew floral dies cuz they're just the prettiest.
3. Spent hours sorting through scraps and making flowers.
4. Spent more hours attaching flowers to plastic stems and fitting them into the box.
5. Adhered personal message to the back side of the box.
6. Made envelope out of 12x12 PP.


Got a smile out of DH. Will be very curious to hear what Oma thinks.

And since it was so much fun I proceeded to spend another few hours making another bouquet of flowers! And a more detailed tutorial of my process. You can find that here.

I had actually taken a look at the January Inspiration Challenge at Altenew and was going for the pinks and reds with silver color scheme (it is a winter birthday!) but my bouquet building took me a bit off the mark. I'm hooking up at the challenge anyway!


And SSS Wednesday challenge is looking for Layers. With all my layered die cuts I'm joining in over there too. Thanks for coming by.

Thursday, January 14, 2021

spotlight on pop up box cards

Hi friends. Late to the party, I recently discovered pop up box cards! Such fun and what a way to make a handmade card interactive. I love the depth of scene you can achieve too... so many possibilities.

I'm over at STAMPlorations today with a tutorial for my flower-filled pop up box card.

And it's about Squares over at Country View so I'm hooking up there. My box is a7x7x7cm square. And I pepped up the flaps with squares cut out of cover plate die cuts, then framed with square frames to hide the rough edges... So since it's about Frames over at Divas that Die Cut, I'm joining in there too.

SSS Wednesday wants us to Layer it Up. Not sure if I've technically done that, or just "gone deeper" but I'm heading over there.


Tuesday, January 12, 2021

STAMPlorations inspiration #302

Welcome to a new Tuesday inspiration posts from the STAMPlorations inspiration team girls. 

Remember this tissue box? Rescued from the trash to inspire my cards this month...


Meet my next project to illustrate easy ways to add color to B/W stamping.

Stamp Market inks

Know how sometimes it's gotta happen quick? Like, the card needs to be in the mail yesterday? No coloring possible. Here's another easy idea. I took it up one notch by heat embossing the black stamping.


Stamp some color using the reverse of a larger stamp (I used the great organic ovals of a snowman) and then do the black stamping over it. And this time I did stamp outline blooms all over the card like my inspiration tissue box ;)

I'm feeling a need to put sentiments in unexpected places lately. Hope you likey.

Note: My bad. It appears this stamp set is only available as a digital stamp now. But you'd get a similar look with The Birds and Blooms or Pocket Blooms.

You could win yourself a $15 prize code to the store by leaving a comment on this month's inspiration posts! Check out today's post over at STAMPlorations. And if I ever inspire you to order something from the store, I'd really appreciate it if you used my STAMPGIRLMARIA discount code for an additional 20% off your order - at no extra cost to you, just with perks for me ;)

Thanks mucho for visiting today. Have a happy day!

I'm visiting the gals over at The Flower Challenge.


Tuesday, January 5, 2021

STAMPlorations inspiration #301

Welcome to a new year and a new "hundreds" of Tuesday inspiration posts from the STAMPlorations inspiration team girls. (Not sure if there's actually a word for 100 of something. We just hit 300 inspiration posts, now we head to 400. What would you call that???)

As I was taking out the paper trash I spied this tissue box.


Talk about finding inspiration in the most unexpected places! Meet my theme for this month's inspiration projects - B/W stamping.

Stamp Market inks

Know how sometimes it's gotta happen quick? Like, the card needs to be in the mail yesterday? No coloring possible. Well here's an easy idea.

Stamp some color using the reverse of a larger stamp (I used the great organic ovals of a snowman) and then do the black stamping over it. I really had the intentions of stamping outline blooms all over the card using Big Dreamer. But I placed the sentiment and those cute butterflies first and loved it as it was. Just added the trail for movement and put the blooms back in the package :) 

Super CAS. Hope you likey.

You could win yourself a $15 prize code to the store by leaving a comment on this month's inspiration posts! Check out today's post over at STAMPlorations. And if I ever inspire you to order something from the store, I'd really appreciate it if you used my STAMPGIRLMARIA discount code for an additional 20% off your order - at no extra cost to you, just with perks for me ;)

Appreciate your visit. Here's to a happy 2021!

Friday, January 1, 2021

CAS cards challenge january

Well.

Out with the old and in with the new. We made it to the end of 2020. I'm not expecting any big improvements for a while in 2021, just keep telling myself this too shall pass. Even if like a kidney stone.

So on to funner things! It's time for the very first STAMPlorations CAS Cards Challenge of this new year. We've a fun color combo for you. Can't help be happy.


As always the challenge is to create any CAS card, with an optional color twist - this month is pink + red + orange.

Meet my card.


cotton crochet thread, patterned paper

Pretty simple. Quite CAS cuz I left so much white. I did not make a shaker with the balloon die, just used the two pieces to get a tiny bit of pink frame in with the orange. Added the red with the thread. Done.

CAS card tip: Add texture to your CAS design by adding a bit of thread or twine. Or add tone-on-tone die cuts. Or both ;)

For more inspiration with this shaker die check out this post.

I'm looking forward to a new year of your CAS card creations! Your project might be chosen as one of the prize winners. Check out how the DT was inspired by this month's photo here.

And don't forget about my STAMPlorations discount code STAMPGIRLMARIA for 20% off should I ever inspire you to do some shopping ;)  Thanks for stopping over today. See you in the gallery. 

Related Posts Plugin for WordPress, Blogger...