Showing posts with label stitching. Show all posts

Friday, September 2, 2022

forgotten but not gone (1)

Continuing with my summer programming even though it's September ;) I've got a few cards to share this month that seem to have been forgotten in my photo file. Oops.

Let's start with purple, shall we?


A closeup of that golden die cut cuz it's just so pretty combined with the splatters of gold ink.

STAMPlorations coffee stamp and sentiment die
Distress Inks

Zig watercolor brushes
sewing machine, pearls

Happy weekend! 

Thursday, June 17, 2021

new paper goods - ephemera tiles

Hi friends. Dropping in today to share something new with you. There's a new kid on the block over at STAMPlorations and it's pretty exciting.

Meet "paper goods" - card fronts, colorables and ephemera. Shery has a wide variety of designs from florals to coffee to graphic. Today I've had a play with some graphic ephemera tiles.

There are six tiles (1.75 in) to a sheet of 120 lb paper, and six sheets to a package. For my first card I used a sheet as is.


I stenciled around the edges of my cardbase since the sheet is a bit smaller, added the B/W edge die up top, stitched the sheet onto the card and topped it off with a die cut sentiment.

I used the sheet as is for my second card, but can you tell what I did differently?
I used a circle die to cut the messages and then turned the sheet vertically and adhered it to my cardbase to which I'd added a couple black art marks to pick up on the style of the tiles. And then for fun, I popped the circles up on foam tape and adhered them haphazardly on the colored squares. No risk, no fun ;)

My last card is CAS. Yep.

 Art Border 3 die (coming soon)
Heidi Swapp black color shine spray, PP, washi, enamel star

I used a tag die to cut two tiles from a sheet as well as from PP. Used a coming-to-the-store-soon border die to spice up the bottom of the card front. And keeping with the splatter style I added a strip of washi along the bottom edge. Adhered the tags and voila!

Keep watching the STAMP blog for more sneaks of these fun, new, paper goods. I'll be back with some of the graphic card fronts soon.

I'm going over to the gallery at:
Crafting Happiness - AG with option tag
Just Us Girls - #588

Tuesday, March 30, 2021

STAMPlorations inspiration #313

It's time for another Tuesday inspiration post from the STAMPlorations inspiration team girls

I have a theme this month - white on white

I told you last Tuesday that my card was made with leftovers from my last Spotlight card cuz I couldn't throw the little circles away. Today's card uses up some white papers from my paper scraps. I think it's a fun way to add interest to a white background. And I happen to love wispy threads ;)


That wraps up my month of white on white. Hope you enjoyed it.

You could win yourself a $15 prize code to the store by leaving a comment on this month's inspiration posts! Check out today's post over at STAMPlorations. And if I should ever inspire you to order something from the store, I'd appreciate it if you used my STAMPGIRLMARIA discount code for an additional 20% off your order - at no extra cost to you, just with perks for me ;)


Tuesday, February 23, 2021

STAMPlorations inspiration #308

Welcome to another Tuesday inspiration post from the STAMPlorations inspiration team girls

I'm concentrating on shaker cards this month. Are you already a fan? If not, perhaps I can inspire you to try one of the versions I've done this month: a see-through-to-the inside shaker using recycled cellophane packaging or a tulle shaker or a waterfall-ish card with a shaker element (perfect for a crafty friend).

Today I have my last shaker card for you. It's a full card shaker, recycling cellophane packaging which we all have tons of, right?
white embossing powder, Gelli print, sequins, sewing machine

I like this kind of card. It's different. It doesn't have a fold (I adhere a piece of white CS on the reverse so I can write my message), but there's a definite fun factor to it.

I took a Gelli print from my stash and adhered it to a piece of CS. I traced some leaves onto it with a stencil, added sequins and a die cut birdie, then put it all in cellophane packaging and stitched up the sides and top. Stapled a heat embossed sentiment to it and voila! I've done a belly band as a way to attach the sentiment before too.

You could win yourself a $15 prize code to the store by leaving a comment on this month's inspiration posts! Check out today's post over at STAMPlorations. And if I ever inspire you to order something from the store, I'd appreciate it if you used my STAMPGIRLMARIA discount code for an additional 20% off your order - at no extra cost to you, just with perks for me ;)

Thanks for visiting. I'm visiting Seize the Birthday with this birthday shaker card.

Wednesday, April 8, 2020

another easter bunny

I created another Easter bunny like the one I did for a three-year-old girl for the United We Craft Blog Party Simon Says Stamp came up with. This one's for a one-year-old boy. Hope he likes the googly eyes.

Again I've used the Faberge Egg die to create the bunny's head.

fabric, PP, thread, pom pom, googly eyes

Stitched the BG paper to the card and used fabric scraps for the ears. Added a pom pom and wispy threads for the nose.The sentiment is from the fancy part of the egg die. Outside "happy". Inside "Easter".

I wish you and yours the same. Happy Easter.


Thursday, March 5, 2020

guest designing at time out #156 - reminder

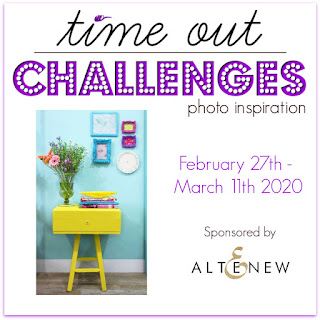
Popping in today to remind you about the photo inspiration challenge over at Time Out . Lucky me, I get to guest design with the talented DT this fortnight. Here's the fabulous inspiration.


I just love how that fresh yellow pops off the aqua, especially with those touches of white. (BTW, you can see a larger version of the photo over at Time Out.)

This challenge is kindly being sponsored by Altenew. I can't help but think of florals when I think of Altenew. Agree? I headed to my stash (whistled... ;) inside joke for Darnell) and took a look at my florals. I discovered that I had some leftover blooms in with the die and wouldn't you know it, the colors fit the bill. They're the colors of those cute frames on the wall in the photo.


All I needed to do was adhere the blooms on the background, a piece from my BG stash made by cleaning up some metallic gelato-y messes awhile back. And then die cut a sentiment from lemon yellow CS to mimic the console.


Again, thanks to Sandie and the design team for having me. It's such fun to be part of the inspiration post for this month's photo challenge. Have you played yet? I'm looking foward to seeing your entries in the gallery.

I'm joining the fun at:
Die Cut Divas - Anything Goes
Love to Create - AG Mixed Media
SSS Wednesday Challenge - Something Feminine
The Flower Challenge - Anything Goes


Wednesday, February 19, 2020

STAMPlorations digital stamps four more ways

I'm over on the STAMPlorations blog today with four digital stamp projects. You could win a $15 GC to the store for comments left here and there. Just sayin...

So. I'm no pro with digital stamps. I love getting inky with actual stamps. And I'm a pro at ink smudges. But there are some benefits to digi stamps - no smudges, perfect coverage without a MISTI, image resizing, even layering images (though I've yet to give that a try). And no shipping!

I use Microsoft Word and my Canon ink jet printer. I recommend this post for a great intro to digi stamps. It's where I figured out how to print them using Word.

I've got four projects to share today. One image enlarged. One shrunk. One left as is. And one heat embossed. Let's get started.

First up, I wanted a really large image. I inserted the PNG file for the image (it's the rectangular frame with roses along its left edge) into a Word document. Then I clicked on the image and stretched it to enlarge it. It's got nice thick lines so this worked great. I trimmed the printed image down to the card front size I wanted and made a shaker card.

Blossom Frames digi stamp
Copic markers
sequins

Something about those thick black lines... I decided to go all dramatic on this one. Chose red tones and Copic colored only a piece I die cut from the printed panel and set it back behind the shaker. Added a heat embossed German sentiment since this will be a birthday card for DS's girlfriend.


For my second card I shrunk a digi stamp so it could be just an accent piece on my card.

Blossom Frames digi stamp
Altenew ink
PP, washi, sequins

You can imagine my joy when I stumbled upon this PP in my stash. A perfect complement to the digi image. Thinking anniversary or wedding, I chose silver glitter for the die cut sentiment and the strip of washi. Sequins added more sparkle.

To eliminate some of the empty white space I masked and stamped some yellow blooms with the Sweetly stamp. On the cardbase and within the digi frame. BTW, I flipped the die and made a second cut to turn the manila tag into a rectangle!

So after enlarging and shrinking images on the previous cards, my next card uses an image just as it is (A2 size), I merely trimmed away the black lines of the frame.

Fluttery Garden digi stamp
Copic markers

No need to color the entire image. I had fun coloring just the butterflies. Have you ever been to a garden where those gorgeous blue butterflies flutter about? They were my inspiration.

I added interest by cutting out parts of their wings with an exacto knife and backing the "holes" with yellow cardstock. Added white gel pen dots to the wings and some color to the background with dots of various yellow Copic markers.


My final card was the result of an aha moment I had when I was printing digi stamps on PP (for my March post!), and using cellophane tape to hold my PP in place on copy paper. I noticed the toner ink remained wet where it printed on the tape...Maybe that would also be the case on vellum, I thought. And it was! Which means if you're quick you can heat emboss a digi stamp printed onto vellum! 

Cupful of Blooms digi stamp
PP, embossing powder, vellum

It may not be as perfect as with normal heat embossing, but I think it's pretty amazing! And quick. I chose to back it with floral PP and adhere the vellum with just a line of messy stitching up top.


That's it for today. Don't forget to leave a comment here.  And here too, for another chance to win.

I'm playing over at:
SSS Wednesday Challenge - Add a sentiment (card #3)
Die Cut Divas - Hearts or Flowers (card #1)
Creative with Stamps - Red (card #1)

Monday, February 17, 2020

fun with funky fossil designs adventure

Happy Monday! I had some fun this weekend with some new stamps from Funky Fossil Designs (I won a GC at Time Out and of course I had to pick up a few things while I was at the store ;).

My first play was with the Quirky Owls. Check them out here.

I also picked up Adventure and made two cards to share with you today.

First one turned out exactly as I'd hoped. I think this image is so cool.


Stamped it in black on PP and then heat embossed the sentiment in white onto vellum that I stitched loosely to the front. I'm thinking this could make a good card for a graduate or someone starting a new job or moving to a new city.


My second card... well, a good idea but lousy execution.  I'm sharing it anyhoo.


I was going for a sunrise feel. DH says it looks like the forest's on fire. Oops. Next time I'd use sponge daubers to apply ink to the stamp rather than the ink pads. Or maybe mask the image and apply ink behind it? I heat embossed the sentiment over the hot mess to hide a bit of it ;)


Fun, fun, fun. I just noticed Sarah is having a sale at Funky Fossil. 15% off until midnight tonight.

Thanks for stopping by. I'm stopping by at:
Daring Cardmakers - Something you Love (that image of mountains/trees)
Creative with Stamps - Red

Friday, February 14, 2020

STAMPlorations release - reprise

Hope you're all having a sweet Valentine's Day. No Valentine for you here today. There's a new release in town over at the STAMPlorations shop. Have you seen it? And did you see all the DT makes this past week?

Remember Leafy?

And this card I made with it?


I mentioned the leftovers I had after die cutting those tags from the light and middle blue panels...

Leafy stamp
Manila Tags die
Winnie and Walter Hello die
sequins, washi, PP snippet

I took those panels, layered them over one another and adhered a snippet of PP behind. Stitched the panel onto a cardbase and added a strip of washi along the bottom. Added a die cut sentiment and sequins.

Gotta love leftovers ;) There's still time to check out all the DT's creations over at the STAMP blog. And leave comments, there are prizes to be won - a $20 gift code and a stamp set from the release.

In addition, the four new stamp sets being released are 10% off automatically until February 19. If you use my STAMPGIRLMARIA designers' code you'll get an extra 20% off too!

Thanks for stopping by.

Tuesday, November 5, 2019

STAMPlorations inspiration #240

Welcome to the first Tuesday inspiration from the STAMPlorations inspiration team for November.

When I was playing with the clear stickers for our birthday bash, I also made this freestyle collage card. Spot the stickers?


Must admit I had no plan for this design. I took a piece of PP and adhered a sticker to it (pink). Did some stamping with Antique Linen Distress Oxide. Adhered another sticker to a piece of PP and die cut the tag from it. Added some bits from my extras cup (that "sun" up top is the center of a Bloomdala Bliss die cut) along with enamel dots and raffia.

For further inspiration with this stamp set check out this card. I used the tag die here.

You could win yourself a $10 GC to the store by leaving a comment on this month's inspiration posts! Check out today's post here. And I'd love it if you used my STAMPGIRLMARIA discount code for an additional 20% off if you're placing an order from the store.

Thanks so much for stopping by. I'm stopping by at:
SSS Wedsneday challenge - Anything Goes

Friday, September 14, 2018

altenew layered lily for a sympathy card

Summer programming...

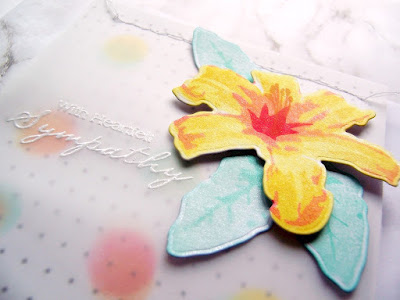
Here's a sympathy card I made for a friend. I thought it fitting to CASE a card of hers.

Altenew inks
vellum
sponge daubers

On PP I made some splotches with various inks and sponge daubers. Heat embossed the sentiment onto vellum and stitched it loosely to the card front. Stamped the lily and spritzed with perfect pearl mix before adhering with foam tape. Subdued. Yet pleasant.


Back in Deutschland and getting caught up. End of the summer programming!

Tuesday, June 5, 2018

neat and tangled release - clearly canine

Howdy and welcome back to some special programming! Today is Day 2 of the June Neat & Tangled release countdown and I'm joining the talented DT this week with my creations with these new products! Today is graphic goodness pure.

Today we are showcasing the Clearly Canine stamp set and die. I got a "soft and sweet" vibe from this cutie so pulled out some CS I'd marbled with alcohol inks and went from there.

Neat and Tangled Clearly Canine die
Neat and Tangled Clearly Canine stamp
enamel star
washi

This was really so easy. Die cut that sweet pooch's face from the panel and stitched it just along the top to a piece of PP. I like the effect of the shadows when the papers separate so I didn't want to glue it down completely. Added a tiny sentiment stamped in yellow and then adhered the panel (adhesive only along the top edge) to my cardbase. Again, cuz my top-fold base is cut from A4 but the marbled panel was letter size, I added a strip of washi along the bottom of the base. I like the little something it adds peeking out.


What to do with the positive pieces? As you know, I can't throw anything away. So this CAS card was born.

 Neat and Tangled Clearly Canine die
Neat and Tangled Clearly Canine stamp
Versamagic Wheat ink
thread


Easy peasy. I used the negative to get the placing of the pieces right (although you can experiment with eyes/ears further apart/closer together for some fun looks). Just added a few strands of white thread as whiskers!

Check out the Neat and Tangled Blog to see all of the wonderful inspiration and take part in the daily giveaways! All products showcased this week will be available on Friday, June 8 at 8am EST in the shop.

Thank you for visiting today and thanks to Neat and Tangled for having me!

I'm taking these over to the Anything Goes Simon Says Stamp Wednesday challenge, Cards in Envy Let's Hear it for the Boys, Die Cut Divas - Animals and Clean and Simple at Addicted to Stamps and More.
.

Friday, June 1, 2018

happy 5th birthday STAMPlorations!


Summer birthdays are such fun, aren't they? Five years ago Shery R. started a little company called STAMPlorations. It's grown incredibly since then and this month we are celebrating big time. Check out that graphic above, or the STAMPlorations blog, to see how you can celebrate with us and maybe win yourself some awesome prizes!

In honor of the birthday, Shery has released some birthday stamps (think revamped wonky cake) and some beautiful phrase dies (wait til you see the font!) Here are the two I used.


Because our challenge this month (there is only one) is for you to CASE the STAMPgirls, I thought I'd CASE some cards with the new products for my post today. Here we go. It's a long one.

Remember this card of mine with the wonky cake? Today I used the leftover die cut from DD's birthday card and gave it a drop shadow with rose gold foil CS. For my cardbase I smooshed some Picked Raspberry, Dried Marigold and Cracked Pistachio (thought they matched the colors on the die cut best) on my mat, spritzed with water and "inked" up my stamp with the various colors before stamping the random BG. Did my best to keep the colors separate to prevent muddiness.


See that rose gold peeking out? Yum.


I think it's cool how the phrases are in the stamp sets too, in that cool font and with a retro feel. I decided to pair the two on this card, which is somewhat a case of this card by Emily L. Heat embossed the sentiment three times down the left edge of a PP panel. Applied Tea Dye through a brick wall stencil (thanks, Loll!). Stitched the panel to my card and added the die cut from PP and white craft foam.

patterned paper
clear embossing powder
stencil
distress ink


Might need your sunglasses for this next one. I'm actually going to use it as a graduation card for a young man. Know who I CASEd on this one - sun rays, yellow, black and white? My teamie Monica T. Wasn't going to use sequins, but there was an ink smudge mishap... Can you tell which of the three was necessary to cover the smudge? (If not, good ;)

Mustard Seed distress ink
white embossing powder
circle die
stencil
sequins

Even added a touch of B/W in the form of washi along the bottom (on the inside however) cuz I loved that element of Monica's design so much.


I love this next one. It was such fun to create. Getting a comic book vibe? The first person to leave a comment with the answer to who/what I was CASEing on this one will get this card! As is, to use...

distress inks
black Sharpie 

Thought the bold nature of the design could use a sentiment in glossy white CS - better known as recycled sticker packaging ;) Also popped this one up on a die-cut layer of yellow craft foam.


This last card  came about cuz I wanted to try stacking these phrase die cuts. I chose blue for a masculine card. Then I remembered this card. Took the "happy" stamp and stamped it from dark to light red to support the "birthday wishes".  Added splatters and Nuvo dots. Then a strip of B/W. One of those "don't know when to stop" creations, you know the kind! And now I cannot get a photo of it without it looking all blurry. It's not that bad IRL...

Altenew inks
patterned paper
Nuvo drops

Well if you stuck it out to the end, thank you!!!  There is a lot more inspiration over at STAMPlorations today and there will be all throughout the month as the DT members present their fave STAMP projects. I'd love to see you CASE a card of mine. I'll keep an eye on the gallery! Have a great day.
Related Posts Plugin for WordPress, Blogger...