Showing posts with label Moxie Fab. Show all posts

Thursday, May 8, 2014

CASAF... (STAMPlorations, ATCAS, Moxie Fab)

... as in "clean-and-simple-artsy-fartsy".  Cuz that's how I described my style back in my Moxie Fabber of the Week interview, all the while thinking that the two really don't go together.  Hmm.

Well hear ye, hear ye - Make a CAS card and make it grungy.  Huh?

Kylie heads off to Europe and leaves us with a challenge like that! Proves that there is room in the world for CASAF!


Well the first thing that came to mind was my STAMPlorations Holiday Artsy stamp set. And as I was admiring the cards in the gallery I stumbled upon this card from Loli.  And in her post, talking about "creatividad", she included this photo.

Image Source


Me gusto muchisimo! It'd make me so dang happy to think that my brain looked a little like this. Had to share it with you!

So I took my stamps, lotsa Distress Paint, the current sketch at STAMPlorations and this is what happened.  And before you ask, one line in the copy under "right brain" in the ad reads "I am the sound of roaring laughter" which instantly brought Katy Perry to mind. Thus my sentiment... figure I can add "it's your birthday" on the inside later.


Took a scrap of watercolor paper (note I left it the shape it was - left brain) and heat embossed my hand-lettered sentiment before smooshing the panel into some spritzed yellow Distress Paint. TIP: Use an embossing pen to hand-letter a sentiment.


When dry, hit it with some purple, pink, orange and green paint then spritz and watch the magic (right brain) happen. TIP: You can stop the magic anytime you want (left brain) with a dab of paper towel.


Repeat for another layer. Remember, I was going for the feel of the "right brain" in the ad.


When dry, I pulled out the stamps, splotched some paint onto my craft sheet and stamped with it. Used the block shape and a brush stroke stamp.


Then some yellow "coffee stains" and after I dried them I repeat stamped the wavy brush stroke at the left, hit it with water only there and let the paint flow.  A la the ad. (very right brain - you OCDers are freakin' out about now)


Waste not, want not, ya know? TIP: Mop up the leftovers with scrap CS or tracing paper.  I also re-heat-embossed the sentiment cuz Distress Paints don't really work with the emboss resist technique even if you wipe the embossing up after every layer.  TIP: Do your embossing after the panel is finished ;) Then came the three graphic strips (left brain)  and voila!


Hooking up at the Moxie Fab Handwriting challenge too. Thanks for sticking around for my oration on CASAF!  Have a good one.


Supplies for ROAR:
Paper:  CS Bringmann, watercolor paper
Stamps: STAMPlorations, chaos Alexandra Renke
Ink :  Versafine
Tools: embossing pen
Other: Distress paint, black embossing powder


Sunday, April 27, 2014

handwriting (CFC, Moxie Fab)

Quick but effective, agree? I used a Stampendous "congratulations" stamp and one of the MOM Subway Art stamps from STAMPlorations atop a hand-drawn belly bump silhouette for this card.


I'm hooking up to:
Moxie Fab World - Hip on Handwriting
CASual Fridays #131 - Three Thirds

Thanks for looking.

Sunday, April 6, 2014

more stencils and paint (Moxie Fab)

Did you see this card I created with lots of paints and stencils? I blogged about it yesterday.


Now if you know me, you know I don't like to let anything go to waste.  I had quite a few paint-covered stencils during the creation of that card and what is a paint-covered stencil anway?  It's a giant stamp.

See the black letters, the yellow bricks and the red flowers.  Imagine all that residual value!

And meet yesterdays somewhat meeker cousin...


Just flipped the painted up stencils over onto another piece of card, put a piece of scrap paper on top of it and rubbed the residual paint onto the card.  Black, yellow, then red.

And then of course, there was the paint leftover on the palette.  Couldn't let that go to waste, so I practiced some hand-lettering of simple words.  Definitely not the stuff of stamp designers, but hey, it's real! (said in an Uncle Si tone...)


I cut out the "hi", adhered it to black CS and fussy cut it again.  Some wispy thread and two cut-from-vellum-and-stamped-with-Delicata Kesi flower custers later the cousin was dressed and ready to go!


See that wonderful touch of sparkly gold? Yum. That's the Triangles stamp from Kaisercraft, BTW. Great for a tiny, subtle print.

This cousin is joining the other one at the Stencils challenge over at Moxie Fab World. Cuz stencils are definitely moxie fabulous.

Have a good one.


Supplies for hi:
Paper:  CS Bringmann
Stamps: Kaisercraft
Ink : acrylic paints
Tools: flowers (Kesi Art)
Other: alpha stencil (Dyan Reavley), bloom stencil (TCW), bricks stencil (Dutch Doobadoo),paintbrush,  thread

Saturday, April 5, 2014

stencils and paint (Moxie Fab, SSS, Virginias View)

Playing with stencils and paint I was. After doing the mountains of laundry that accumulated here while I was having a good ole time in Michigan!

Wanna have a looksee?

Used my DIY gelli plate (a plastic bag on a pile of newspapers) applied green paint to gelli plate and "printed" onto white cardstock.


When it was dry I applied turquoise and light blue paint through a raindrops stencil from The Crafters Workshop. Um, you may notice I actually used the "second print" of the green page, not the page pictured above.


Then I used black paint with an alpha stencil from Dyan Reavley.


I die cut a bloom and hand cut a stem to use as masks.  Adhered the masks temporarily and applied cream paint to the entire piece. This is how it looked when the masks came off.


Went with yellow paint and bricks (from Dutch Doobadoo) on left side; red paint and blooms (The Crafters Workshop) on right side of piece. Get the picture?


Took masks off. Stamped leaf with black paint. Trimmed panel to size and adhered to card. Made a dymo label sentiment and popped it up on dimensional adhesive and over some wispy threads. Figured after all the "heavy" stuff a little bit of "wispy" was in order ;) So here she is in all her glory...


And let me tell you right now, I was totally inspired by Jessica Sporn. Wanna have some fun and get wild? Check out her blog. And stop by tomorrow to meet this card's somewhat quieter cousin ;)

This is going to the gallery at Moxie Fab World where it's all about Stencils right now.  Check out the amazing gallery and add something of your own.  And I'm also joining the Birthday fun at Simon Says Stamp - 5 years. Not bad, eh? Have a great weekend! And ETA:  Virginia's View Challenge #2 is Stencils too.  Gotta go there!


Supplies for happy birthday:
Paper:  CS Bringmann
Stamps: Claudine Hellmuth
Ink : acrylic paints
Tools: bloom (Spellbinders)
Other: stencils, label maker, brayer, paint brush, thread


Thursday, January 30, 2014

my moon and stars (Moxie Fab, ATCAS)

Stars are trendy, have you noticed? (Duh. Cristina K. called that one months ago.) Structure paste too, have you tried it yet?  I'm (finally) using some I got at Aldi several years ago when I thought I was going to venture into acrylic painting.  Thought.

Well I'm gleaning inspiration from the cardmakers who are taking the Online Cards Stenciled class and providing tons of great ideas.  Here's my version.


Not seeing the stencil?  Well, I made my own.  Just die cut one larger and two smaller stars from a piece of cereal box and moved the die-cut negative around to add the structure paste to random spots.  TIP:  Be careful where you lay the "stencil" down so that you don't smear wet paste ;)

Also made the moon stencil by die cutting a larger circle and die cutting a portion of a smaller circle from it.  Added that portion back into the larger circle negative to get my stencil for the crescent shape.  Capice?  Hard to tell but those are gold polka dot washi strips peeking out from behind the image.  So hard to get a decent photo when the sun won't come out.  I like this Studio Calico rub-on -  a bit different from the "to the moon and back" that's out there these days.

Playing here:
Moxie Fab World (yay for Teri) - Trendy Star Power
Addicted to CAS - #30 New (I used new gold polka dot washi and rub-ons)

Thanks for looking!


Supplies for you are my moon and stars:
Paper:  lilac CS Bringmann, recycled cereal box
Stamps: none
Ink : blue and lilac Distress inks, Delicata gold (around moon)
Tools: circles MFT, star SSS
Other: pearl and gold structure pastes, washi tape

Saturday, November 9, 2013

Moxie Fab thanks! blog hop


If you were on a desert island (BTW - ain't that an oxymoron?) and could take only one blog with you - which would it be?  Well, it dawned on me after last week's Black Friday, that for me it would be Moxie Fab World.  And if ya take a gander at the number of paper crafters hopping today, it looks like it'd be one heckuva party on that island!

If you want to see the nearly 300 names on the blog hop list (thanks to Keren B, Taheerah A, and Virginia L for their hard work, BTW) head over to Moxie Fab World.  If you are hopping along, I hope you arrived from Lalo's blog

So why is this party so huge?  Well, for me, MFW is (was) kinda like Grand Central Station of Cardmakingland.  And the conductor extraordinaire, Ms. Cath Edvalson.  And there we were, all the little engines, "I think I can, I think I can."  And there she was telling us "you can do it", "here's how to do it", "here's someone who does it well" and then, if you were really lucky, "well done!"

I feel so lucky to have been "moulded" as a cardmaker by hanging out at the Moxie Fab World. And lucky to have met many who share my love of the craft.  I 'm already missing my daily dose of Ms. Cath's Moxie Fab World and I'll be forever grateful for the role it played in my cardmaking.

But mostly, I am looking forward to seeing whose world Ms. Cath is going to brighten next with her talents.

So Cath, the bottle is in the fridge.  The topper is yours.  All you have to do is show up to claim it. We'll share a couple Riesling spritzers out on the screened porch listening to Louis Armstrong's "What a Moxie Fab World" and discussing gallons, quarts and pints.  Hugs to ya, girlfriend.


Now, off to Laurie Schmidlin ya go...  Thanks for visiting.


Friday, October 25, 2013

pink leaves (Moxie Fab, ATCAS, PTI)


OK, how can you not be enthralled with this photo?  It's the current Tuesday Trigger at Moxie Fab.

Image Credit
Is that not a bowlful of Distress Ink messy fingers waiting to happen?  Maybe I should also interject this shot of the Sweet Gum Tree on our front lawn. From green to yellow, to pink, to red, to purple this guy's got it all.


See why I was inspired? So, the messiness happened.  Distress Inks.  Water flecks.  Some Tim Holtz stamped grunge speckles.  Gold splatters.  Then the Impression Obsession Leaves die came out to play.  And then this "sequin die waste" was laying there as I was choosing my leaves and it dawned on me.


I could include a negative die cut leaf on my line of strung leaves.  One partially dry-embossed card front later this is what was born.


Because I stamped a sneak peek of my inside sentiment through the hole, I'm linking up to Challenge #24 - Transparent at Addicted to CAS.

And although it's not a wreath, my card does include dimensional leaves, so I'm linking up at Papertrey's Make it Monday #137.  (Melissa's beauty isn't really a wreath either, is it? ;) I used the "fall" sentiment stamp from A Wreath for All Seasons stamp set for my sentiment.


Thanks for visiting, again, today.


Supplies happy fall birthday:
Paper: cardbase Bringmann, Neenah
Stamps: sentiment Hero Arts and Papertrey
Ink:  distress inks, Versafine 
Tools: leaf die Impression Obsession, embossing folder Craft Concepts
Other:  crochet thread


Monday, October 21, 2013

new trend? (Moxie Fab, ATCAS)

Sharing one of the species "reject" with ya here cuz I want to hook it up to the Stickers Challenge at Moxie Fab World.  2014 is going to bring a lot of milestone birthdays in my neck of the woods- the kind with a "5" in front - and I had this idea for a card for a girlfriend who starts things off.


Had a ping (as Bev would say) to use a hashtag.  Wanted to use the Pink Paislee Luxe glitter stickers. The sentiment was cake.  Got it down on a strip of vellum but then had to decide which PP to put it on.  I kid you not, I must have laid that strip down on 50 sheets of PP, taking a photo each time cuz my brain was getting too foggy to objectively decide on one.  The following morning I decided on this PP.  Thought the doodle-y, whimsical-ness was a quirky match for the sparkly, "50" mature nature of the card.  My friend is so not "50"... whatever that means...

So, this didn't make the cut in the last PC submission.  But I am seeing the hashtag all over the place lately.  For one brief moment I'm gonna think of myself as a trendsetter ;)

I'm also hooking up at Addicted to CAS #24 where the theme is Transparent.  As in vellum in my case.

Thanks for visiting.


Supplies #hello50:
Paper: cardbase Bringmann, PP K&Co., vellum
Stamps:
Ink:  
Tools: 
Other stickers Pink Paislee, enamel dots MME


Sunday, October 20, 2013

cheery smile (Moxie Fab, KIS)

Two reasons to be cheery.  First, the (NBUS) stickers I used for this were from an American Crafts collection packet I was lucky to win over at Paper Crafts Connection last spring.  Thanks PC! Second, using a package of stickers to create a card is something new and different for me and pretty darn easy!  Cool.

Now, the stickers are just dandy.  My brilliant idea to use the Studio Calico V-Pattern Mask and stamp through it... maybe not so dandy.  Oh well.  There is a certain touch of whimsy to it.


Stamped the BG.  Stamped the grass.  Adhered the stickers.  Added the chevron PP strip behind the panel and two tiny strips of color under the chalkboard sentiment sticker.  Happy summer.  In the middle of autumn ;)

Joining the fun at:
Moxie Fab World - Handmade Cards - Stickers and Tape
KIS - #25 Be Inspired (the sticker package with the colors and flowery theme "drove" my card)

Thanks for visiting.  Have a good week (it's back-to-school-after-a-great-fall-break time here).


Supplies smile:
Paper: cardbase Bringmann, PP Simple Stories
Stamps:"grass" Neat and Tangled
Ink:  Versafine, Hero Arts
Tools: mask Studio Calico
Other stickers American Crafts, sentiment sticker Pebbles


Tuesday, October 1, 2013

hello gold (Moxie Fab)


OK, bear with me one more time.  Going for gold - over at Moxie Fab and the All that Glitters challenge. I've been playing with structure paste and oh what fun!  Just so happens I bought a four-pack a while back. Including gold. Nuff said.


Used a stencil intended for wall painting to add the structure paste.  Stamped some graphic PTI shapes in modern fall colors and Delicata gold.  Added a die cut in vellum.  Didn't like that alone so added a white one over it, slightly offset.  It's a keeper.

So's Ellie. She's still a coward when out for a walk, but she's sure cute :))) Most of us would kill for her eyelashes. Check 'em out.


Have a good one.


Supplies hello:
Paper: cardbase TPC, vellum
Stamps:  PTI
Ink:  chalk ink, gold Delicata
Tools: stencil, die PTI
Other:

Sunday, September 29, 2013

buzz, buzz...it's an alien (Moxie Fab)

Have you ever thought of googly eyes as flying saucers?  No, eh?  Well I did.


What do you think of my cute alien?  PC-generated image and sentiment on this one.  Since I don't know how to combine images in one "file" I just printed the sentiment and then printed and fussy cut the little guy and adhered him to the panel. Some circle punching and bokeh stamping (green cuz it's an alien, 'member?). And some googly eyes.

Which if you look at them from the side...


... flying saucers!

Hooking up to the General Craft Supplies challenge at Moxie Fab.

Appreciate your visit.  Have a good one.


Supplies i only have eyes:
Paper: cardbase Bringmann and Neenah
Stamps:  image from monstercoloringpages.org
Ink: green Hero Arts
Tools: circle punch
Other: googly eyes, foam adhesive, Glossy Accents

Saturday, September 28, 2013

bunches of love (Moxie Fab, TAWS)

What do you get when you take packaging from camembert (ya know, really thin balsa wood), some Distress Ink and a die?  Well bunches of love, of course...


After applying DI to the strips of wood (I disassembled the top and bottom of the container and used the strips.  Saved the circles for another day.) I used my Heart Delight die from Memory Box and made lots of hearts.  Some twine and a tag and a sentiment and voila.

Joining the challenges at:

Moxie Fab World - Handmade Cards - Metal, Wood and Cork
TAWS - #38 Mix it Up


Appreciate your visit.


Supplies bunches of love:
Paper: cardbase Bringmann
Stamps:  sentiment TAWS
Ink: Distress, Aladine
Tools: hearts die Memory Box, tag die Sizzix
Other: recycled camembert packaging and twine

Friday, September 27, 2013

smell autumn in the air (CFC, Moxie Fab, Simply Create Too)

We have been having a week of lovely fall weather here in Germany. Sure hope it continues a while. Nothing I like more than putting on a jacket and heading outside in the sun. (I'm getting too old for the hot days of summer.)   Anyhoo, I've a card for you that nods to this wonderful season.


Notice those colors on the leaves.  How do you think I made them?  Distress inks?  Nope.


Tea bags. If you rip them open and spread them onto damp cardstock, let them dry naturally, and then scrape the clumps off you get this cool result.  The purple-ish tones are from a fruit tea.  Cool, eh?  Even have a slight scent of fruit tea to your card when you're done. Here's a tute - in German but with photos.

Added some dry embossing (reminds me of a cable-knit sweater).  And see the fiber?  The egg noodles I buy have that as a closure ;)

I'm joining the fun at:
CASual Fridays - #115 Fall Colors and a Leaf
Moxie Fab World - Handmade Cards - Color Media (tea)
Simply Create Too - #47 Fall/Autumn

Have a great weekend.


Supplies happy anniversary:
Paper: cardbase Bringmann
Stamps:  sentiment Technique Tuesday
Ink: Amuse
Tools: dies Spellbinders, embossing folder Cuttlebug
Other: tea bag, recycled twine

Wednesday, September 25, 2013

pti september bloghop (PTI, Moxie Fab)


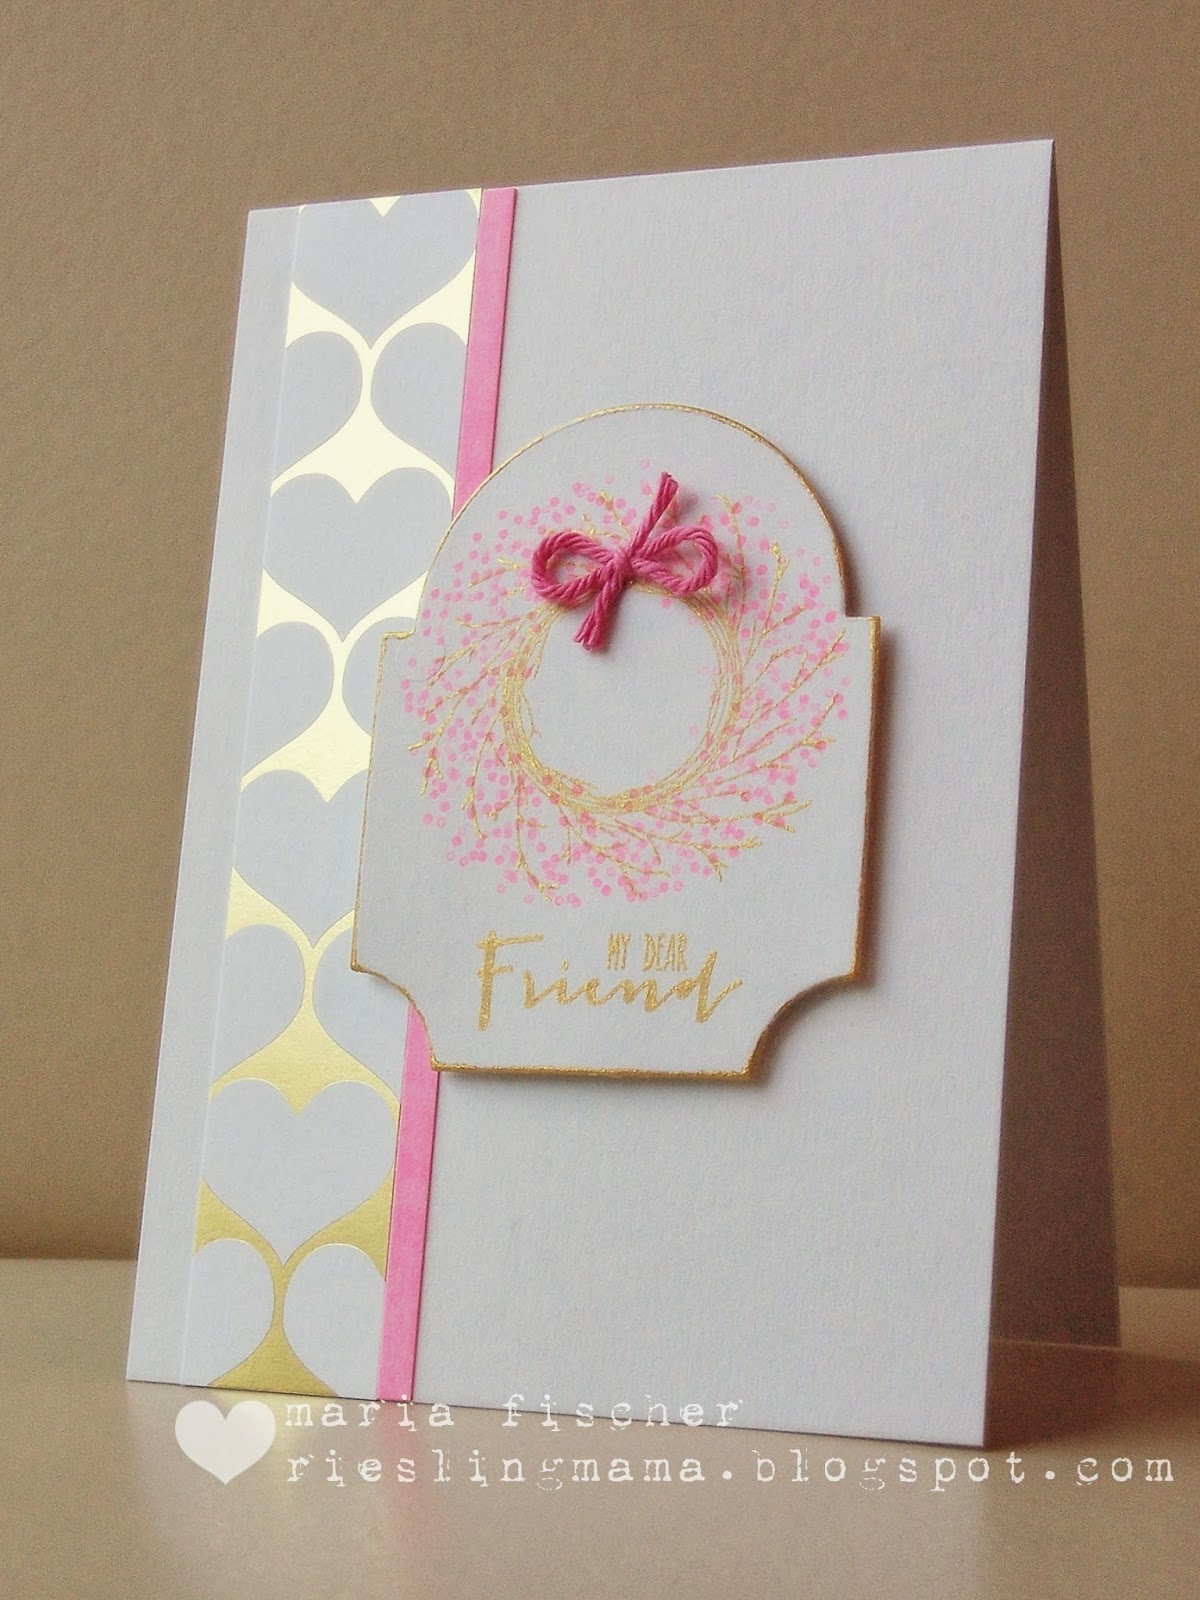
It's time for another PTI blog hop. Well I'm "sharing openly" and will certainly "leave inspired" but as for "being creative" I took a couple short cuts.

First off, the wreath. I've used it before for a hop. But I love it. This stamp set was one of the first reasons I ever googled to see what the heck Papertrey was. (Can you believe that?) And the theme of this blog hop is  wreaths...

And the gold ink... well I'm hooked on it lately and it was just laying there on my messy workspace. Decided to pair it with neon pink this time around.  And add a slice of that yummy Pink Paislee metallic paper I fell in love with at Danielle F.'s blog last holiday season. And ink the edges of my die cut mat with gold ink a la Maile B.  See what I mean about cheating in the creativity department?!?! 


I inked a strip of white CS to add next to the gold metallic paper to add more of the pink. (I think that's a Jennifer McG. stroke of genius, BTW). As for the crochet thread bow... that was my idea and maybe not such a good one. Oh well. What would you have added instead of the bow?  I'd love to know.

Here's another shot of that Delicata gold pigment ink yumminess.


I'm hooking up to the Moxie Fab World "All that Glitters is Gold" Challenge too. Thanks for visiting. Hop along now.


Supplies my dear friend:
Paper: cardbase Bringmann, PP Pink Paislee
Stamps:  PTI Wreath for all Seasons and Irresistibly Ikat
Ink: pink Aladine, gold Delicata
Tools: die PTI
Other: crochet thread, foam adhesive

Monday, September 23, 2013

delicata glitters (Moxie Fab)


See that Delicata gold loveliness?


OK, someone stop me.  I'm overwearing my welcome over at the All that Glitters is Gold Challenge at Moxie Fab.  I can't help myself.  (And, no don't stop me cuz I ain't done yet!)

This may bring back memories of the beautiful ombre trigger a couple weeks back.  And it should. By the time I was ready to create, the trigger was long over.  But it works with gold.  Even better IMHO.


Was going to pop up the larger portion but then opted to pop only the smaller outer strip.  Kinda cool.  Catches the images so they don't fall off the side ;)

Thanks for coming by.  Appreciate it.


Supplies for birthday wishes
Paper: CS  Bringmann, white Neenah
Stamps:  PTI
Ink : Inkadinkado pigment and Delicata gold
Tools: 
Other: foam adhesive


Sunday, September 22, 2013

in transition (Moxie Fab, SSS)

Warning:  Lousy photo coming at you and no, I'm not getting into the trend of "staging" my photos.  It's 11 p.m. here and I finally made the card I'd been thinking about for the Tuesday Trigger at Moxie Fab World.

Image Credit
May I say I love this image.  And it's from a German gallery!  Of course my stamping mind first went to the idea of layering striped stamps.  But take another look at that image - how the heck would you achieve that look?  Methinks it would require lots of creative inking and maybe even paints and combs for some texture. No time for 'xperiments.

So... Ardyth P.'s cool card for Bev's birthday was somewhere in my cranial crannies.  Then the title of the challenge hit me.  "In Transition."  Hmmm, die cuts and transition.  How about the transition from teenager to adult?  It's happening in our family next year.  So...


Some Roy G. Biv (great way to use up scraps).  Some Parker die cut numbers from Memory Box. And cuz you can get that great die and the Simon Says stamp I used around the edges (from Absolutely Delightful) at Simon Says Stamp I'm hooking up to the current challenge.  Some piggy-backed gold on black sequins to anchor the corners (cuz the stamping looked suboptimal where the patterns met ;) and voila!

Good night.  It is here anyway.  Thanks for looking.  Hope your week is a good one.


Supplies for new day
Paper: CS  Bringmann, scraps
Stamps:  border SSS, sentiment Hero Arts
Ink : Memento
Tools: die Memory Box
Other: gold and black sequins

Saturday, September 21, 2013

daddy's little girl (Moxie Fab, CASOS, SSS, KIS)

Gold embossing and one specific stamp.  Having those two things in mind I whipped up this card. Well, it was "whipped up" after I spent 20 minutes deciding which PPs to use...  That's what ya get for having too much of the stuff.


Very simple, very sweet with all the emphasis on that sentiment.  Which is heat embossed in gold. As the card was laying on the dining room table waiting to be photographed, it dawned on me that it would make a great cover for a brag book for a Daddy.  Can't you picture him having one at his desk with some photos of his little girl? Can't you picture the ladies in the office going gaga over it? Hmmm, do we want the ladies at the office going gaga over the fathers of our little girls?!?!?

I'm playing at four challenges with this card:
Simon Says Stamp - Use SSS product (the Inkadinkado stamp set)
CAS on Sunday - Oh, Baby
ETA: Keep it Simple - #23 Flowers
Moxie Fab World - All that Glitters is Gold

I will forever be a fan of gold embossing powder, even if it's not trending.  I think it's that magical moment when the stuff does its thing and turns from powder into something most non-cardmakers never dreamed you could make at home ;)

As for Miss Ellie (yep, that's her name)... 12 weeks and definitely EVERYBODY'S little girl in our family.


Thanks for visiting today.


Supplies for daddy's little girl:
Paper: CS  Bringmann, PP October Afternoon
Stamps:  Inkadinkado
Ink : Versamark
Tools: scallop die Amuse
Other: gold embossing powder, crochet thread