Showing posts with label markers. Show all posts

Friday, October 20, 2023

STAMPlorations art marks and markers

While I was having fun using up those gelli prints , I also had this cute little Mini Art Marks stamp set out. That little rainbow caught my eye and I had some fun with it, water based markers and a spray bottle.

Time consuming, but worth it I think. Have a good day.

Thursday, February 11, 2021

spotlight on taking cas design up a notch

I'm over on the STAMPlorations blog with a tutorial for taking your CAS design up a notch. Check it out here. 


Wednesday, August 14, 2019

STAMPlorations special release - dee's artsy impressions

Today there are a couple new stamp sets being released over at STAMPlorations. They're from our own Deepti Malik and here's the Beautiful You set I got to play with today.


I test drove some new kids' markers I just picked up at Aldi to color those lovely silhouette stamps and made this one-layer card.

waterbased markers

You probably know the technique. Ink up the stamp by coloring its various parts with different colored markers, spritz with water and then stamp. Such a fun technique.


Then I used a similar design idea, but kept all the silhouettes black and added a spot of color with the die cut bird. I just love how that tiny "Hello" nestles in with the wildflowers.

 STAMPlorations Beautiful You stamp
STAMPlorations Perched Bird die
patterned paper

Dee has a second new set out today (both new sets are 10% off til August 24). Visit the STAMPlorations blog to see more inspiration. By commenting here and there before August 22, you could possibly win yourself a prize! Thanks for coming by.

I'll have more makes with these tomorrow.

I'm hooking up at:
AAA Card Challenge - Made in Minutes (stamps onto MISTI, run markers over them, spritz, stamp, voila!)
The Paper Players - B/W + one

Monday, July 17, 2017

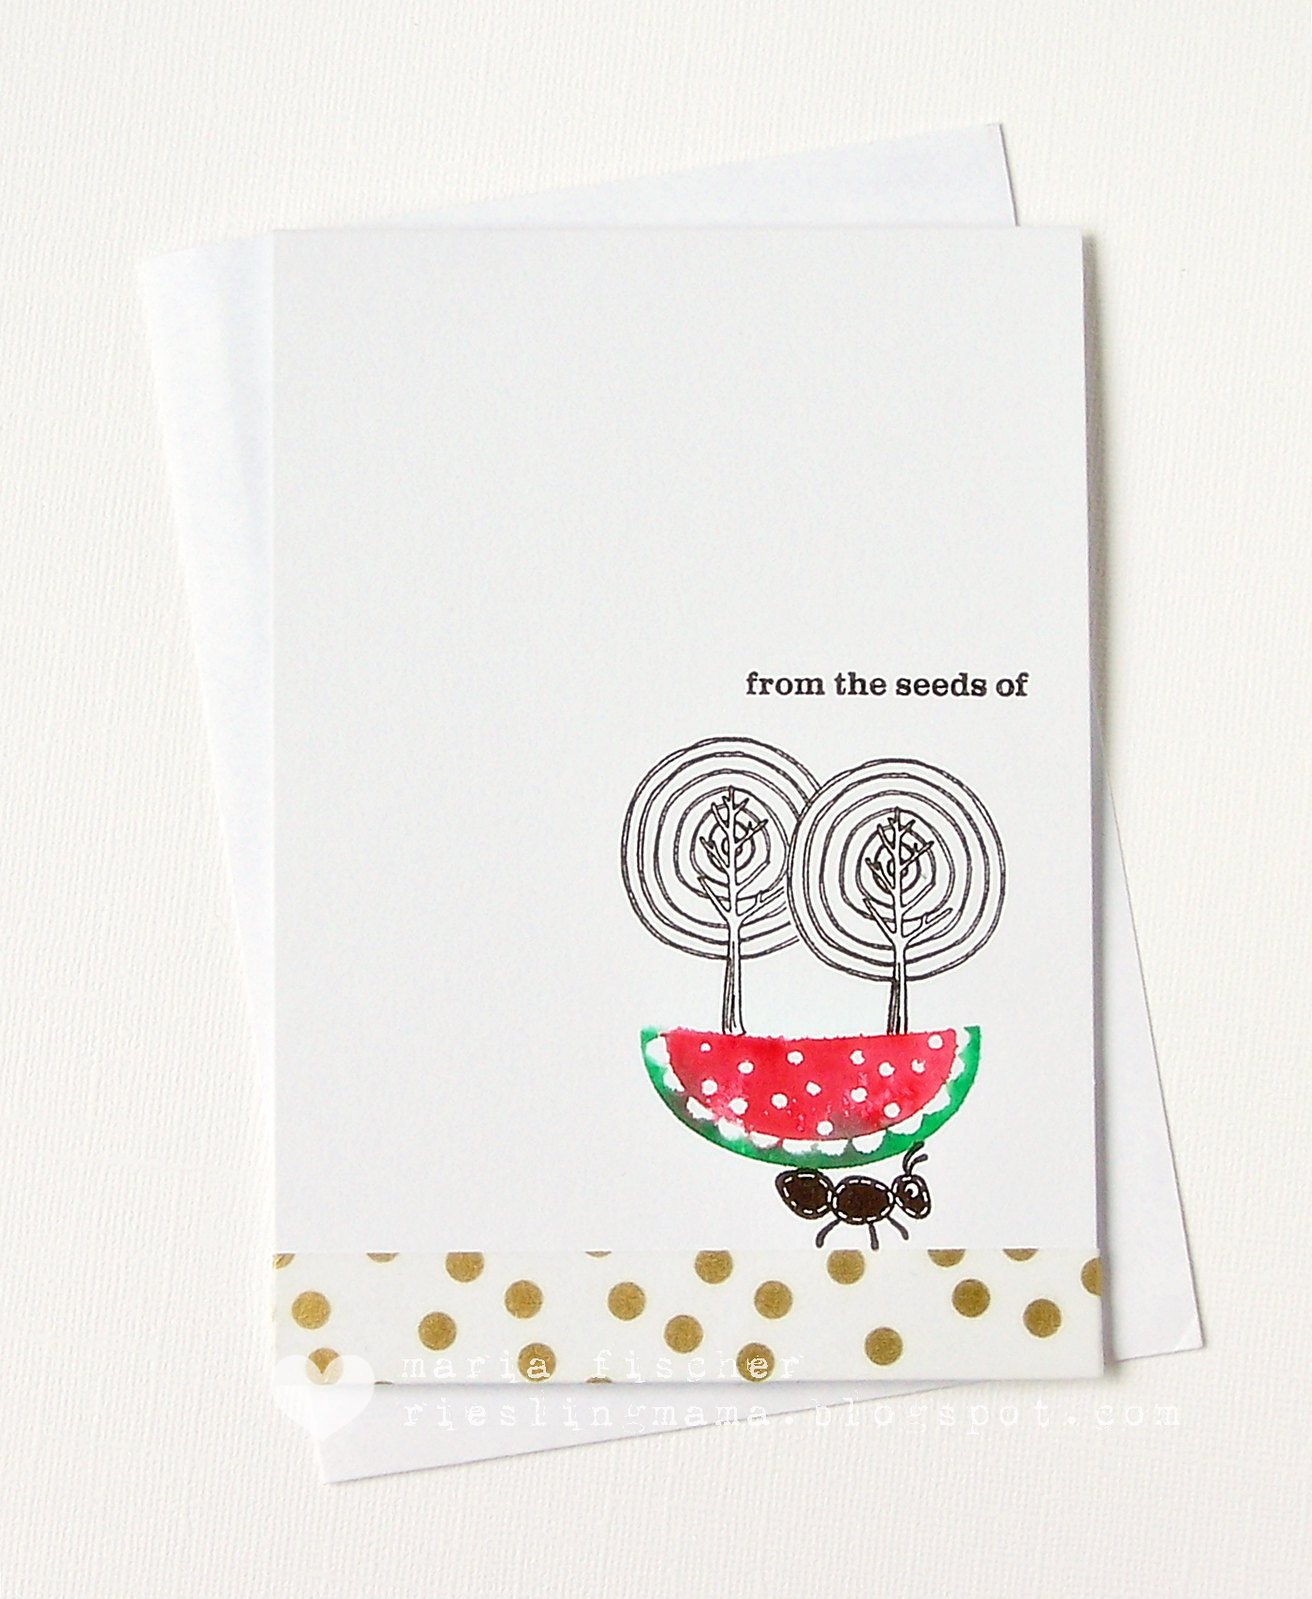
watermelon for winnie and walter

Oops. Nearly forgot to post this card I made for a couple challenges and of course one is closing soon, so here I am again. Know which color challenge inspired me?

100_1725

I discovered an old Basic Grey stamp set with a watermelon slice (definitely the summer trend this year!) and that reminded me of the Color Throwdown.


There's also this ant in the set and I decided he was going to be carrying the slice through the woods. What? Yeah, I don't know either...

Colored the slice with markers, spritzed and stamped. Stamped the ant. Masked the slice and stamped two trees from Winnie and Walter Kindness. Cuz it's the stamp set over at the Rerun Challenge this month. And since Taheerah A. is all about fruit at The Gossip Column, I'm going there too!

The inside sentiment (notice the reference to "seeds") reads "kindness happiness grows". Sweet, eh?

That's all from me today ;)

Thursday, June 8, 2017

sweet and cool summery card

There's a cool, summery stamp set from Concord and 9th that finally came to live at my house and wouldn't you know it, this inspiration photo shows up in my feed.


Know which stamp set I'm talking about? The one everyone has had for a year already ...


That popsicle image gets me every time. And there are some super sweet (and fabulously font-y) sentiments too. I had a play at coloring the solid image stamp with markers, my kids' old sets, spritzing with water and stamping. Multiple times to get some depth.


Didn't use three elements from the inspiration so I'm not in the running to win, but I'm hooking up at Daring Cardmakers anyway. That inspiration is so light and lovely, don't you agree? And I'm joining the lovely ladies at CAS Watercolor and Happy Little Stampers CAS this month too.


Wednesday, August 31, 2016

color blooms blog hop


Ready for loads of fun - as in, take you back to your childhood days kinda fun? As in, get out your box of 64 Crayola crayons and pull out that "Magenta" kinda fun!

Today the STAMPlorations girls are hopping to show you what we've been doing with Color Blooms, the coloring book loaded with Shery's floral designs which you can order here.

You should be sure to leave lots of comments to have a chance at a prize, including Color Blooms. And, you should color. There's a linky party where you can hook up a project you make using the free Color Blooms sampler which you can find here.

Today I've got two cards made with Color Blooms. Big and bold. With my kids' hand-me-down Rose Art markers! Nothing fancy happening here folks. Just lots of relaxing fun. This shot shows Copics too, but it ended up just being me, my waterbased markers, a couple black Sharpies and Color Blooms and a few hours out on the screened porch.


One page yielded four cards! I've posted two cards I made with Color Blooms WITHOUT coloring. Used those two lower sections of the page. You can check them out here.

Here's my first colored specimen.


Grabbed a handful of pinks, purples and blues and colored away, only leaving the outer petals of each bloom white for better contrast. Die cut the section with Crazy Stitched Rectangles. Glued it onto some scrap white CS and die cut Smile from it and from craft foam. Adhered the panel to my cardbase. Popped in the raised "smile" and added a heat embossed sentiment from Sentiment Builders: Christmas. Adhered a scrap strip of blue paper beneath it. Can you find Waldo? ;)


Remember how I glued the colored panel to cardstock to give it more strength before die cutting? On this card I took advantage of the thinner paper and did some layering with it.


Again here I chose a handful of my favorite colors from the last card and added some bright yellows too. When coloring with waterbased markers if you apply too much color the paper will begin to pill, so I only added a second layer of the same color color around the center of the blooms for a bit of depth.

TIP: I used the matching bloom stamp from Floral Bliss to stamp around the edges of my cardbase before adding the black and Color Blooms layers (die cut with Crazy Stitched Rectangles.) Added a metallic Hugs die cut popped up on craft foam and voila! Love the slightly curled edges of the lighter layers!


Thanks for coming by. Hope you're enjoying the hop and I look forward to seeing your colored creations in the linky party over at STAMPlorations. You have through September 6th to link up.

I'm hooking up over at Simon Says Stamp's Wednesday challenge where it's Anything Goes this week.

Wednesday, November 19, 2014

day 3 of STAMPlorations november release hop


Welcome to Day 3 of the November Stamp Release Blog Hop here at STAMPlorations! For complete info on our hop, including how you can win stamps, click here.

Today, we're putting the spotlight on TYPOGRAFIA. We'll be picking one commenter to win this set so leave a comment here and on the rest of the STAMPlorations girls' posts for a chance to win the set.

stmp1081.jpeg

Here's my project...


I "focused" on the word "light" and decided to ink up the stamp using markers so that I could give each word/letter individual treatment. And I used a brush stroke from Holiday Artsy to create some rays of light in Adirondack Sunshine and Hero Arts Butter Bar behind my sentiment panel. I inked the edges of the panel and mounted it on black CS before adhering to the card.

Happy hopping. Hope you like what you see.

*** The stops in the hop*** 
Debra | Deepti | Kylie | Maria | Monika | Nonni | Shery | Shirley |Vicki

Tuesday, November 18, 2014

day 2 of STAMPlorations november release hop


Welcome to Day 2 of the November Stamp Release Blog Hop here at STAMPlorations! For complete info on our hop, including how you can win stamps, click here.

Today, we're putting the spotlight on VIGNETTE: Eat Drink Be Merry. If you visited my blog last week, did you guess our special guest designer correctly after seeing the coffee images?!?!? Yep, it's the oh-so-sweet and amazingly talented Amy Tsuruta! We'll be picking one commenter to win this set so leave a comment here and on the rest of the STAMPlorations girls' posts for a chance to win the set.

stmp1079.jpeg

I couldn't resist those martini glasses. Here's what I did.


Looks like a party to me!  Made some guiding pencil marks (which you can see did not ensure perfect placement :( ) And I used markers to ink each glass (since the image is two glasses) with a color. Spritzed once with water, then stamped. Stamped the sentiment and then dry embossed the panel with  Sizzix Christmas Dots. Added Wink of Stella to the glasses and the "bubbles" in the center.

Enjoy the rest of the hop.

*** The stops in the hop*** 
Debra | Deepti | Kylie | Maria | Monika | Nonni | Shery | Shirley |Vicki
Special Guest Designer: Amy Tsuruta

Friday, October 17, 2014

beauty markers (Craft Stamper, ATSAM, SSS)

I love this technique. Apply various colors of waterbased markers to a stamp (TIP: works best on a rubber one), spritz with water and stamp. Then spritz and stamp again. Two images for the price of one. And usually the second is purtier.

I have to say that this time, cuz I sent out the first one without taking a photo of it for you to see and decide for yourself. Duh.

Here's the second print.


A bit hard to imagine the blooms and berries in the negative spaces, eh? Wanted to share the stamp set with you, but I can't find it on the web, so... I think it was Hero Arts.

I'm joining the fun at:

Take It, Make It - October Multicolored Stamping
Addicted to Stamps and More - #117 Make your Mark
Simon Says Stamp Monday Challenge - Letter "O" for ombre

Fall break has arrived in these here parts. Yippie. Happy weekend everyone.


Supplies:
Paper:  cardbase The Paper Studio
Stamps: Hero Arts, sentiment PTI
Ink : markers, Hero Arts
Tools: 
Other: water


Thursday, September 11, 2014

cupcakes and markers and glitter oh my it's nonni's birthday (STAMPlorations)


Cupcakes and birthdays. They go together, right? Well my teamie, the oh-so-talented Nonni, of Korttikarkuri had a birthday and this is the cupcake I made for her. Nonni, hope you had a wonderful day. There is a linky party over at teamie, Sandie's blog if you'd like to share a card for Nonni, too.

And since I missed the post where my teamies shared photos of their pets for Nonni who has a new fur baby herself, here's a recent shot of Miss Ellie needing a grooming.


And it just so happens that this month over at STAMPlorations it's all about "Stamps and Markers" and what a fun combination that can be. Talk about getting extra mileage from your stamps. Color 'em up with markers and stamp. Or color then spritz with water and stamp like I did here. And your color choices are only as limited as your collection of water-based markers ;)


For this card I decided to showcase the unique advantage to coloring stamps with markers. Can you guess what I'm talking about? Notice the chevron border. See how it looks 3D? If I had inked it up with one ink pad I wouldn't get that effect. But I colored the sides of the chevron pattern with two different colored markers and voila! 3D. I used the same two-tone coloring on the arrows at the top and the sentiment too.  I even colored my toothpick purple to hold the sentiment. It's much easier to color small areas with a marker tip than to selectively ink them!

I also used marker scribbles on my craft mat misted with water to watercolor the cupcake and then picked up the excess to make the splatters. Added some clear glitter embossing powder to the watercolored frosting while it was still wet and heated it from beneath. It sticks enough to the wet area to work. And in a nod to another teamie, Shirley B., I gave her credit card swipe technique a try. Um, I obviously need more practice ;)

Thanks for looking. I'm between vacay and our big "161" party at the moment, so things are kinda quiet around here. CU with the regular programming again soon :)


Supplies for hb2u:
Paper:  CS Bringmann
Stamps: STAMPlorations
Ink : Memento and markers
Tools: waterbrush, die Spellbinders
Other: embossing powder, toothpick


Friday, September 5, 2014

STAMPlorations september challenge "stamps and markers"


Can't believe it's already September. It's time for another monthly challenge at STAMPlorations. And the theme this month is a fun one. Stamps and markers.


I'm sure coloring in of images comes to mind, but since that is definitely not my forte, I've colored an entire BG stamp with five or six colors of blue markers, spritzed it with water and stamped. TIP: If you use a stamp that is symmetrical, you can use that as a guide for applying the colors.


Then I applied some pearly white embossing paste through a stencil for a bit more interest, before adding my sentiment. I stamped the small complementary sentiments from SENTIMENT BUILDERS: Thank you in white on black CS and the main sentiment I inked up with marker and stamped onto white CS. Did some fussy cutting of the sentiments. Added some wispy silver metallic thread and a blue oval and corner before adhering my sentiments.

Quite the mixed media thing going on here too, eh? Speaking of which, have you checked out our sister challenge - The Mixed Media Card Challenge? The theme over there this month is "autumn colors". So maybe you want to pull out your markers and stamps and create a twofer!

And don't forget that if you enter all three STAMPlorations challenges in September, you will be in the running for a great random prize (in addition to the individual challenge prizes).


Supplies for thanks:
Paper: Bringmann
Stamps: BG Hero Arts, sentiment STAMPlorations
Ink : diverse markers, white pigment Hero Arts
Tools: stencil, die Spellbinders
Other: white embossing paste, thread


Tuesday, June 4, 2013

sympathetic reject (ABNH, SSS)

Made by a local cardmaker.  Moi.  Intended for submission.  Rejected by a local editor.  Moi.  But that means a new blog post.  Check it out.

I was aiming for masculine and sympathy.  Wanted to use markers in blues and greens for the BG. Colored the stamp, misted, stamped, misted again, stamped again.  Had two panels.  That's where things got difficult.

This was my original design idea.  Nestle sentiment in with butterfly.  Butterfly stamped in gray on vellum.  OK, but the stinker went and warped on me overnight.  Might have been the extra misting for the second generation stamping???  No amount of foam adhesive was going to win the battle. Hmmm.


This was the first stamping, darker colors, see?  But then I got the crazy idea to kiss the solid butterfly stamp and stamp it onto vellum.  Didn't really like the result, but then I saw the inked area on the envelope pattern BG stamp and wondered what that would look like.  So I stamped.  In a sub-optimal place.  (Let's hear it for the advantages of clear stamps over rubber ones!)  And then put the sentiment below.

I do like the butterfly effect with the dark colors, but should probably have angled it to the right and then nestled the sentiment in more to the left.  Yes, we live and we learn.

Happy day to ya'll.  We actually have sunshine - yippie!  - although the Rhine is flooding many an area. Keeping our fingers crossed.


I'm playing at:
Simon Says Stamp - Anything Goes
A Blog Named Hero - Masculine


Supplies with sympathy:
Paper: Bringmann, vellum
Stamps: shadow and envelope BG Hero Arts, butterfly and sentiment Skipping Stones Design
Ink: Versafine and markers
Tools: scissors
Other: 


Sunday, March 3, 2013

two-fer trigger (Moxie Fab, SSS)


Inspired by the colors and embroidery of the Tuesday Trigger at Moxie Fab I grabbed my medallion stamp.  It's kinda got the circles-but-square look like the pattern in the material.  But how to get the texture of the embroidery? Which even kinda shimmers?


 How about with more stamping, some heat embossing and even some metallic gelato dots?


Colored the image with markers, misted with water and stamped.  Then misted again and stamped again.


Then I saw my PTI Lovely Layers set still laying there from my monogram card and decided to add more interest and layers with some of the circle images from it (the green and the white embossed).  And then I had the brilliant idea to put some little blooms into those circles.  Ha  (insert nod in Darnell's direction - she's recently reorganized her clear stamps by category) .  You know you probably have many little blooms, they come as fillers with lots of stamp sets, but WHICH ONES?  Took me 10 minutes, but now I can tell you that Hero Arts All Occasion Messages has some great little fillers.  The stitched bloom in the green circles is from a Crafty Secrets sewing set.  The cluster of three teensy berries is PTI Harvest Berries and the teensiest flower ever - embossed on the purple flourishes -  is in the PTI Love Lives Here.  Whoddathunkit?

I've been inking just the outside edge of focal panels lately, barely noticeable but I think it adds a kick.  Just wanted to point out that I did it on the first card, using up the "gelato smush" I had created to stamp the dot clusters.  I just watered it down even more (it was on my plastic painter's palette) and let the edges of the watercolor paper soak some up!  Actually did it to the envelope edges too.  Less waste ya know ;)

Also playing at:
Simon Says Stamp - Anything Goes

Happy new week and thanks for looking.


Supplies :
Paper: Cardbase Craft UK, watercolor paper
Stamps: medallion Rubbernecker, PTI Lovely Layers, Harvest Berries and Love Lives Here, Crafty Secrets, sentiment Mia's Stempelküche and The Crafts Meow
Ink : Versafine 
Tools:  Mini Mister, heat tool, corner rounder EKS
Other: waterbased markers, purple metallic gelato Plot, white embossing powder, bling


Saturday, November 3, 2012

it's your CAS day (SCS)

Had a not-yet-used beauty from Heartfelt Creations rubber stamps.  Inked it up with markers, spritzed with water and stamped.  Spritzed and stamped again and this was the result.


Added the lovely PTI sentiment cuz HYCCT#1228 is a CAS challenge with focus on the sentiment.  I think this works.

Happy day.


Supplies It's your day:
Paper: CS Papertrey 
Stamps: Heartfelt Creations, sentiment PTI
Ink : markers, Versafine
Tools: corner rounder EKS
Other: bling

Saturday, April 7, 2012

innovative stripes (distress inking)


The new monthly contest at Hero Arts:

ha-april2012-sketches

Wanted to use the bottom left sketch but not just strips of CS or PP.  I swear it was one of those lightbulb moments and I had my idea for the stripes.


 Combined several of my fave techniques.  Heat embossing.  Distress Inking.  Stamping with markers.  And of course the great quality Hero Arts Stamps.  Such fun.

TIP:  To minimize alignment problems, rather than stamping the one "inchie" image four times horizontally, I lined up the four stamps vertically as I wanted them on the card.  Then pressed my acrylic block onto them.  Stamped the outside vertical rows, then the inside ones.

Heat embossed with clear powder.  Used two strips of scratch paper to mask the stripes and applied Vintage Photo, Walnut Stain, Pumice Stone and Antique Linen Distress Inks.  Rounded top corner.  Card base done.

I colored the wildflower stamp with markers, spritzed a couple times with water and stamped onto Neenah CS.  Made three images to be able to punch various sections.  Knew I wanted to group the circles rather than use just one.  Played around until I got the combination of images I wanted.  Popped them up at various heights using foam dots.

Here's a second card I made:


This wildflower image is less watercolor-y than the first.  I just love the artsy feeling that comes with playing with this technique.  Each result is different.  You even get more bang for your buck when you spritz again after stamping once.  Taking liberties with the sketch, I chose to place my sentiment on the inside along with a second generation image.


And even dressed up the envelope a bit.


I'm joining the ladies over at the new A Blog Named Hero for their challenge to use some Hero Arts favorites.  I do love this stamp for its versatility.  Used it here.  And here.

Thanks for looking.


Supplies Thinking of You:
Paper: Neenah
Stamps: Hero Arts CL 266 and K4880
Ink: markers, Distress Inks Ranger
Tools:  corner rounder and circle EKS
Other: clear embossing powder, Mini Mister, foam dots