Showing posts with label Tim Holtz. Show all posts

Friday, May 24, 2024

STB - february 19 2024

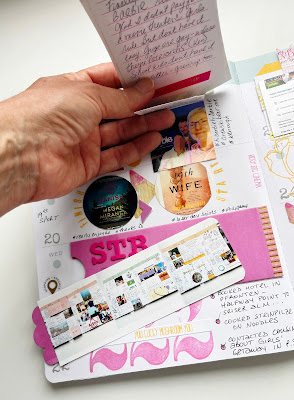
So there ain't nothin' pastel or quiet about this week's spread in my STB memory planner. And Barbie is to blame. We watched the movie this week. With flowers and cocktails to match of course.

My favorite Crayola color in the 64 box was Magenta (and Periwinkle). So I was extremely happy to have an excuse to pull out a pack of journal cards I have and put them to use here in this Barbie spread. Can you believe that card allowed me to doctor it up to read "today is the best day ever?" Like they always greeted the day in Barbieworld! 

Of course I had to include all the "Hi Barbie" too ;)

The sleeve holds photos of STB spreads. I was cranking them out.

And I forced myself to write down things I need to make happen. Let's just looking back right now, I'm shooting about 50/50.

Journal cards. Stickers. Stamps. Washi.That's what's in my Heidi Swapp STB memory planner this week. 


Friday, March 11, 2022

more scrap strips

Did you catch my tutorial yesterday at STAMPlorations? More strips. This time torn from scrap paper I used when swatching inks.

And did you catch that I'm in the process of moving my craft room? And rediscovering all the stuff I have? Who's been around cardmaking for a few years and can recognize the PP I found in my craft room and used on my card?!?

chipboard stickers

So I adhered the stripped, die cut tag to two pieces of Tim Holtz Ideology paper (I think it's so old it just might be trendy again with its retro colors and images). Did you recognize it?

Then I pulled out various stickers I have and decide to pop a few onto my card to jazz it up. Oh, and a little punched butterfly from my stash too.

Let me tell you, this card is certainly not perfect, but it was FUN to make. I was inspired by watching Barbara just have fun pulling out supplies and scraps and put 'em all together. And boy do I have supplies and scraps...

Thursday, November 28, 2019

which one would you choose?

Been meaning to share this post for a while. A bit ago I was asked to make two cards for guys' 60th birthdays. One for a winemaker I actually know. The other for someone I don't know - except my friend said he's with the police and likes meat! Um. OK.

Should you have any questions to supplies, just ask.

Winemaker was easy.


Grateful for wine labels I got from Jacqueline years ago, I put one to use and carried on the gold theme with grapes and various collage elements.

As for the other guy, I was pretty clueless. So I searched the internet for milestone card ideas. Made several so she could have a choice. Which one do you think she chose? Which would you choose?

I kinda carried on the wine feel for this one.


And then gave a gatefold card a la Jennifer M. a try. Great way to stretch your cover plate dies too!


Next up, gave another cover plate die a shot. With kinda police colors ;)


And then I grabbed an alcohol-inked BG from my stash and turned it into a more playful card.


How about a deluge of confetti to celebrate?


Then there's the party props to support the giant "60".


And finally, the only "meat" stamps I owned...


So which one did my friend choose? Yep, the hot dogs! Though I'm happy to report she bought the blue geometric cover plate version and the alcohol-inked one too ;) Do you have a favorite?

Hope your Thanksgiving is/was wonderful. We celebrated last Sunday and I must admit I'm happy the preparations are over, though I'm still eating leftovers ;)

I'm joining the fun at:
ETA: Did someone say Circles? I'm hooking up at Day of the Month Card Club.
SSS Wednesday Challenge- Anything Goes
AAA Birthday - Number

Monday, November 19, 2018

25 days of christmas tags 2018 - part 1

Tracey's 25 Tags event came into my reader as I was pondering what to make for neighbor gifts this year... Now I know. And have already made a few sets of tags. Wanna see?

Without further ado, here are my first three.

For Day 2 with Altenew I was inspired by Norine's simple tags in kraft and light blue and made this set. And used up some PP ;)


Can you see the sparkle of the glitter CS and the glitter embossed sentiment? Such fun contrast to the kraft CS.


For Day 4 with Reverse Confetti I was inspired by Tracey's little gnome set in a cute scene. I used to be so afraid of little scenes, cuz they require coloring, but I bought myself a couple of "cute" sets with dies and am slowly expanding my horizons ;) This set is for the family DD babysits for. And did I mention how great it is to use up some of my PP stash!


Reverse Confetti Gift Card Holder Tag die
circle punch
Copics

For Day 5 with Newton's Nook, I loved the ornament shaker tags by Jennifer. When I thought about making ornament tags that could also be hung on a tree, I decided they needed to have lots of shiny gold. So I pulled out a PP pack with lotsa gold (did I mention how great it is to use up stash?!?) and these happened. Quite an exercise in engineering... how to include that dangling star embellishment between all the layers but in front of the acetate ...


Create a Smile Schone Bescherung stamp
craft foam
sequins

And these additional tags happened with the leftovers from the shakers!

Charlie und Paulchen Frohe Weihnachten die

I'll be back with three more tomorrow. So happy Tracey's challenge spurred me to create my neighbor gifts for Christmas in November! Thanks Tracey!

I'm also joining in at:
Addicted to Stamps - AG with option ribbon (#2)
Stamping Sensations - Get Ready for Christmas (#2)
The Paper Girls - Wanna build a Snowman? (#2)
Crafty Hazelnut - Christmas (#2 no buttons but bells!)
Crafty Hazelnut PP Challenge - November (#1, #2, #3)
SSS Wednesday - All that glitters is Gold (#3)


Saturday, February 17, 2018

winnie and walter 4th birthday - scraps, dies and comeback

Winnie and Walter's 4th Birthday Bash! Are you playing? I'm using up more scraps today. And die cuts. And making a comeback.


I loved this card of Lydia's when she first made it and proceeded to CASE it. Today I've revisited it, albeit a bit differently, in the process of using up some more scraps for Kelly's Scraps challenge.

No idea where the leftover bits were from on this card - but I think they found a great place to live. All I had to do was stamp the leaves on the cardbase and add a strip of grid paper (yes, finally for Keren, a real grid!). Again more white leaves - I love how this card, though fully loaded, has a light and airy feel to it!

Thanks Winnie and Walter for being such a great company and inspiring with such great challenges! I'll be back with more scraps...

First I'm taking this over to Simon Says Stamp Wednesday's  Add a Die Cut challenge. And hooking up at Taheerah's Comeback, Lydia's Use Dies and Keren's Grid challenges  too!

Friday, December 1, 2017

christmas card set - tim holtz

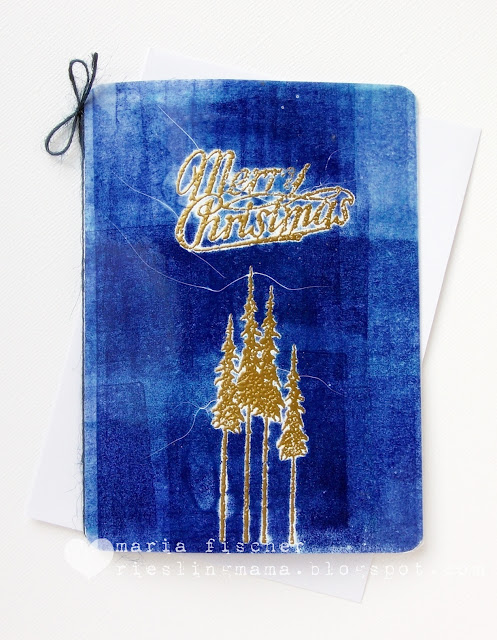
I believe today's is the last card set made for this year's neighbor gifts! Unless I get more ideas I have to try out ;) Using Tim Holtz today (Christmas Memories and Mini Holidays #2) and an old technique.

I revisited the brayering on glossy cardstock technique. Although I used photo paper and it ain't glossy cardstock. Watch for the cracks that happen when the heat embossing tool heats the coating too much and it suddenly sounds like you're making popcorn. Not to mention the not-yet-melted embossing powder that then flies off the panel you're holding in your hand ...


Note to self: Invest in glossy cardstock. Or don't heat emboss with this technique. BUT HEAT EMBOSSING  AND THEN BRAYERING OVER IT WAS THE WHOLE IDEA. If it looks like I was shouting, I was. It was an interesting crafting session, let me tell you. I have a neighbor who's all about blue so I really wanted to do this set for her. Oh well, I'm callin' it the vintage look...

Thanks for looking! If you've stuck with me through all this you're a real trooper. So now it's on to the other TO DO list items. What's next on your list? Mine's cookie baking.

I'm joining these challenges:
SSS Wednesday - Anything Goes
Crafty Hazelnut's Christmas - AG with optional doily

Friday, August 4, 2017

simply graphic on distress ink smoosh again

Yep, that's what today's post brings - another twofer with one of the smooshed Distress Ink backgrounds I created.

You met my new Simply Graphic crocodile yesterday. Is that what he is? Don't really know but he's lean and lank and I like him!

Today's card used the negatives (yesterday's leftovers) from Rectangles and Doudous from Simply Graphic, some stamp surgery on Papertrey Belated Birthday Mini and a word from Tim Holtz Holiday Words Block (which obviously isn't just for the holidays!)


I couldn't resisit using that negative of "wishes" to go with the negative of the croc, whom I decided to back with some zebra striped PP. I love all the B/W on this. So playful, don't you think?

Have a great one! I'm enjoying some vacay with my Dad in MI as you read this... CU again next week.

Thursday, May 25, 2017

playing with zigs - pt 5

Here's the last of a series of cards I made when having a play with my Zig clean color brush markers.


One heat embossed bloom and some masking and stamping of only two others on today's card. I like this design as well as the bunch of blooms. A heat embossed sentiment and a watercolored bloom. Voila!

Hope you've enjoyed my series. Here's the whole bunch. Have a great day!


Wednesday, May 24, 2017

playing with zigs - pt 4

Ready for another one of the series of cards I made when having a play with my Zig clean color brush markers?


One heat embossed bloom and some masking and stamping of the others. A heat embossed sentiment and a fantasy-watercolored bloom. Voila!

Hope you're enjoying my series. Have a great day!

Tuesday, May 23, 2017

playing with zigs - pt 3

Hi again. Here's another one of the series of cards I made when having a play with my Zig clean color brush markers...and some fantasy coloring...


One heat embossed bloom and some masking and stamping of the others. A heat embossed sentiment and a fantasy-colored bloom. Voila!

Have a great day!

Monday, May 22, 2017

playing with zigs - pt 2

Hi again. I'm back today to share another in a series of cards I made before all hell broke loose in my life. I had been having a play with my Zig markers...and some fantasy coloring...


I heat embossed the bloom I wanted to color, then masked it and stamped several more. Heat embossed the sentiment and had fun coloring the bloom.

Thanks for visiting. Hope you're enjoying your weekend!

Saturday, May 20, 2017

playing with zigs

Hi friends. It's been awhile, eh? When we last "spoke" I was heading to MI to be with my Mom who wasn't feeling well. Well that journey took a few turns ending with her passing peacefully on my birthday. Then there was Dad to get settled in his "new normal". And now I find myself in my "new normal" - back in Germany with my head in MI half the time AND with my baby graduated from high school!

Thought I'd share a series of cards I made before all hell broke loose in my life. I had been having a play with my Zig markers...and some fantasy coloring...


It feels nice to be back. Haven't quite made it to my craft room yet, but I will. I've missed you all. (Thank you to those who sent wonderful cards to cheer Mom up or comfort me and Dad when she passed - Shirley, Darnell, Ruth, Amy T, Bev, Shery, Cornelia, Bonnie ... and any others I'm forgetting. You're the best!)

Sunday, January 22, 2017

trying zigs again with flower garden

Hi. Happy Saturday! I'm back again for more "slow-blogging" ;) Could almost make you think Spring had arrived in my front yard, eh?


If you saw yesterday's post, you saw my latest attempt at watercoloring florals with Zig clean color brush pens. I was way too heavy-handed and not happy with the result. I figured it was time to try, try again. So I googled. And came across this video gem from Kristina W. Oh to know where to put which colors to get such amazing results, which I admit may not be realistic, but oh so pleasing to my eye.

I happen to have NBUS Tim Holtz Flower Garden stamps too, so after I heat embossed some blooms onto watercolor paper I basically colored along with Kristina! So nice of her not to mind when I kept making her back up and color that middle flower just ONE MORE TIME ;)

Here's my finished card.


The center flower is exactly like Kristina's, colored with Yellow and Light Carmine. This is a great image to practice on cuz 1) the petals are large and 2) you can totally copy Kristina's method. On the left peony I used only Pink, using a second layer of it in some areas. On the right one I used Pink, Purple and a few touches of Wine Red. I actually used Light Blue and Pale Green on the stems.

To hint at a sky I inked up sentiments from STAMPlorations Vignette: Artful Flutters (top half with Tumbled Glass, bottom with Broken China) and stamped them over the flower which I masked. Added a hint of edgy Scrapbook Werkstatt So ist das Leben PP to tie in with the blue tone.

What I learned about watercoloring with Zigs? Don't start with a tiny image to practice this technique. Don't work on the entire flower at one time; only on smaller areas. Use a light hand - multiple light layers is the key. Let layers dry. Use a rag to dab up wet color if you feel you've been too heavy handed.

I did even more playing with my Zigs after this project, making a whole set of cards. You'll be seeing them soon. Just keep watching!

I'm going over to the playhouse to play with Darnell's NBUS #8. She's got lots to celebrate and is actually challenging us to give colored pencils on kraft a try, but I'm translating that to watercolors on watercolor paper ;)


Oh, and one more question for you. Don't worry, it's an easy one today ;) Anyone ever had a Pentel Aquash waterbrush that leaks where the tank screws into the barrel? I get a blob of water on the outside of the brush when I squeeze the tank. The blob eventually drips onto my project. Not good. (I had had to take mine apart to unclog it - which worked - but after putting it back together I ran into this problem.) I did my watercoloring of these flowers with a number 4 brush and water!

Enjoy your weekend.

Tuesday, July 5, 2016

CASEplorations July


Welcome! I'm sharing my card for the July CASEplorations challenge over at STAMPlorations. We're CASEing this fabulous mixed media card by Elina Stromberg of Elina's Arts and Crafts. So much goodness on her blog to check out. You can read about her card in this blog post.


I definitely wanted to do some Distress Inking and keep the love birds theme. Here's my recipe.

1. Make a mask with heart die and use the negative. (TIP: Draw a pencil line down the center of the cardbase and align the points of the top and bottom of the heart along it!)
2. Stamp birdies from Smallbirds. Stamp and fussy cut a mask and cover them up.
3. Use sponge dauber to apply Wild Honey in center, Barn Door around outside of heart.
4. Stamp text element from Mixed Media Elements a few times on heart with Memento black ink.
5. Use hearts from Sketchy Coffee Cups and Frames and Flowers with water to bleach several spots on the heart.
6. Splatter with paintbrush and water.
7. Remove masks.
8. Watercolor birdies' bellies with Tumbled Glass.
9. Selectively ink and stamp sentiment from Party Time.
10. Die cut branch and sentiment and adhere.

Here's a close up so you can get a better look at the faint text stamping and that oh-so-fun water bleaching!


Whew. Sounds like a lot, but it wasn't really. Especially if you like playing with your Distress Inks, I certainly hope you'll join us at CASEplorations this month!

I'm joining the Red, White and/or Blue challenge at Simon Says Monday, All Things Bright and Beautiful at The Artistic Stamper and at Inkspirational


Tuesday, June 7, 2016

and more fish

But this is the last. I promise ;)

Here are the last cards I made with the stamped panel I created for this card. This version is probably my favorite/standard design for randomly stamped backgrounds. Just give it a heat embossed sentiment (from Mia's Stempelkueche) on a contrasting color and voila! I actually added a bit of Tim Holtz Mixed Media die cut too. And dry embossed the stamped panel with Lil Inkers Stitched Rectangle die.


Went for a twofer with the last panel. Sliced it in half diagonally and added PTI Happy die cuts, accompanied with a stamped or a sticker sentiment. The netting BG stamp is CHF.


Sure enjoyed working with WPlus9 Fish More - it's a set you really should have in your arsenal ;)

I'm taking these cards to:
Cards in Envy - No Girls Allowed
Lawnscaping - Off Kilter
Craft Stamper - Take it Make it June - Let's Get Inky

Related Posts Plugin for WordPress, Blogger...