It's already Easter! Time flies when you're having fun! And boy did I have fun playing with my w&w goodies. I appreciate your stopping by on this holiday weekend for Take Four of my Leading Lady stint at w&w.
I'm wrapping up my gig today with trendy METALLICS.
So. Gold. I don't think you could have missed this trend, thank you iPhone. Just when you thought gold might be going out of style in the cardmaking world, gold foiling hit the market and now metallics of all colors are all over the place. A touch of metallic sure gives a card pep. Let's take a look at some metallic options.
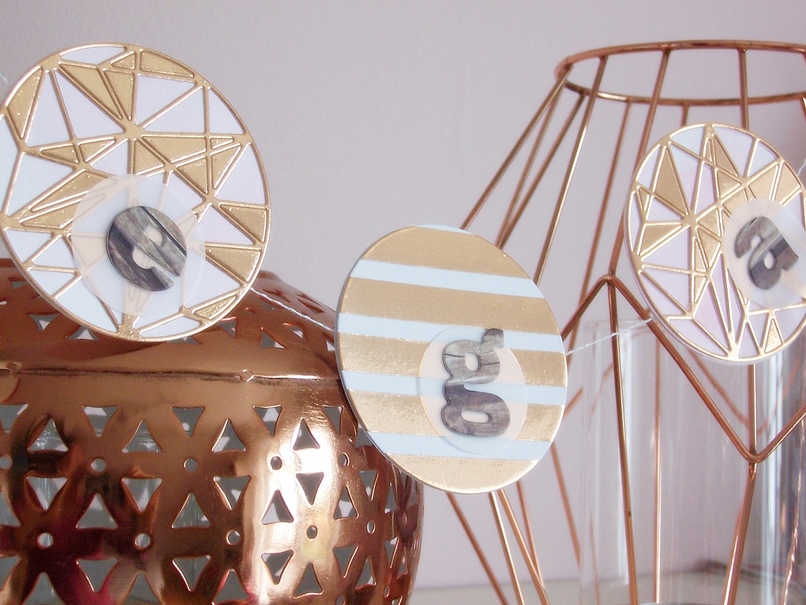
I sneaked a couple cards using gold foiled PP into Take Three. Did you see them? Well, I personally like metallics in stripe form, so I went about creating my own rose gold (thank you iPhone) stripes using recycled Schokokuss packaging to make this banner for my daughter's room. I missed her while she was on a ski trip :)

I die cut the circles using the solid and faceted dies from True Multifaceted Circle. I left some of the facets in and backed the faceted circles with a circle of pink watercolor washed CS. Added punched circles of vellum and die cut woodgrain letters using MFT By the Letters to the circles too.
To assemble the banner I first die cut five solid circles from white CS. I temporarily adhered them to a few sheets of printer paper, spaced out like I wanted them to be on my banner. It's about 50cm long. Then I stitched straight through them all, stitching them to the scrap paper (sounds weird I know - just wait). When done, I flipped it all over and carefully tore the scrap paper off of the stitched circles, leaving the white circles strung on a nice stitched line of thread. You can pull the thin paper up pretty easily right along the stitching. Then I adhered my pretty pieces to the white circles using Matte Medium. TIP: Stitch through the circles a little higher than the middle to ensure there will be more weight on the bottom to keep the circles facing the front. Ask me how I know ;)

Moving on. Another great way to get a touch of metallic onto a project is with those shiny little pieces of plastic we've come to know and love. Sequins. And why not use lots of them from Lucy's Winnie's Sparkly Shaker Selection mix. And pair them up with shimmer cardstock, gold washi and gold ink spray?
Meet Card #1

The Flawless Diamond Cutaways lends itself perfectly to shaker making. I cut it from aqua shimmer CS, cut the solid out of a Neenah white panel and added a smooshed-with-Distress-Inks-and-splattered-with-Heidi-Swapp-Color-Shine background piece behind it. My sentiment is from My Precious which complements the faceted dies perfectly. Just look at all that metallic goodness trapped in that gem! Even tiny little clear stars - how lovely!

Card #2

Another oldie, but goodie for adding a metallic touch to a project is Perfect Pearls. With this faux metal technique (a la Jennifer M.) you brush them onto a Distress Inked area while it is still damp. I inked the masked area with Evergreen Bough and Cracked Pistachio and used white Perfect Pearls. TIP: Use a water/Perfect Pearls mixture in a mini mister to lightly spray the finished area and set the Perfect Pearls.
When the panel was nearly dry I dry embossed it using Cover Model: Multifaceted which I had cut from a cereal box. Isn't this geometric design perfect for the faux metal look? To finish off my card I added an offset layered "wishes" cut from shimmer CS using The Big, The Bold and Party Cutaways. and a heat embossed sentiment from The Big, The Bold and Party.


Yep. That was white CS. Applied metallic embossing paste through the Scenery:Pattern of the Rings stencil. Punched a circle out of scrap paper and used the negative as a stencil to sprinkle silver embossing powder onto the lower portion of each of the circles only while the paste was still wet. Let it dry and then hit it with my heat gun. Voila! How's that for sparkle and shine? And the texture is fabulous.

Couldn't cover up all that gorgeousness, so I added a heat embossed on vellum tree from Kindness over one stamped onto PP and fussy cut. The "hugs" is from The Big, The Bold and Friends. The secondary sentiment is one of the many wonderful options in Kindness.

Well, friends, that brings us to the end of this month of my Leading Lady gig! It sure was a pleasure to share my takes on WATERCOLOR, ILLUSTRATED, STRIPES and METALLICS with you. I hope you enjoyed it, too. Remember to leave a comment on all four of my Leading Lady posts to be in the running for this giveaway. Today I'd love to hear if you had a favorite project from my entire Leading Lady gig. I'll announce a winner on April 6th. And if you're celebrating, have a beautiful Easter!


I die cut the circles using the solid and faceted dies from True Multifaceted Circle. I left some of the facets in and backed the faceted circles with a circle of pink watercolor washed CS. Added punched circles of vellum and die cut woodgrain letters using MFT By the Letters to the circles too.
To assemble the banner I first die cut five solid circles from white CS. I temporarily adhered them to a few sheets of printer paper, spaced out like I wanted them to be on my banner. It's about 50cm long. Then I stitched straight through them all, stitching them to the scrap paper (sounds weird I know - just wait). When done, I flipped it all over and carefully tore the scrap paper off of the stitched circles, leaving the white circles strung on a nice stitched line of thread. You can pull the thin paper up pretty easily right along the stitching. Then I adhered my pretty pieces to the white circles using Matte Medium. TIP: Stitch through the circles a little higher than the middle to ensure there will be more weight on the bottom to keep the circles facing the front. Ask me how I know ;)
Moving on. Another great way to get a touch of metallic onto a project is with those shiny little pieces of plastic we've come to know and love. Sequins. And why not use lots of them from Lucy's Winnie's Sparkly Shaker Selection mix. And pair them up with shimmer cardstock, gold washi and gold ink spray?
Meet Card #1

The Flawless Diamond Cutaways lends itself perfectly to shaker making. I cut it from aqua shimmer CS, cut the solid out of a Neenah white panel and added a smooshed-with-Distress-Inks-and-splattered-with-Heidi-Swapp-Color-Shine background piece behind it. My sentiment is from My Precious which complements the faceted dies perfectly. Just look at all that metallic goodness trapped in that gem! Even tiny little clear stars - how lovely!

Card #2

Another oldie, but goodie for adding a metallic touch to a project is Perfect Pearls. With this faux metal technique (a la Jennifer M.) you brush them onto a Distress Inked area while it is still damp. I inked the masked area with Evergreen Bough and Cracked Pistachio and used white Perfect Pearls. TIP: Use a water/Perfect Pearls mixture in a mini mister to lightly spray the finished area and set the Perfect Pearls.
When the panel was nearly dry I dry embossed it using Cover Model: Multifaceted which I had cut from a cereal box. Isn't this geometric design perfect for the faux metal look? To finish off my card I added an offset layered "wishes" cut from shimmer CS using The Big, The Bold and Party Cutaways. and a heat embossed sentiment from The Big, The Bold and Party.

Remember how I said I like a little touch of metallic on cards? Well get ready for metallic overload.
Meet Card #3

Yep. That was white CS. Applied metallic embossing paste through the Scenery:Pattern of the Rings stencil. Punched a circle out of scrap paper and used the negative as a stencil to sprinkle silver embossing powder onto the lower portion of each of the circles only while the paste was still wet. Let it dry and then hit it with my heat gun. Voila! How's that for sparkle and shine? And the texture is fabulous.