Showing posts with label clear sticker. Show all posts

Sunday, February 25, 2024

STB - july 10 2023

And the next summer week spread in my STB memory planner. 

More Michigan R&R. Perusing mags for reno ideas. 4 inches of rain and tornado warnings. Tickets - one! to a KC Chiefs game in Frankfurt and the hilarious Great American Trailer Park Musical. OMG, pee your pants funny!

Using up stash when working on my Heidi Swapp memory planner preserving memories like this ;) Washi for cohesiveness. Alpha stamps in multiple sizes and fun stickers. And circle photos cuz I love 'em.


Tuesday, October 17, 2023

STAMPlorations more designs with gelli prints

 Hi there peeps! 

I was having so much fun using a technique (a la Susanne R.) which also uses up those gelli prints we all have hanging around our craft rooms. 

Paired it with  a cool coffee mug die cut here.


Or how about with many bloom die cuts cut from black cardstock?


Oh heck. How about with a green heat embossed ice cream cone? Artistic license, ya know?

Friday, October 13, 2023

STAMPlorations and gelli prints

Hi there peeps! 

I was very inspired by a technique (a la Susanne R.) which uses up those gelli prints we all have hanging around our craft rooms. Don't ya love it?

Paired it with a black heat-embossed-on-white fussy cut floral bloom.


Paired it with a white heat-embossed-on-black fussy cut floral bloom.


gelli prints, embossing powder


That's it for today. Thanks for looking.  

Tuesday, January 4, 2022

STAMPlorations inspiration #350

Welcome to 2022! Hope your holidays were wonderful. Mine were spent quietly, with family.

It's time for our first Tuesday inspiration post from the STAMPlorations inspiration team girls for you this year! Here's my card.


washi
 
On a mission to use up some backgrounds I've created over time, I pulled out a die, die cut it from three backgrounds and added a sticker sentiment. Easy peasy. Chose backgrounds with some shine (thanks to metallic watercolors and Perfect Pearls mist) to pep the design a bit.

As always, you could win yourself a $15 prize code to the store by leaving a comment on this month's inspiration posts! Check out today's post over at STAMPlorations. And if I should ever inspire you to order something from the store, if you use my STAMPGIRLMARIA discount code you receive an additional 20% off your order.  Have a great day! And let's all have a great year!    

Wednesday, December 1, 2021

STAMPlorations cas cards challenge december

Welcome to the STAMPlorations December CAS Cards challenge!


As always the challenge is to create any CAS card, with an optional color twist - this month the twist is metallic plus one color.

On the slim chance that you haven't started your Christmas cards yet, here's a super easy design for you.


gold embossing paste, Festive Berries distress ink 

CAS card tip: Extend your image off the edge for more interest. Include 3 or 5 of something to please the eye (I've used four pinwheels + one good sized sentiment).

I'm looking forward to your CAS card creations this month! Your project might be chosen as one of the prize winners. Check out how the DT was inspired by this month's photo here.

And don't forget about my STAMPlorations discount code STAMPGIRLMARIA for 20% off should I ever inspire you to do some shopping ;)  Thanks for stopping over today. See you in the gallery. 


Tuesday, November 30, 2021

STAMPlorations inspiration #345

Welcome to today's inspiration post from the STAMPlorations inspiration team girls

Lately I've been making Christmas cards with ephemera pieces. There are lots of ephemera options in the STAMP store. And lots you can do with them. I tend to like CAS designs.

Meet today's card. 


It's CAS that's for sure. The ephemera piece needs something to anchor it so I added some stenciled stars in the corner of my card front and added a couple gold die cut stars too to create a threesome with the ornament. Three is always a good design idea, right? 

A sticker sentiment made this card super quick.

As always, you could win yourself a $15 prize code to the store by leaving a comment on this month's inspiration posts! Check out today's post over at STAMPlorations. And if I should ever inspire you to order something from the store, I'd appreciate it if you used my STAMPGIRLMARIA discount code for an additional 20% off your order.  Have a great day!        

Tuesday, May 4, 2021

STAMPlorations introducing spring coffee kit

There's a new product in town. Over at the STAMPlorations shop. Have you seen it? Shery is putting together kits at a great price point.

Today a few of my teamies and I are sharing our makes with the new Spring Coffee Kit. Ready?

The kit contains an image stamp, sentiment stamps and stencils (2 patterns each in large and mini). All you have to decide is...

Do you want to color? Then go for it. Color and fussy cut the image and pop it up on a background created by randomly stamping one of the sentiments.

alcohol markers, washi tape

In case you're interested, I watched this video before coloring my coffee (yes I was intimidated by that big expanse of brown!) Easy peasy.

If you're not into coloring, use the mini stencil and a circle mask to "color" the coffee. I added some blue touches with alcohol markers but you wouldn't even have to. I heat embossed one of the kit sentiments in blue but didn't like it so I then stamped over it in black and clear embossed it.


circle die, Distress Inks, alcohol markers, embossing powder

And then there's this method for getting color onto a B/W stamped image. Check out this post for the deets. Basically it involves stamping, applying embossing paste and then sponging ink.


clear embossing paste, Distress Inks, enamel dots

So, that's a wrap. Are you a fan of kits? Be sure to check out all the DT's creations over at the STAMP blog. And be sure to leave a comment, Shery's giving away a kit.

Please remember to use my STAMPGIRLMARIA code if I inspire you to place an order. You'll get an extra 20% off!

Appreciate your visit. Have a great day. I'm hooking up card #1 over at SSS Wednesday Challenge - Anything Goes.

Friday, March 19, 2021

spring/summer coffee lovers hop

It's that time of year. You know what time. Coffee time.

Today's project is for the Spring Summer Coffee Lovers Blog Hop. STAMPlorations is a super sponsor and in addition to the STAMP prizes being given away on the hop, you could win a prize for leaving a comment over at the STAMP blog today too.


I know the tones of the graphic are kinda muted (more towards the neutrals ruling the world of decor presently) but I had to use some brighter colors for a spring/summer card.


distress inks, vellum, Glossy Accents

Masked off the edges of my cardbase. Inked through the stencil. Added some Perfect Pearls splatters. Fussy cut the stamped coffee cup and mounted it on a circle of printed vellum. Added a sticker sentiment and a shot of shine to the cup with Glossy Accents.

Get hopping! But don't forget to stop by STAMPlorations to leave a comment.

I'm joining the fun at:
Spring Summer Coffee Lovers Hop
Crazy 4 Challenges - C4C575 Stencil
Hero Arts Stay Crafty - Bring on Spring
Happy Little Stampers - March Stencil AG


Tuesday, February 2, 2021

STAMPlorations inspiration #305

Welcome to a new month of Tuesday inspiration posts from the STAMPlorations inspiration team girls

I'm concentrating on shaker cards this month. Are you already a fan? If not, perhaps I can inspire you to try one of these versions.

My first is inspired by Jennifer M. You can watch her video here. I went with a coffee theme. I chose the rectangular coffee cup silhouette die since it made for a nice large window from the front to the inside of the card where the die cut is actually adhered.


 Dots and Beans stencil
Hero Arts inks, sequins, recycled packaging

See that second photo. I'll describe the layers of the shaker bottom up as they are in the photo.
Stenciled card front, cellophane, fun foam 2x, sequins, cellophane, creme cardstock. All trimmed smaller than the card, TIP: especially near the top/hinge of the card so that when closing the card there's not too much bulk and it closes flat.

In the photo you also see the second sticker sentiment, which is hidden behind the first on the card front, so it reads "rise and grind caffeine queen".

You could win yourself a $15 prize code to the store by leaving a comment on this month's inspiration posts! Check out today's post over at STAMPlorations. And if I ever inspire you to order something from the store, I'd really appreciate it if you used my STAMPGIRLMARIA discount code for an additional 20% off your order - at no extra cost to you, just with perks for me ;)

Appreciate your stopping by. Have a good week.

I'm stopping by:
Seize the Birthday - Transparency or Vellum
SSS Wednesday - AG
Cut it Up - Point of View (considering the window to focus your view to the die cut inside)


Friday, May 22, 2020

spring summer coffee lovers hop

Know how I've been playing with fantasy watercoloring this month? I kinda carried on with that inspiration for today's projects which are a part of the Spring Summer Coffee Lovers Blog Hop. STAMPlorations is a sponsor and in addition to the four STAMP prizes being given away on the hop, you could win a prize for leaving a comment over at the STAMP blog today too.


For my first project I used the new set, Sweet Kindness. This set arrived just in time as that floral spray (not coffee related, I know) was perfect for a tag to accompany a birthday present!

Gansai Tambi watercolors

Watercolor paper.  Tag die cut. Water. Watercolors. Dabbing and voila! I love how those little half-embossed alphas fit perfectly to personalize the tag for my friend. Here's the tag in action ;)


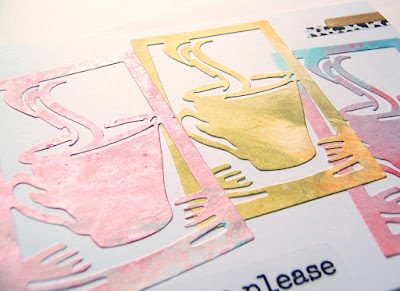
And then I went all "fantasy watercolor" again. Made this next card with Bloomin Coffee and You.


Gansai Tambi watercolors

I printed a digi version of the stamp (cuz my postman hasn't delivered this set to me yet) onto watercolor paper. FYI, my image is larger than the stamp in the set. But if you're interested in digi stamps, this collection of digi stamps has a similar image and many more.

So. Fantasy watercolor. Wet-on-wet technique. I wouldn't call it "sloshed" cuz only Shirley can do that. And it's sure not realistic. It's kinda dabbed. Kinda pushed around. But I stuck to a more limited color palette and even kept the coffee brown!

I fussy cut the image and adhered it to a cream colored cardbase since my watercolor paper is creamy. A sticker sentiment tops off the cup.

Hope you're enjoying the hop with a nice cuppa. Thanks for stopping over today. Have a great week and remember to "Be kind, be calm and be safe."

I'm joining the fun at:
Spring Summer Coffee Lovers Hop
I pulled my colors from ATSAM - Photo Inspiration

Friday, May 15, 2020

CAS cards challenge may reminder

Hello peeps! Back with a reminder about this month's CAS card challenge at STAMPlorations. 

Here's the May CAS Cards challenge inspiration.


As always the challenge is anything goes with an optional color twist - this month is baby pink.

Today's card.

I used pink watercolors for my first card this month. To use up the leftovers, I grabbed the Art Marks stamps and stamped with watercolors in a masked off rectangle on my card front. Added a couple orange rings of color too to warm up the pinks.

Then I added a few pops of black and a sticker sentiment and called it good and CAS.

CAS card tip: Mask off an area of the card and go crazy within that area only!

For more inspiration with this stamp set check out this post.

Have you joined us yet? Your project might be chosen as the winner of a GC to the shop. Check out how the DT was inspired by this month's photo here.

And don't forget about my STAMPlorations discount code STAMPGIRLMARIA for 20% off should you find yourself shopping ;)  Thanks for stopping over. See you in the gallery.

I'm heading to the gallery at:
ATSAM - CAS

Thursday, May 14, 2020

spotlight on stretching your dies

I'm over at the STAMPlorations blog with a tutorial for this card (and another) using stand-alone dies to dry emboss your CAS card background for additional interest. Check it out. And have a nice day!


Friday, May 1, 2020

CAS cards challenge may

Hello there peeps! How's it going these days? Hope you and yours are staying healthy. We're back with a new CAS card challenge at STAMPlorations. 

Here's the May CAS Cards challenge inspiration.


As always the challenge is anything goes with an optional color twist - this month is baby pink.

As my mojo went when Corona came along, I went to my craft room with no idea what I wanted to make. I saw watercolors and decided to make things really easy on myself. How about a pink rainbow?

Today's card.

STAMPlorations Birthday Word Art clear sticker
Altenew watercolor

Grabbed a flat brush. Painted some curves. The sticker sentiment reminded me of a cloud, so I cut it into a cloud shape and adhered it. Voila!

CAS card tip: Although the card is full, thanks to the monochromatic color scheme and the big pop of black it's still very clean and simple. All the attention goes to the font of the sentiment.

For more inspiration with this sticker set check out this post.

I'm looking forward to your CAS card creations this month! Your project might be chosen as the winner of a GC to the shop. Check out how the DT was inspired by this month's photo here.

And don't forget about my STAMPlorations discount code STAMPGIRLMARIA for 20% off should you find yourself shopping ;)  Thanks for stopping over. See you in the gallery.

Tuesday, March 31, 2020

STAMPlorations inspiration #261

Because March has five Tuesdays, I'm back with one more Tuesday inspiration from the STAMPlorations inspiration team!

This month I've been creating cards all inspired by a card I saw last month that just took my breath away - the central design idea being "something framed on an inked background". Today ... well, if you saw last week's card you'll understand where today's originated.

I had chosen the dragonfly die as a potential candidate for the "something" but hadn't used it yet.

Distress inks - Cracked Pistachio, Evergreen Bough, Broken China, Blueprint Sketch

So there I was following the same design process, though trying to make it more masculine. I decided to go with the dragonfly but instead of die cutting and watercoloring, I'd dry emboss them on the distress inked BG. And pop on a clear sticker sentiment and call it good.


Subtle dimension, but it's cool. Hope you enjoyed this month's series.

You could win yourself a $10 GC to the store by leaving a comment on this month's inspiration posts! Check out today's post over at STAMPlorations. And if I ever inspire you to order something from the store, I'd really appreciate it if you used my STAMPGIRLMARIA discount code for an additional 20% off your order - at no extra cost to you, just with perks for me ;)

I've used the dragonfly on this card too.

Thanks for stopping over today. Have a great week.

Wednesday, March 18, 2020

STAMPlorations digital stamps with patterned paper

I'm over on the STAMPlorations blog today with five digital stamp projects. You could win a $15 GC to the store for comments left here and there. Just sayin...

So as I mentioned in my last Digital Wednesday post, I'm a newbie to digital stamps, but there are definitely some benefits to digi stamps - no smudges, perfect coverage without a MISTI, image resizing, even layering images (though I've yet to give that a try).

My technology tools are limited to Microsoft Word and my Canon ink jet printer. I watched this video for a great intro to digi stamps.

For today's projects I used a pad of patterned paper from the dollar store. The pastel colors caught my eye. The paper is thin however, so to print on it I used cellophane tape to attach the 6x6 sheets to a normal sheet of copy paper. This went through my printer without any problem.

TIP: First I print the image onto copy paper and then hold that up to the light with my 6x6 PP in front of it to see where I would like the image to be. (See how I lined up the flower on the floral PP so that one of the red roses was in the center of the bloom?)

Here's a look at the PP pad and some of the images I printed.


Another TIP: I use Photoscape to edit photos. I'm no pro. But since I knew I was only using the bloom from the latte-cup-with-bloom image, I cropped the image to remove the top portion of the to-go cup. This was then what I printed to waste less PP. (As if I don't already have enough PP to last 300 years...)

Let's get to my cards, shall we? First up, I used a cup of blooms image and thought I was going to mix and match cup and blooms - paper piece just the mug from PP onto the image printed on white cardstock and then give the white blooms just a little dab of color. But I liked the look of the image on the watercolored-look PP so much I couldn't cut it apart! So these two cards happened.

For the first, I fussy cut the image printed on Neenah solar white, added dabs of color to the flowers and adhered it on a floral PP.


Cupful of Blooms digi stamp
alcohol markers
patterned paper

Then for the second card I added color to the centers of the flowers on the image fussy cut from the pretty watercolored-look PP and added it to a shimmery, linen texture cardbase.

TIP: Look for pencil colors fairly close to your PP colors to keep the contrast minimal. I used a pink, a purple, a blue, a gray and a green cuz they were closest to the tones of the watercolored-look PP.


Cupful of Blooms digi stamp
Prismacolor colored pencils
patterned paper
embossing powder

For my next card I used an image that covers the front of an A2 card. I printed it once onto white cardstock and once onto PP. When fussy cutting the blooms from the PP to paper piece on the other panel, I carefully cut out the frame too.

TIP: When I fussy cut the flowers touching the frame on the PP panel, I made sure to leave the thick black line around the frame intact. This enabled me to use the frame for a second card. In general when paper piecing, fussy cut on the black line. Since you will be adhering the fussy cut piece to a stamped or printed image, those outlines will show.


I lightly applied some Spun Sugar and Squeezed Lemonade to the Neenah panel before adhering the PP flowers. Then I stamped the sentiment and added some sequins.


Coffee Blossoms digi stamp
Distress inks
PP, sequins

To accompany the fussy cut PP frame, I shrunk one of the other coffee cup images, printed it onto contrasting PP (twice so I could see which size I preferred) and fussy cut just the flowers to use to embellish the second card. (This was when it dawned on me to use Photoscape to crop the image so only the part I need would print and I wouldn't waste PP ;)


Added a sentiment in the form of a clear sticker to the frame. And colored the leaves of the flower spray and added gems too.

Coffee Blossoms digi stamp

This last card was such fun. I printed the image (sized to my liking) onto four different patterned papers, felt like I was back in kindergarten as I fussy cut the flowers and then arranged them on my cardbase.


TIP: Use the bits and pieces you trim off around the edges to fill some of the white space on your cardbase. I only had four flowers but it looks like I used seven.

I did not add adhesive to the outer edges of the petals so there's some dimension. I love how the sequins fit perfectly in the flower centers. Adds dimension. And that sentiment die with the drop shadow adds even more dimension.


Holiday Lattes digi stamp
sequins

Whew. That was a lot. Don't forget to leave me a comment. And on my Digital Wednesday post here too, for another chance to win.

With card #1 I'm playing over at:
The Flower Challenge - Anything Goes
SSS Wednesday Challenge - Whatever the Weather (card's going to girlfriend who combats stress with coffee)
Related Posts Plugin for WordPress, Blogger...