Showing posts with label acetate. Show all posts

Saturday, January 18, 2020

simon says stamp - snowflake mandala


Snowflakes aren't just for Christmas anymore. Right? See that die in the lower left of the graphic above? It came to live at my house. It's part of the recent Hey Bestie release at SSS. Thanks, Simon.

My card today definitely leans toward Christmas (I used snowflake PP) but I actually intended it to be an encouragement card to be sent in the winter. Heck, add a couple hearts and it could even work for Valentine's Day!


MFT Circle die
patterned paper
washi tape

I was actually going to make a shaker card but took the lazy way out. This is a one layer card. Sorta.

I die cut the circle from the front of the cardbase, adhered acetate behind it and a piece of PP behind that. Then I glued the die cut snowflake on the front of the acetate and added the sentiment. There's a little bit of extra depth thanks to the adhesive between the layers. Kinda cool.


Check out all the makes with the products from the release in the gallery here.

I'll be back tomorrow with another non-Christmas card...

Sunday, February 3, 2019

spellbinders dance for joy

Ever since I saw this die it tickled my fancy (see the pooch nipping at the last girl's dress?). So I got it! I do love silhouette dies. And what to do with them? Well, there are several, albeit limited options. I went with the classic, black silhouette...

I pulled out an old inked and stamped-off piece that had some blues and greens in it, reminiscent of the sky and grass. I die cut it and adhered the silhouette to it, hanging it over the edge a bit for added interest. Then, cuz I didn't know what do for a background behind this piece, I decided to give an acetate card front a try. I really like how it turned out.

distress inks

See the subtle stamped print in the BG? So unexpected, but pretty.


Thanks for stopping by. I'm stopping by at these fun challenges:

Addicted to Stamps and More - Anything Goes
Basteltraum - Die/Stencil
Simon Says Wednesday Challenge - Anything Goes
Fusion - Penguin Love (that photo of the three loving penguins plus the Fusion colors... I think my card fits the challenge)

Sunday, April 15, 2018

christmas cacti shaker

Not one for making Christmas cards when it's not really Christmas-time, (though the crazy weather in MI at the moment would sure inspire holiday cards - geesh - got outta there just in time but my poor Dad is wearing a jacket in the house cuz the power/heat went out too!) but I got some goodies from Spellbinders to play with and when I saw the dome in this die I couldn't get "snow globe" outta my mind!

Penny Black PP
acetate
sequins
twine
white embossing powder

So why not cacti in the snow? I added some white heat embossed dots to the BG panel and some acetate to the die cut front panel and created a little shaker to mimic a snow globe. There's just something fun about cacti isn't there? Only from afar of course ;)


Thank you Team Spellbinders for the fun cacti to create with. I've another creation tomorrow.

I'm joining the fun at:
Mod Squad - Simply Clean
Simon Says Stamp Wednesday - Texture
ABC Christmas - I for ice (guess it's actually snow, but with the weather in MI right now...)
Crafty Hazel's Christmas Challenge - April

Tuesday, February 6, 2018

winnie and walter 4th birthday - waterfall shaker

Missed the fun last year but I'm excited to have time to celebrate with Winnie and Walter this year for their 4th Birthday Bash! Congrats ladies!


Today's card was inspired by Lea's Love Shaker Challenge. And by this card. Scroll down to see the whole card/message...


Distress Oxide Worn Lipstick ink
washi
recycled packaging
sewing machine
sequins

Whew! Quite the supply list, but such fun to create. I really like this take on a shaker, don't you? Another form of  "interactive". And the cohesiveness - papers from the same pack (Aldi special) and products from one company.

Again, thanks to Winnie and Walter for their great products and great challenges! I'll be back with more...

I'm taking this over to:
Simon Says Stamp Wednesday's -  Anything Goes
Die Cut Divas - Love
Cuttlebug Mania - Happy Birthday
Craft Stamper - Take it Make it February
Allsorts - Spots and Stripes
CASual Fridays - Hearts


Tuesday, August 29, 2017

spotlight on the joys of tissue paper

Have a story and tutorial for you over at STAMPlorations today. About leftovers. And tissue paper. And acetate. Check it out.


Tuesday, December 22, 2015

happy new year shaker wine bottle tag

This is the last MMCC for 2015, with a theme of "Celebration" and an optional element of "Vellum". And since it may likely be my last post for 2015, I'm taking the opportunity to wish all of you a wonderful holiday. And only the best for 2016!


I thought a wine bottle tag shaker would fit the holiday celebration quite nicely!


In addition to stamped stars and smooshed ink, I've got

TEXTURE - textured CS for my frame from Lil Inker Stitched Rectangles, vellum
DIMENSION - multiple layers, shaker, dangling numbers
TECHNIQUE - ink smooshing, shaker

See that sparkle and shine from the sequins? Definitely celebratory IMO.  It's a party on a card, tag. Join us with a mixed media card for MMCC #18 won't you?


I was inspired by:

Freshly Made Sketches #217


HAPPY NEW YEAR EVERYBODY!!!!!!!!!!!!!!!!!!!!!!!!!!!!!!!!!!!!!!!!!!!!!!!!!!!!!!!!!


Friday, April 17, 2015

STAMPlorations inspiration #13


Hello.

It's time for some more inspiration from the girls at STAMPlorations. 

Remember, we'd love for you to join us in our Inspiration Playground with a CASE of one of the many cards that we share with you throughout the month on the STAMPlorations blog. You can find the linkup for April's Playground here.

Maybe you want to get oh-so-inky and give this new-to-me technique a try?

Alcohol inks and acetate. But probably not the way you're thinking. I was intrigued when I saw Tammy T. trap the ink between two pieces of acetate, creating the look of liquid in a bottle. Are you intrigued yet? There is a wonderful tutorial for this technique on her blog.

This time around the DT is pulling out some of the older stamp sets. I chose Bloom Sketches Daisy 2 (with a sentiment is from Daisy 1). The angle on this bloom is just perfect and so realistic. Agree? I had to use it to go with my realistic water in the jar!


All my bloom needed in addition was a stem, a table to sit on and a bit of color to its center! I must admit this technique is amazingly cool. Captivating.

FYI, the alcohol ink eventually dries out, so be sure to mail it while it's still purty :)

I'm hooking up at these challenges:

Muse #113 - loved Michele's blues and stylized blooms and watery looking background


Addicted to Stamps and More #140 - keeping it simple with flowers on a wooden table I am


House of Cards April Challenge - Is that not a cool photo? My card doesn't have the butterflies (I nearly put a tiny red punched one on, but it didn't fit the bill) but does have the vibrancy.


Shopping our Stash - Lost and Found - My alcohol inks had been neglected far too long!

Thanks for looking. Have a wonderful weekend.

Saturday, April 4, 2015

frohe ostern


Happy Easter Saturday to those of you celebrating! We are enjoying time with Oma as well as a few days at the North Sea.

I have two projects to share with you today.

The first is a project inspired by the opulent photo for the April Challenge at Altenew.


Ori Kami immediately came into my mind. And a piece of CS I had used to mop up some royal blue spray ink leftovers. This is what evolved.


I stamped the fish onto recycled acetate with StazOn and dripped orange and purple alcohol inks onto the reverse. Then I dripped one drop of yellow onto the orange and one drop of pink onto the purple and moved the acetate to make inks spread where I wanted them.

I inked the Super Script sentiment stamp with Versamark and blue pigment ink and stamped it before heat embossing it with white and clear powders for a two-tone sentiment. The secondary sentiment I stamped with Versafine. Added “kelp” and stitched the acetate to the panel before adhering it to the base.


Can you see how the fish kinda "swim" thanks to the acetate just being attached by that stitching up top? I love the depth this creates.

Cuz it's blue (I don't use blue often, do I?) I'm joining Tenia and Veronica's Light it up for Autism Awareness blog hop. I'm learning a lot about autism from those two ladies.


And my second project was for Oma's gift bag. This was also inspired by something laying around on my desk - an old baby wipe that had been used for clean up!


I used a glue stick to cover a manila tag and then laid the baby wipe down onto it and brayered it. Then I stamped this wonderful bunny from Joy Crafts. Added some Easter grass, a kraft die cut bloom behind the hole and some raffia.

Revisited a sentiment technique that I love but often forget - tiny alphas stitched onto a project. Like on this card. These alphas are old but loved product from KI Memories.

I am hooking the bunny up at


Hope you have a wonderful weekend with family. Thanks for stopping by.

Wednesday, April 1, 2015

guest designing at card concept 32


Lucky me, joining the lovely and incredibly talented ladies at The Card Concept this month. And getting to play around in the Mixed Media category too!


If the inspiration photo for challenge #32 doesn't make you happy, don't know what will. For me, it evokes feelings of summer. Those blooms. The Ball jar. I can just feel the breeze coming in through an open window...


So how did I approach this Mixed Media-wise? Well wanting to use multiple mediums and techniques to create texture and dimension, first I stamped my card front with Stampendous Floral Tapestry. Then I watercolored a couple blooms with orange. (And later, cuz I'd forgotten it, a couple leaves with green. Consider that my pint. As in, gallon-quart-pint, remember that?)


Then I dabbed orange acrylic paint through a Craft Emotions Folklore Flowers stencil. BTW, anyone know a trick to get the dried paint off the stencil??? I waited too long and soap and water aren't working and the design is very delicate so I can't really scrub it!


Next I applied gesso over the front. Twice. I was going for a floral-wallpaper-in-Grandma's-house feel and I knew I needed it subdued in the center where my focal image was going to be...


Enter focal image. A NBUS Tim Holtz Bell Jar die. But first I applied alcohol inks to acetate - I forgot to snap the photo before I die cut so just placed them back into the remnants to show you. Die cut the bottoms from woodgrain PP.


So in case you didn't notice first time around, go back and check out the sweet cupcakes surreptitiously posing in the background of the inspiration photo... I had originally planned to house a nice big sentiment under the bell jar, but then STAMPlorations Sketched Cupcake came to mind and...


I heat embossed the image on white CS and turned it into a chocolate cupcake with vanilla frosting! Fussy cut it and adhered it to my card.  Popped the bell jar base up on foam adhesive, capturing the bottom edge of the acetate too. Created a tiny tag punched with a border punch to mimic a doily and stamped the sentiment onto it before attaching it to the acetate with twine. I used a bit more foam adhesive on the back of the tag to hold the tag in place and attach the top portion of acetate.

TIP: Adhering acetate with dimensional adhesive allows it to really add some WOW to your card but visible adhesive is a problem. Hide it behind other card elements!

Thanks mucho for coming by today. I'm so happy I could share my Mixed Media project with you.  Can't wait to share my next guest designer project with you on April 15th.  I hope you'll peruse the Card Concept DT's works of art. Don't you love to learn more about card styles with every new challenge?

If you stop by later today, I'll be sharing another Mixed Media project - more flowers...

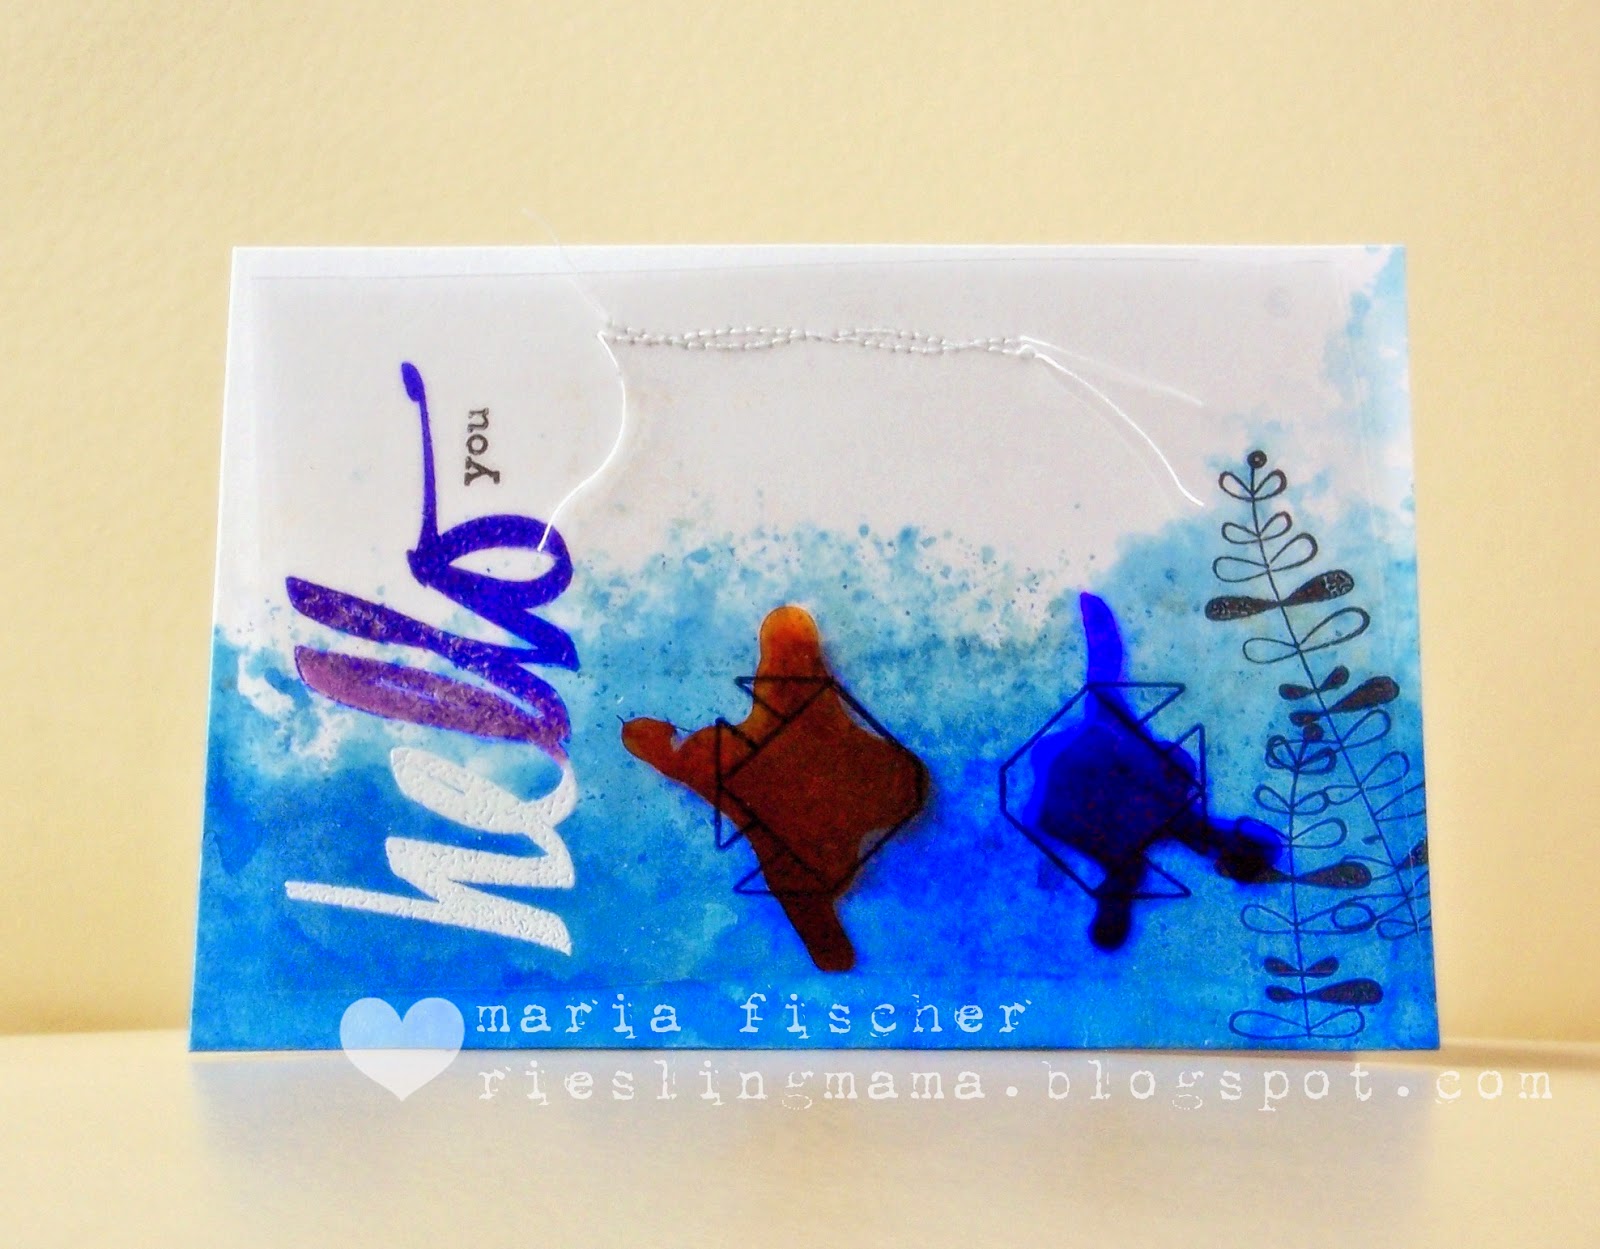
I'm hooking this card up over at A Sprinkle of Imagination (I've used Sailboat Blue and Stream Alcohol inks) where it's an Anything Goes this time around. And I'm joining the fabulous fun at Darnell's NBUS #4 too.


ETA: Have you seen Virginia's new challenge? #14 Layers and Dimension. I'm in.


Saturday, December 20, 2014

JIT magic slider


I remember when "just-in-time" (JIT) was something new in the automotive world. Now it's pretty much the story of my life when it comes to Christmas shopping. Where would I be without online shopping?

It also applies to today's card. DD asked me to make a magic slider (after I'd made this card) for her girlfriend whose birthday was back early November. Her party is today. I made the card... yesterday. See? JIT. Dang.

Can't say I whipped it up in ten minutes. Cuz my non-spatial-thinking brain still has to wrestle with the slider card concept each time. But it does get easier with practice. I'm happy with the result, it's a slider, although not 100% magic ;)

Found a sketch and some colors for inspiration and then created, stamping (in my case heat embossing) with white cuz I wanted to join the Take It, Make It December Challenge at Craft Stamper too.
DCWV December
CQC 272
I knew I needed a magic slider. The sketch had me at the star. Which led to the PTI Star Gazer Additions stamp set. Which I decided to stamp in white on black. And although you'd normally go with blues for the firmament on the colored portion of the slider, I'm not normal. That didn't feel right to me for DD's friend. These colors did.


The rest was cosmetic. Some stars sponged through a stencil onto the card front. Some star PP. Some gold stars, including one as the pull mechanism for the slider! See the tiny "pull here" up top? That has been my most used stamp of the PTI Movers and Shakers set!


So I'm curious. What percentage of your Christmas shopping did you do online this year?

There's a good deal at STAMPlorations should you still need a quick present for a crafty friend...


Related Posts Plugin for WordPress, Blogger...